Status Page Settings
This page provides step-by-step instructions for setting up and customizing your StatusIQ page. It covers essential settings to help you manage and maintain a clear, informative status page.
1. General Settings
1.1 Status Page Details: You can edit all the basic information related to your status page here. You can also edit the Sub domain based URL to suit your brand.
1.2 Custom Domain: If you have configured a custom domain based URL for your status page, this option can be used to redirect your users to a secure HTTPS connection, by default. Other branding options can be found here.
1.3 Cookie Consent Banner: Enable the cookie consent option to display a cookie consent banner on your public status page. Cookie consent banner helps you to receive consent from users before we set any cookies, and it also provides accurate information about the data each cookie stores and its purpose.
StatusIQ sets the below mentioned persistent cookies on the browser of your status page visitors for functional purposes. Persistent cookies are a classification of cookies that expire after a specific date or after a certain time.
|
Cookie Name |
Purpose | Validity |
| c* |
Remember not to show cookie consent banner again |
3 months |
| ppp* | Preserve authenticated state for a user on password-protected public status pages |
15 minutes |
| t* | Store time zone preference for a user on public status pages | 3 years |
| l* | Store langugae preference for a public status page | 3 years |
For status page accessed via our subdomain, the "Cookie Policy" link will be redirected to StatusIQ's status page cookie policy page and "Privacy Policy" link will be redirected to Zoho's privacy policy page from the consent banner.
For status page accessed via custom domains, admins can add their own custom policy URLs in the consent banner to which visitors will be redirected. Preferably it can be pointed to their company's cookie and privacy policy pages. Kindly add the cookie information in the above table to that respective cookie policy.

2. Widget Controls
Under Widget Controls, you can enable or disable the various sections in your status page. To make changes in Widget Controls, go to Settings >Widget Controls. There are five different sections under Widget Controls, namely:
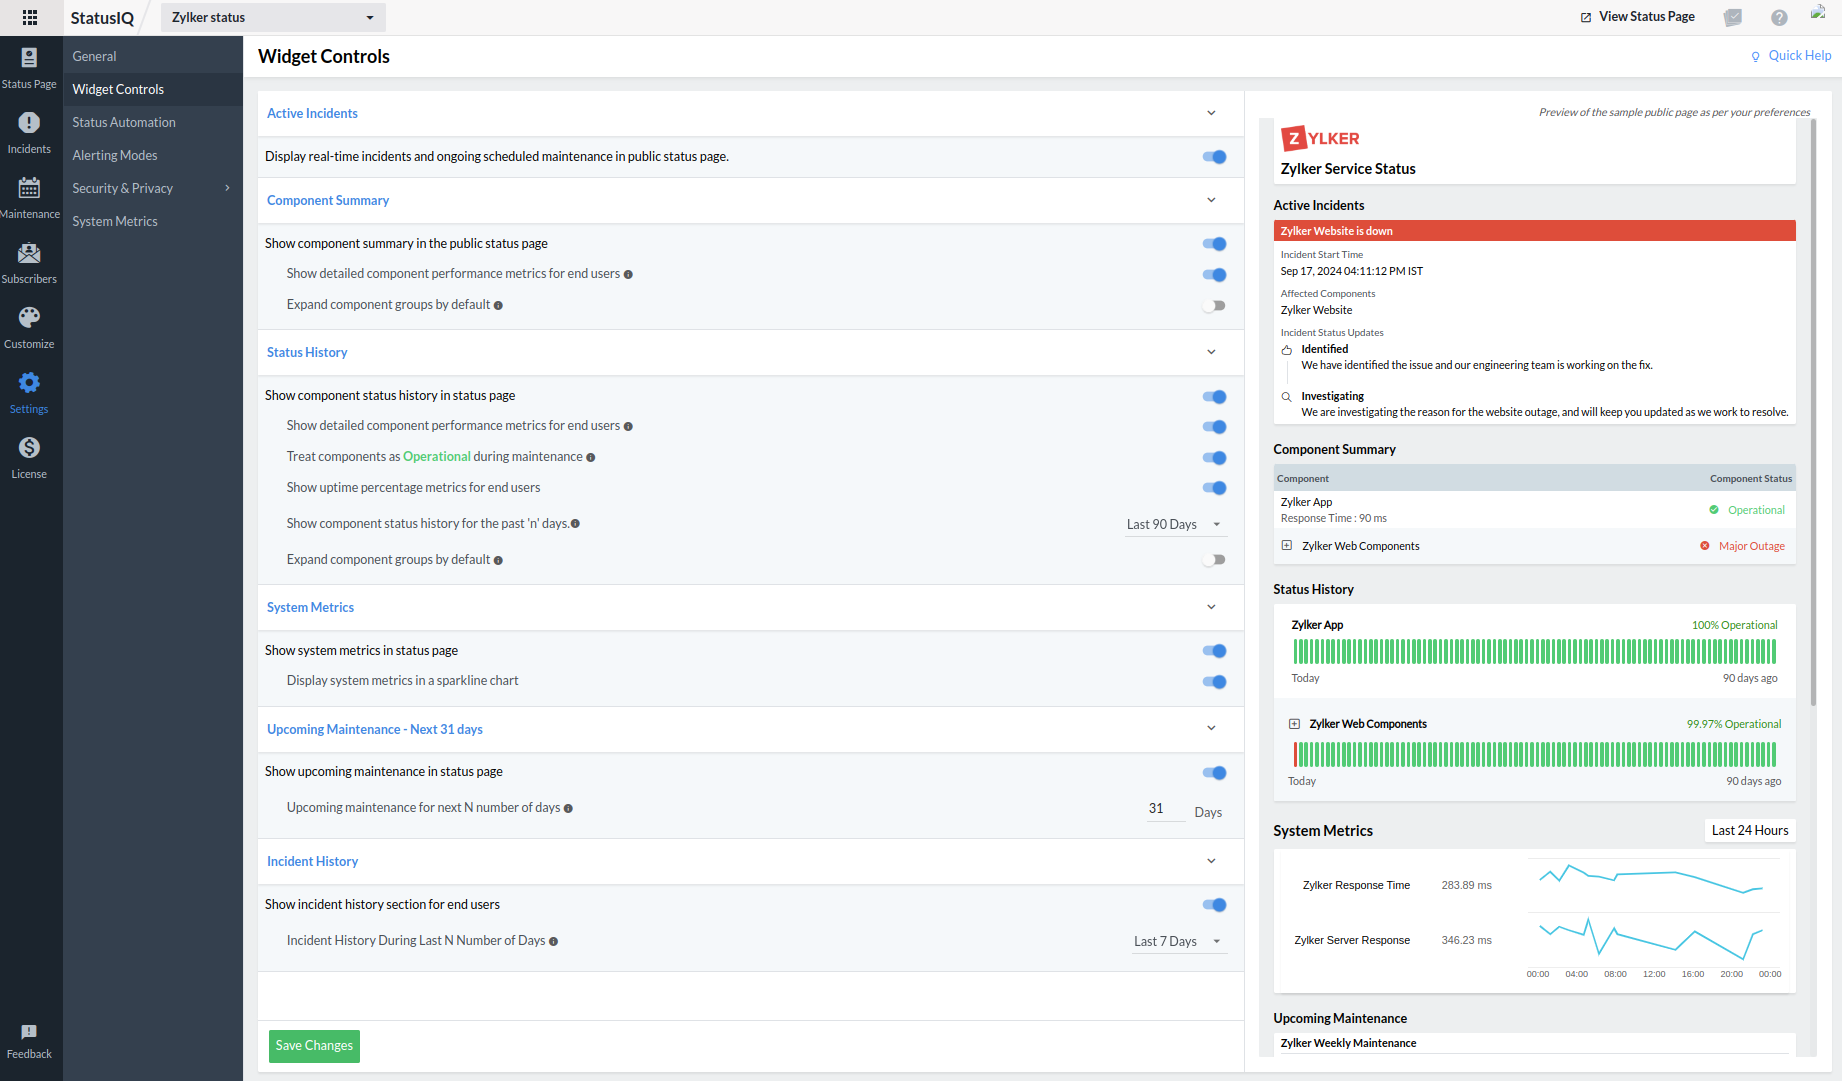
2.1 Active Incidents:
In this section, you can enable the toggle button next to Display real-time incidents and ongoing scheduled incidents (maintenance) in public status page; the toggle button can be disabled if you prefer not to display the incidents.
2.2 Component Summary:
To set your preferences related to a component summary this option can be used. For instance, if you prefer having the component summary in the public status page, you can enable the toggle button next to Show Component summary in the public status page.
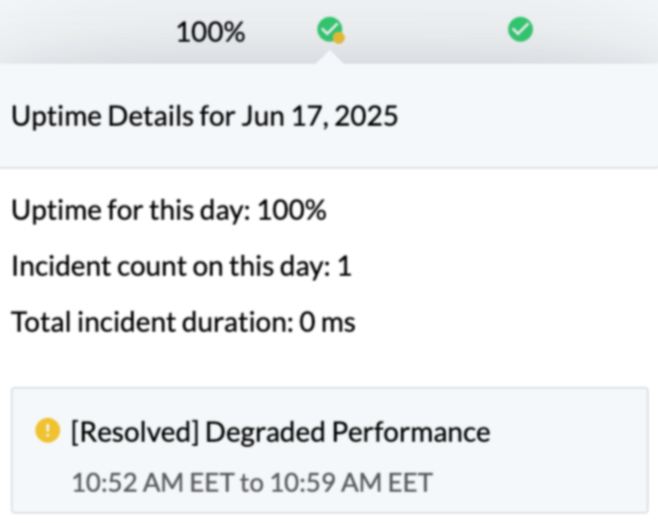
2.3 Status History:
Using this option you can choose to display or hide the Status History.
You can set preferences related to Status History using the five options provided in this section. In StatusIQ, Degraded Performance and Informational statuses are not classified as downtimes and therefore do not affect the uptime percentage.
2.4 System Metrics:
Get real-time performance insights by integrating with third-party data sources or custom metrics for transparency and better communication. You can opt to see your system metrics on your status page and view it in a sparkline chart with the toggle options here.
2.5 Upcoming Maintenance:
You can choose whether you want to show details regarding the upcoming maintenance in your status page or not by enabling or disabling the toggle button next to Show upcoming maintenance in status page. Upcoming maintenance can be set between 7 to 366 days. For instance, if you'd like to show all upcoming maintenance scheduled over the next three months, then you can set it to 90 days.
2.6 Incident History:
In this section you can set whether you want to show the incident history to your end users by enabling or disabling the toggle button next to Show incident history section for end users.
By default, incident history for the past seven days is displayed, but you also have the option to display incident history for the past 30 days.
Click on the Save Changes button to save your changes.
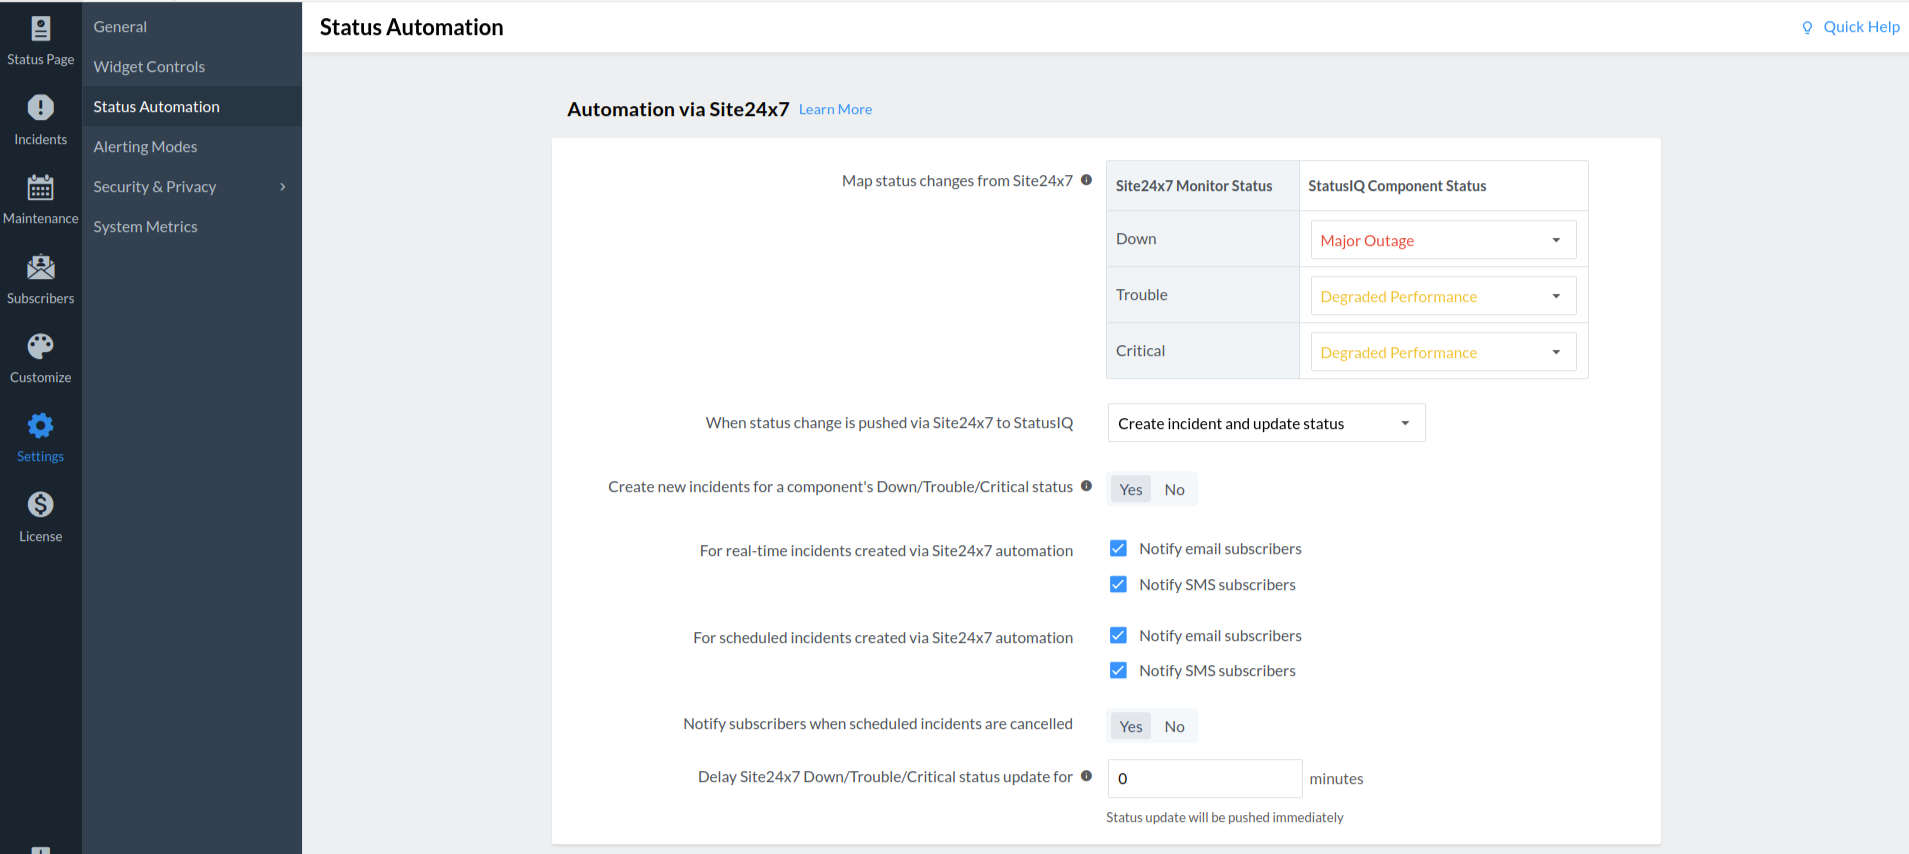
3. Status Automation
Here, you can choose your preference for automating status changes and notify the same to your subscribers.
3.1 Automation via Site24x7
- Map status changes from Site24x7: When there is a change in the status of a monitor in Site24x7 (Down, Trouble, or Critical), a corresponding status change in StatusIQ will be updated automatically. You can choose from any of the following variations what as the status will be shown as in equivalent for StatusIQ.
- When status change is pushed via Site24x7 to StatusIQ:When you've automated the status changes to reflect the status of the monitors in Site24x7, you have the option to:
- Create an incident for the status change in your status page and update its status.
- Only update the status of the component in your status page.
- Create new incidents for a component's Down/Trouble/Critical status: Choose Yes to create a new incident every time a component's status changes. If you choose No, the status change will be appended to an existing incident.
NoteNote 1: StatusIQ will update the status of Site24x7 monitors as per the configuration in the notification profile associated with it. If a monitor is configured to be notified of a downtime after three continuous failures, the corresponding downtime will be updated in StatusIQ only after the monitor's status is Down three continuous times.
Note 2:If you've muted alerts for monitors in Site24x7, then StatusIQ will suppress notifications to the corresponding SMS and email subscribers. However, the status of the component will be updated in StatusIQ.
- For real-time incidents and scheduled incidents (maintenance) created via Site24x7 automation: Choose if you want to automate subscriber notification via email or SMS.
- Notify subscribers when scheduled incidents are cancelled: On cancelling a scheduled maintenance, you can choose to send an email or SMS to subscribed contacts informing them of the cancellation of maintenance.
- Delay Site24x7 Down/Trouble/Critical status update for: Postpone incident creation or status changes for brief outages and fluctuations by configuring a delay of up to 60 minutes. Choose zero minutes to receive status updates instantly according to the notification profile settings in Site24x7.
3.2 Automation via email
- When status change is pushed via email to StatusIQ:If the status of your components are updated in the status page via email, you can:
- Create an incident for the status change in your status page and update its status.
- Only update the status of the component in your status page.
Similar to status update automations from Site24x7, for email updates you can choose to create a new incident on every status change and alert your subscribers via email or SMS. Click Save Changes. Learn more about automation via email.
4. Alerting Modes
By setting preferences in the Alerting Modes section, you can choose to show or hide options for users to subscribe to status page updates via email notifications, SMS notifications, or RSS feeds.
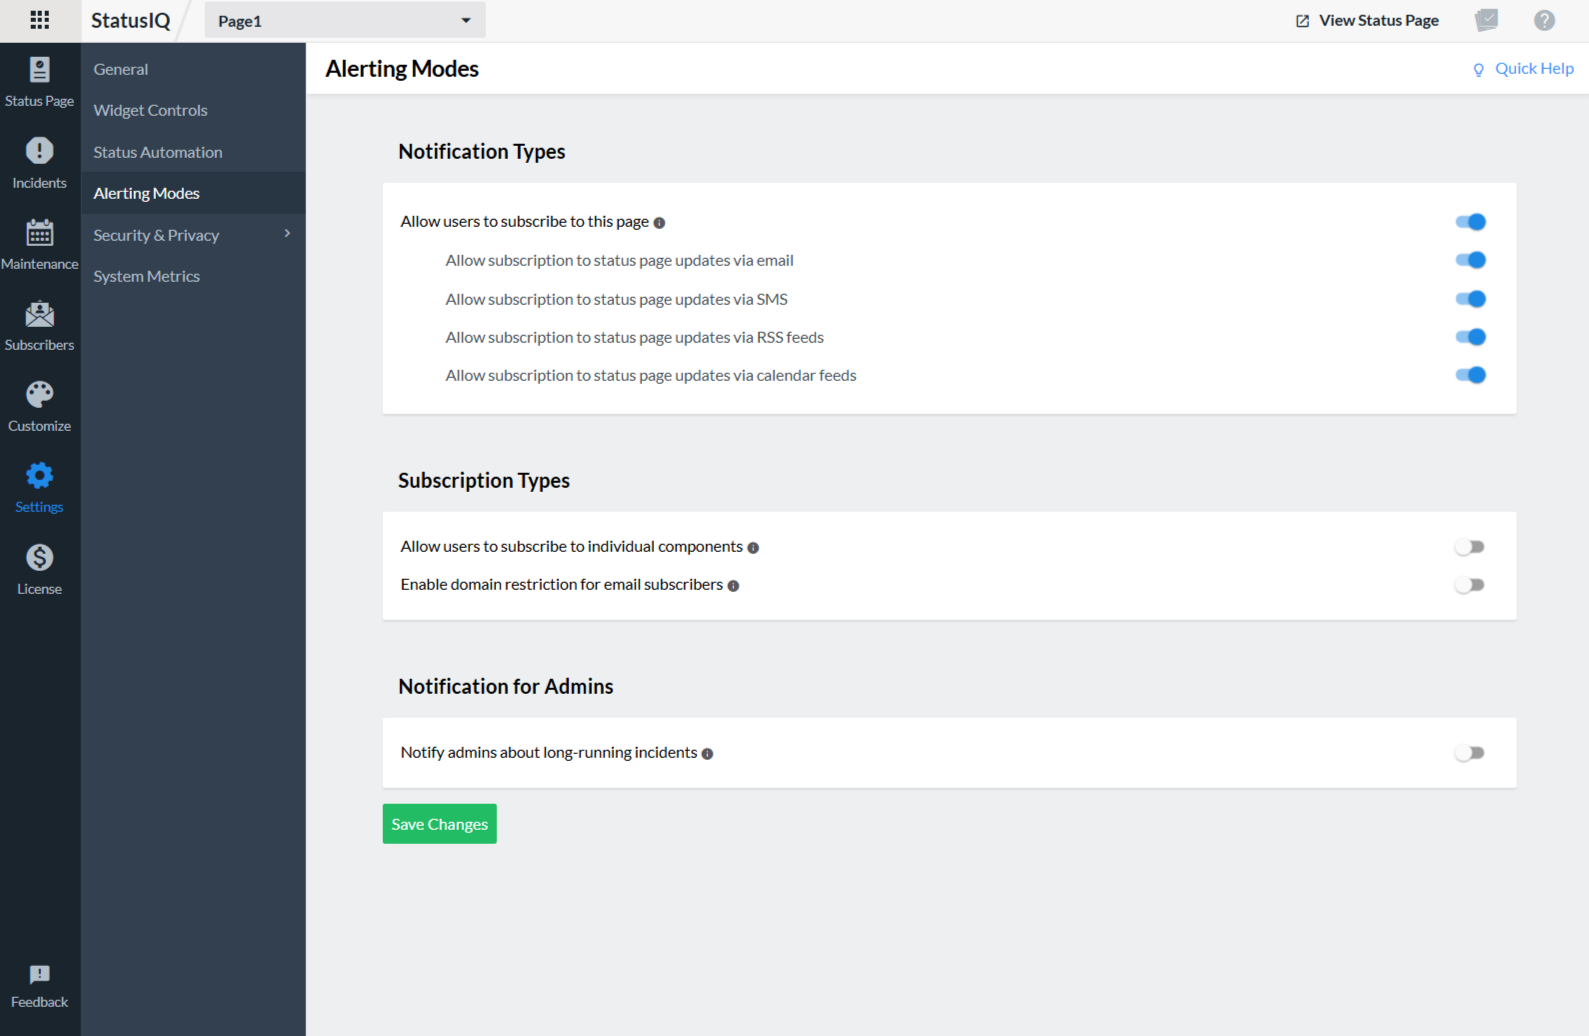
4.1 Notification Types
Using this option admins can enable notification types which end users can subscribe to. If the admin do not need any subscribers, then that can be achieved by disabling the toggle button or by enabling the preferred modes alone using respective toggle buttons.
4.2 Subscription Types
4.2.1 Component-wise subscription:By enabling the toggle button next to Allow users to subscribe to individual components your users will be able to select individual components for which they need status updates.
4.2.2 Domain restriction: Use Enable domain restriction for email subscribers option to restrict email subscribers based on their domains. You can block or allow selected domains. This option is a part of both Green and Blue plans.
4.3 Notification for Admins
4.3.1 Long running incidents
When an incident remains open for more than one hour, it's called a long running incident. Notification regarding long running incidents will be sent to admins, reminding them to take an action. Notifications will be sent within a time gap of one hour, three hours, six hours, twelve hours, and after that once in every twenty four hrs (one notification per day).
As a response to the notification users have two options to respond:
- Updating the status of the incident by logging in to StatusIQ client.
- By replying to the notification mail.
5. Security & Privacy
StatusIQ provides the following security & privacy options for your status pages. To set security & privacy options, go to Settings > Security & Privacy.
5.1 IP Restriction:
By default, your status page can be accessed by anyone. Providing a preferred range of IP addresses can limit the visibility of status pages to specific networks. You can enable the toggle button next to Restrict your Status Page to preferred IP address range, and then add the preferred IP addresses. For example, this option can be enabled if you want to restrict your status page to certain people or a certain region.

5.2 Password Protection:
Your public status page can be viewed by anyone. Limiting the visibility to selected individuals or teams can keep your pages more secure. This can be done with the password protection option provided by StatusIQ, where you can restrict your public status pages to a selected audience with the help of passwords.

5.3 Search Engines:
Search Engines can crawl and index public status pages. So if you prefer not listing your public status page on the search results, you can enable the Hide Status Page from Search Engine Results option. When you enable this option, we will include a robot's meta tag in your public status page, which instructs search engines not to index this particular status page or list it in their search results.
SAML Authentication
Set up single sign-on using SAML-based authentication for StatusIQ
You can allow only your organization's employees to access private status pages by requiring login authenticated via Security Assertion Markup Language (SAML).
Only customers with a verified custom domain can use SAML.
Follow the steps below to configure SSO for StatusIQ:
- Log in to StatusIQ.
- Choose the status page for which you want to configure SSO.
- Navigate to Settings > Security & Privacy > SAML Configuration > New SAML Configuration.
- Click the Identity Provider drop-down to select your identity provider (IdP) from the list.
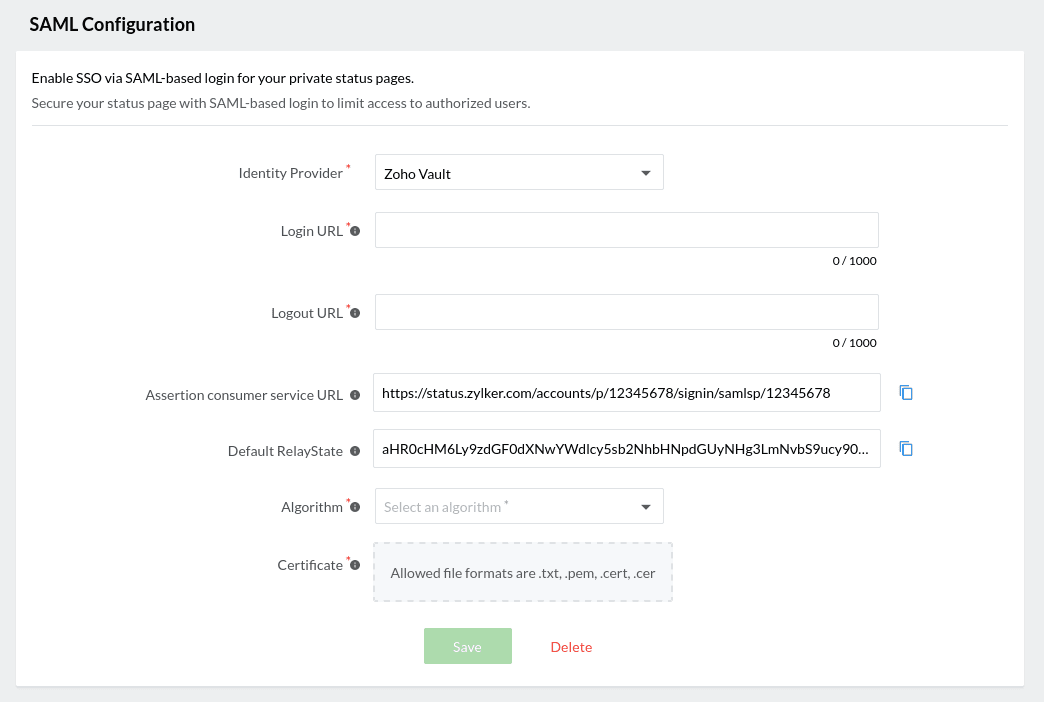
a. Zoho Vault
-
- Identity Provider: Select Zoho Vault from the drop-down.
- Login URL: Enter the remote login URL of your IdP. StatusIQ will be redirecting your end users to this URL for login.
- Logout URL: Enter the remote logout URL of your IdP. Once a user logs out from the status page, StatusIQ will redirect the user to this URL for logout.
- Assertion consumer service URL: Copy this URL and paste it into the respective field in your IdP.
- Default RelayState: Copy the value from this field and paste it into the respective field in your IdP.
- Algorithm: Choose an algorithm of your preference. This algorithm will be used by your IdP to generate the public keys and certificates.
- Certificate: Upload the certificate from your IdP in any format specified.
- Click Save.
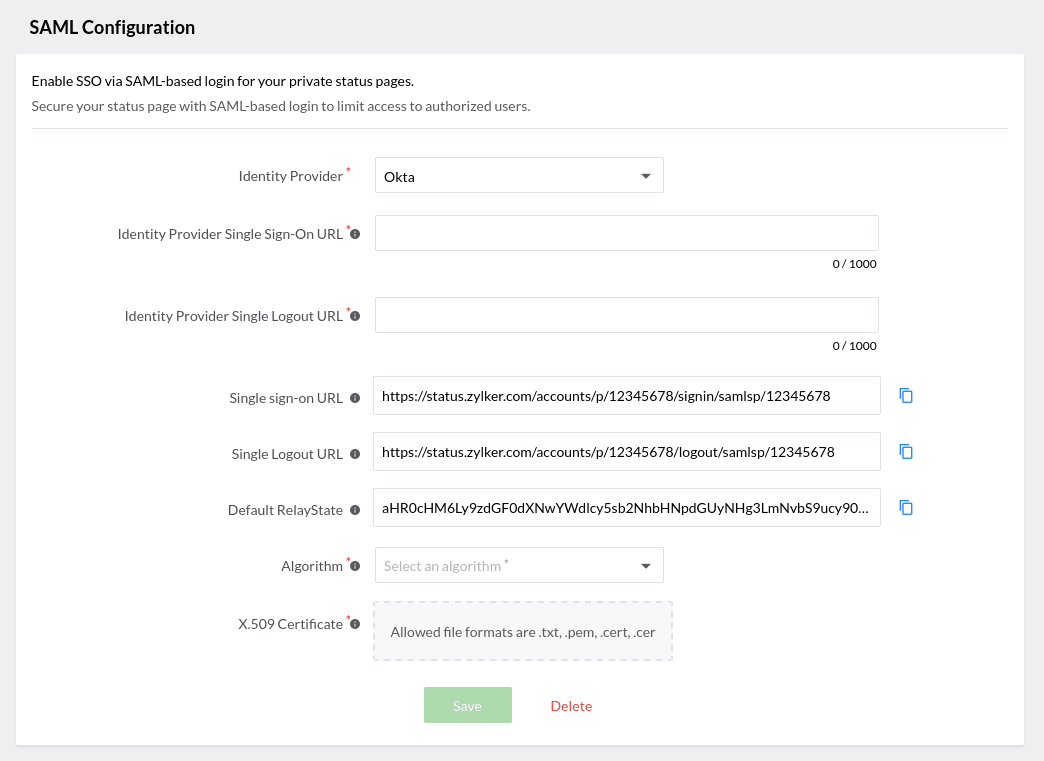
b. Okta
-
- Identity Provider: Choose Okta from the drop-down.
- Identity Provider Single Sign-On URL: Enter the single sign-on URL of your IdP.
- Identity Provider Single Logout URL: Enter the single logout URL of your IdP.
- Single Sign-On URL: Copy the URL from this field and paste it into the respective field in your IdP.
- Single Logout URL: Copy the URL from this field and paste it into the respective field in your IdP.
NoteThis field will be activated only upon providing the signature certificate in Okta. This certificate will be generated after saving your details in the primary configuration process. Alternatively, you can use the Single Sign-On URL for the Single Logout URL by replacing /sso with /slo in the URL. For example if your Single Login URL is https://zylker.okta.com/app/zylker_client/exkcqs4dl88ZAS/sso/saml then your Single Logout URL will be https://zylker.okta.com/app/zylker_client/exkcqs4dl88ZAS/slo/saml.
- Default RelayState: Copy the value from this field and paste it into the respective field in your IdP.
- Algorithm: Choose an algorithm of your preference. This algorithm will be used by your IdP to generate the public keys and certificates.
- X.509 Certificate: Upload the X.509 Certificate from your IdP in any format specified.
- Click Save.
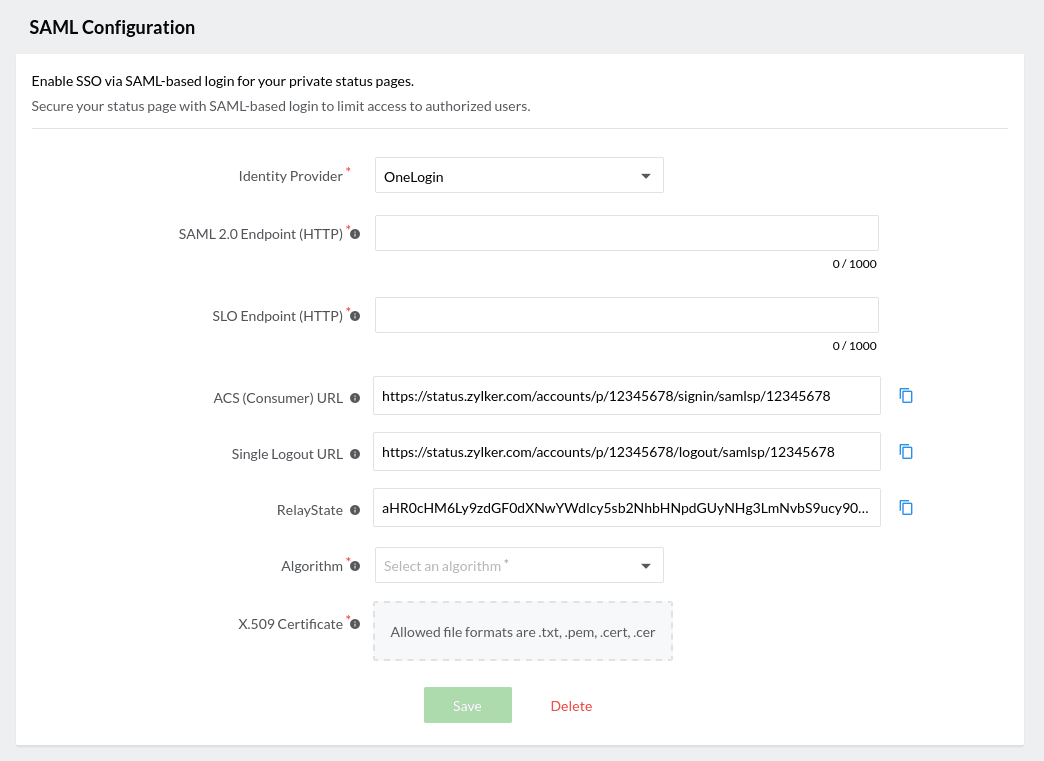
c. OneLogin
-
- Identity Provider: Choose OneLogin from the drop-down.
- SAML 2.0 Endpoint (HTTP): Copy the SAML 2.0 Endpoint (HTTP) from your IdP and paste it in this field.
- SLO Endpoint (HTTP): Copy the SLO Endpoint (HTTP) from your IdP and paste it in this field.
- ACS (Consumer) URL: Copy the URL from this field and paste it into the respective field in your IdP.
- Single Logout URL: Copy the URL from this field and paste it into the respective field in your IdP.
- RelayState: Copy the value from this field and paste it into the respective field in your IdP.
- Algorithm: Choose an algorithm of your preference. This algorithm will be used by your IdP to generate the public keys and certificates.
- X.509 Certificate: Upload the X.509 Certificate from your IdP in any format specified.
- Click Save.
d. Azure
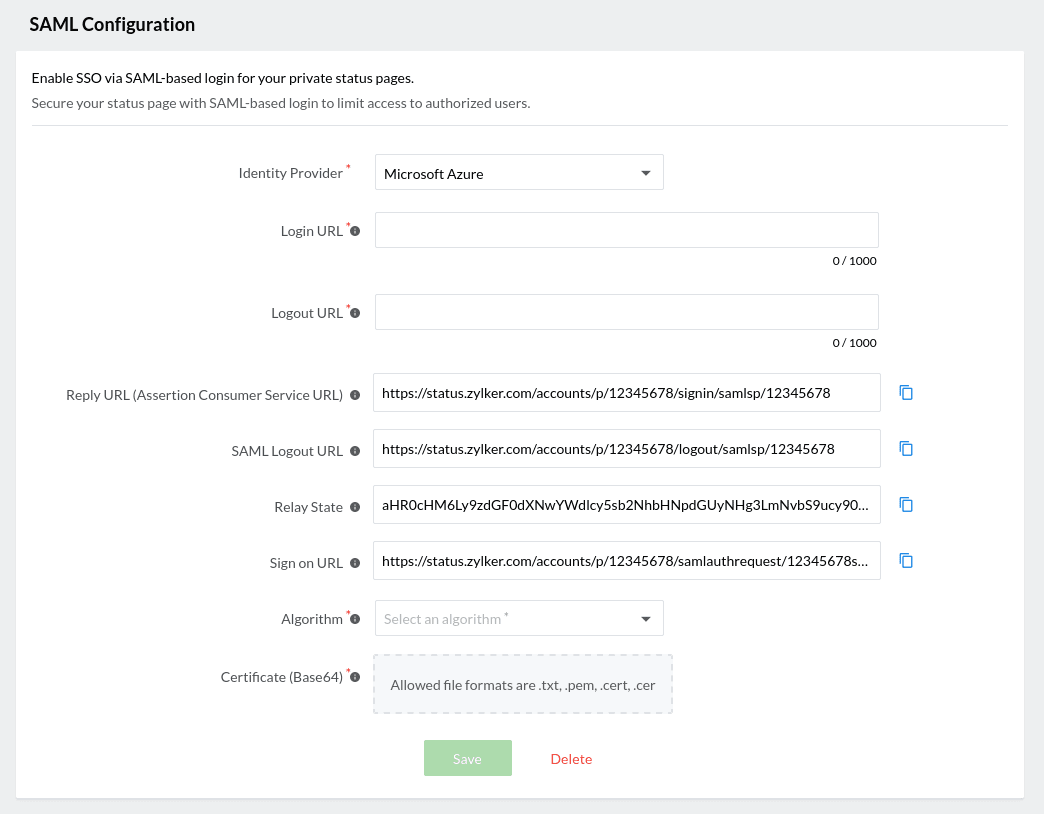
-
- Identity Provider: Choose Microsoft Azure from the drop-down.
- Login URL: Enter the Login URL of your IdP. StatusIQ will be redirecting your end users to this URL for login.
- Remote Logout URL: Enter the Logout URL of your IdP. Once a user logs out from the status page, StatusIQ will redirect the user to this URL for logout.
- Reply URL (Assertion Consumer Service URL): Copy the URL from this field and paste it into the respective field in your IdP.
- SAML Logout URL: Copy the URL from this field and paste it into the respective field in your IdP.
- Relay State: Copy the value from this field and paste it into the respective field in your IdP.
- Sign on URL: Copy the value from this field and paste this URL in the Sign on URL field in your IdP to perform IdP-initiated single sign-on.
- Algorithm: Choose an algorithm of your preference. This algorithm will be used by your IdP to generate the public keys and certificates.
- Certificate (Base64): Upload the Certificate (Base64) from your IdP in text format.
- Click Save.
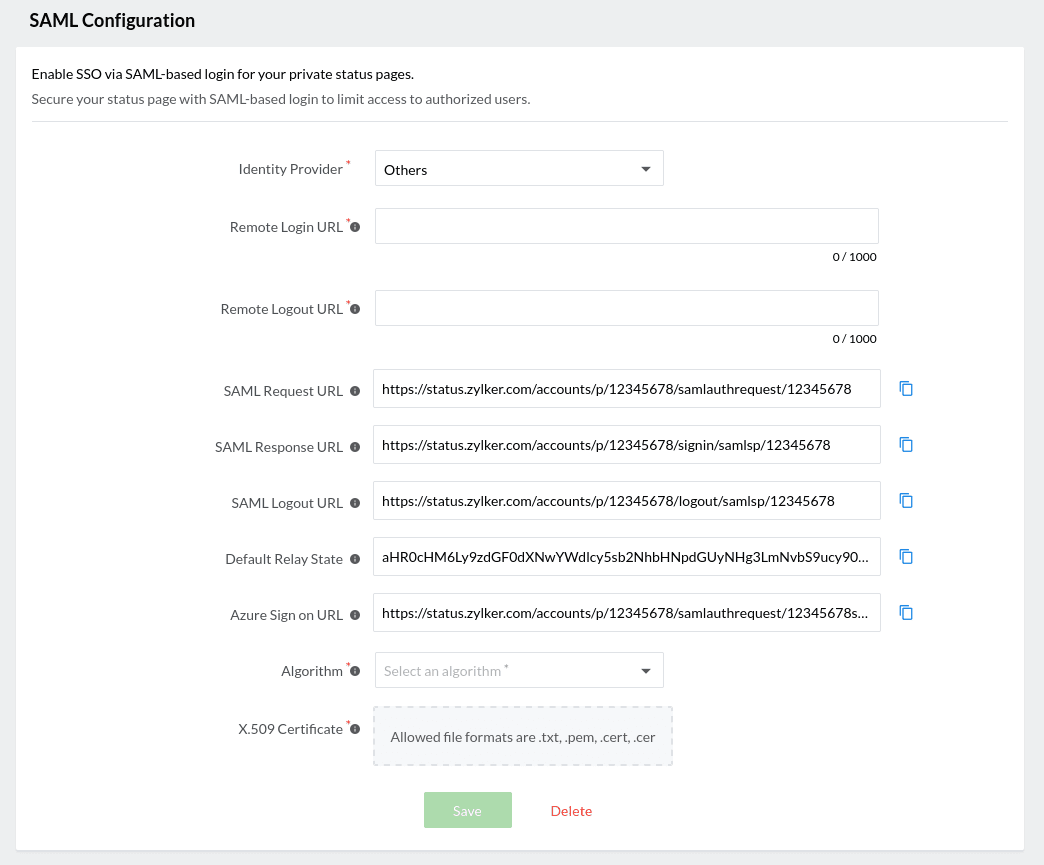
e. Others
-
- Identity Provider: Choose your Identity Provider (IdP) from the drop down.
- Remote Login URL: Enter the Remote Login URL of your identity provider (IdP). StatusIQ will be redirecting your end users to this URL for login.
- Remote Logout URL: Enter the Remote Logout URL of your IdP. Once a user logs out from the status page, StatusIQ will redirect the user to this URL for logout.
- SAML Request URL: Copy the SAML Request URL from this field and paste it into the respective field in your IdP.
- SAML Response URL: Copy the SAML Response URL from this field and paste it into the respective field in your IdP.
- SAML Logout URL: Copy the SAML Logout URL from this field and paste it into the respective field in your IdP.
- Default Relay State: Copy the Default Relay State value from this field and paste it into the respective field in your IdP.
- Azure Sign on URL: Copy and paste this URL in Azure's Sign on URL field to perform IdP-initiated single sign-on (not applicable for other IdPs).
- SAML SP Certificate: Download the SAML SP certificate and upload it in your IdP to verify logout requests.
- Algorithm: Choose an Algorithm of your preference. This algorithm will be used by your IdP to generate the public keys and certificates.
- X.509 Certificate: Upload the Public X.509 Certificate from your IdP in any format specified.
- Click Save.