WordPress websites run into errors for multiple reasons ranging from incorrect configurations and corrupt files to incompatible plugins and hosting-related issues. This guide will look at some simple errors that can occur while hosting a basic website on WordPress.com and the possible approaches to troubleshoot them.
Best practice: Before installing a new application, theme, or code, it's best to have a full website backup that's been tested and restores the site successfully.
By default, logging is turned off, so you’ll see a line that says:
define( 'WP_DEBUG', false );
Remove that and replace it with the following:
define( 'WP_DEBUG', true );

                    if ( WP_DEBUG ) {

                          @error_reporting( E_ALL );

                          @ini_set( 'log_errors', true );

                          @ini_set( 'log_errors_max_len', '0' );

                          define( 'WP_DEBUG_LOG', true );

                          define( 'WP_DEBUG_DISPLAY', false );

                          define( 'CONCATENATE_SCRIPTS', false );

                          define( 'SAVEQUERIES', true );
                  }
Save your changes and make sure the updated file is on your site.
Once this modified setup file is in place, the debug.log file starts logging the details of what happens on the website when it's accessed. This debug file is saved in the wp-content folder and can be downloaded using SFTP and sent to support providers. Debugging can be turned back off by removing ( 'WP_DEBUG', true ) and other added code to ( 'WP_DEBUG', false ) in the wp-config.php file.
Reviewing debug.log files usually helps support personnel or an advanced user understand the nature of an error and take requisite, corrective action.
Secure File Transfer Protocol is used to access website files on WordPress, and SFTP client software is used by the website admin to access the files. SFTP as a service needs to be enabled once per WordPress site by accessing this page. If the user is logged in as Site Admin, the following page will open up:
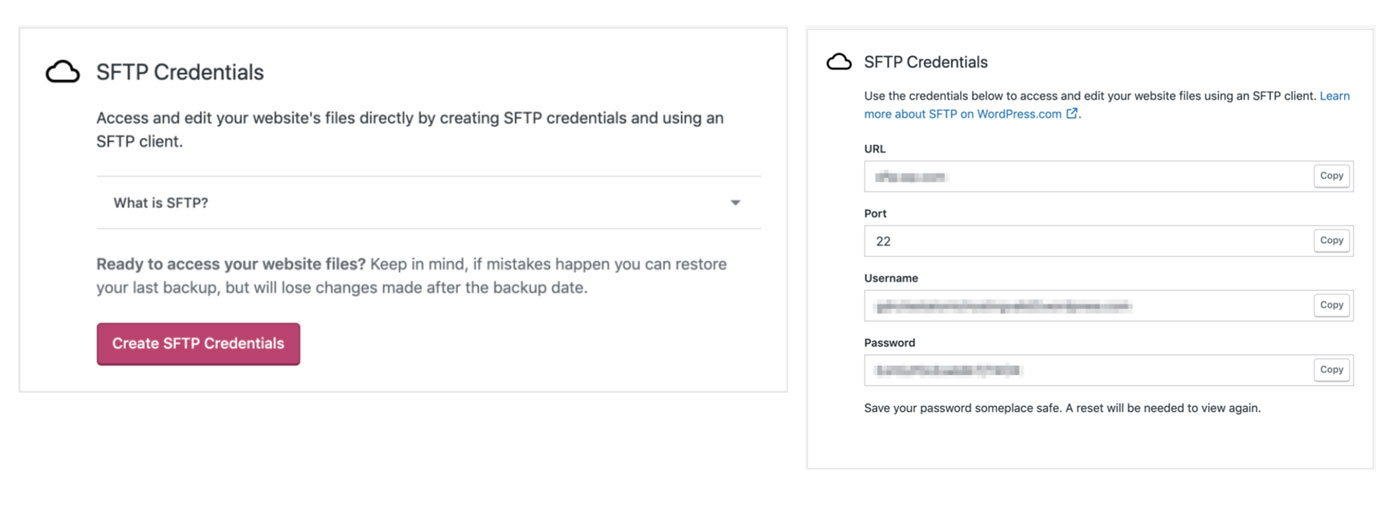
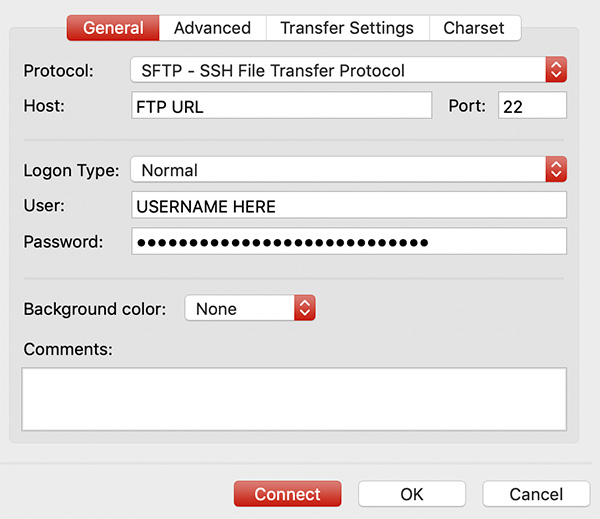
On clicking Create SFTP Credentials, an SFTP URL, Port number, Username, and Password are automatically generated. This information is needed to configure the SFTP client, so it should be kept somewhere safe. An example of a freely available SFTP client is FileZilla
Configuring the SFTP client (in our example, FileZilla):
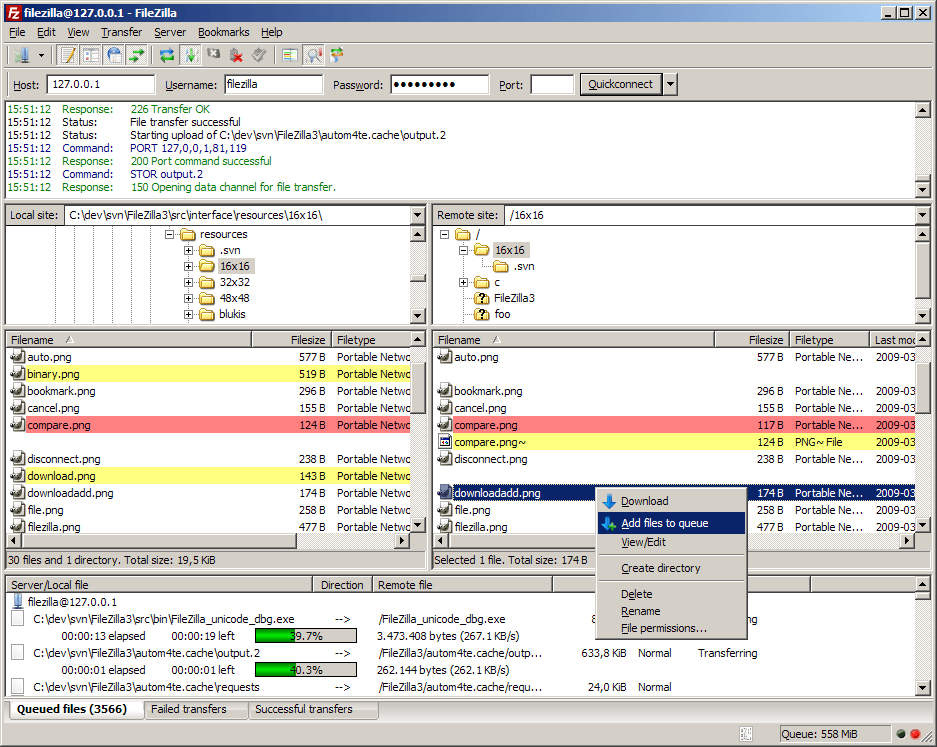
Upon clicking Connect, the FileZilla client will connect to the WordPress instance based on the details already entered in the configuration page. The FileZilla client screen shows the local files on the left and the remote web server hosted files on the right. Refer to this sample:
Using the Activity Log option on WordPress is a great way to track events and activities on your website while troubleshooting. The Activity Log helps investigate the last changes made before an error occurred. WordPress subscription plans usually allow access to the complete Activity list, while the free plan may have limits on the number of events stored. To access the Activity Log, go to the Administration Panel > My Site > My Home > JetPack > Activity Log. A window showing recent events and activities by author will display.
This log is helpful as it covers the most recent 1,000 events, last activity displayed first. The timestamp displayed in the Activity Log matches the time zone set in the site’s settings, which can be configured from My Site > Manage > Settings > General. Here's an example of the event types and their retention period as published by WordPress:
After the retention period, data is moved to long-term storage for subscribers. Once moved, this data isn't visible in the site’s Activity.
Reviewing these logs can help you identify if the last activities or updates caused the current problem. If content and images are missing or if a new theme or plugin is identified as the cause, you can restore a backup taken prior to that point.
Best practice: Use the export option to back up images at regular intervals. This ensures that a backup restore with missing images can be repaired by uploading the requisite images from the exported files.
Backup is a feature available under Jetpack-Activity for those on Business and eCommerce Plans (other plans have the option of evaluating and using other backup plugins). The Jetpack-Activity subscription includes automatic backups once every 24 hours, allowing you to pick a point in the Activity Log and restore it to the state it was in at that point. Typically, a backup includes:
The latest backup can be accessed by following My Site > Jetpack > Backups. Another option is through the Activity Log, where restore points for the site are available from the list of all activities.
For a selective restore from a backup, go to the Activity Log at a certain change or update, and click the three dots next to it.
Restore provides selective options for the site as it was at that point in time including:
For all of the above restore options, third-party themes, plugins, and content may not always restore completely. If that's the case, you can review and reset some of the options. Upon selecting Restore to this point, the following dialog box opens up:
Once the restore is confirmed and the above requirements are met, the restore is initiated and an email notification is sent to the web admin.
A WordPress website can face errors due for multiple reasons ranging from incorrect configurations to hosting-related issues. Some of these simple errors that occur while hosting a basic website on WordPress.com can be solved through troubleshooting with WP-DEBUG, an SFTP client, and the Activity Log, and using backup and restore to revert to the last known working configuration.
Site24x7 APM Insight captures fatal PHP errors and exceptions that cause the White Screen of Death, showing you the exact file and line number.
Yes, Site24x7 Website Monitoring instantly alerts you via SMS, email, or voice call whenever your site returns a 5xx error status.
Yes, Site24x7 APM Insight identifies the slowest database queries, helping you troubleshoot performance bottlenecks in your WordPress database.