Rebranding and securing your MSP Site24x7 portal for customers: A complete setup guide
When using Site24x7 for MSPs, you should complete a few essential steps to ensure your setup is secure, professional, and fully functional for your customers. These include branding your portal, verifying domain ownership, and authenticating emails sent from your system. This guide provides detailed instructions for implementing these steps, which will help enhance security, build customer trust, and improve email deliverability.
Use case
Zylker IT, a managed service provider (MSP), manages monitoring services for multiple customers and aims to deliver a more professional and trusted experience. To enhance this, they set up a custom portal URL (portal.zylker.com) that enables their customers to log in through a custom branded page instead of using the default Site24x7 link.
To secure this setup, Zylker IT completed domain verification to establish ownership and prevent misuse. They also implemented DomainKeys Identified Mail (DKIM) authentication to ensure that all alert emails sent from alerts@zylker.com are recognized as legitimate and not marked as spam. This approach guarantees customers a secure, branded, and reliable service, strengthening customer trust and engagement.
How to complete your domain and email setup
Here are the three key steps you need to complete:
|
Steps |
Required action |
Purpose |
|
Step 1 |
Rebrand your customer portal via custom URL + CNAME mapping. |
Use your own domain so customers can access a white-labeled portal rather than a default Site24x7 URL. |
|
Step 2 |
Add a domain verification key via a DNS TXT record. |
With your confirmed domain ownership, Site24x7 is able to establish your white-labeled portal for you to personalize. |
|
Step 3 |
Validate sender email using DKIM authentication. |
Authenticate outgoing emails to reduce spam/fraud risk and improve delivery. |
Configuring each step
Step 1: Rebrand your customer portal via custom URL and CNAME mapping
To enhance your business reputation using Site24x7's managed monitoring services, consider adding a custom URL for your customers. This enables them to access their monitor, status, and reports through a rebranded portal. To set up the rebranded Monitoring Control Panel, invite your end customers and add them as sub-users or through customer groups to their accounts.
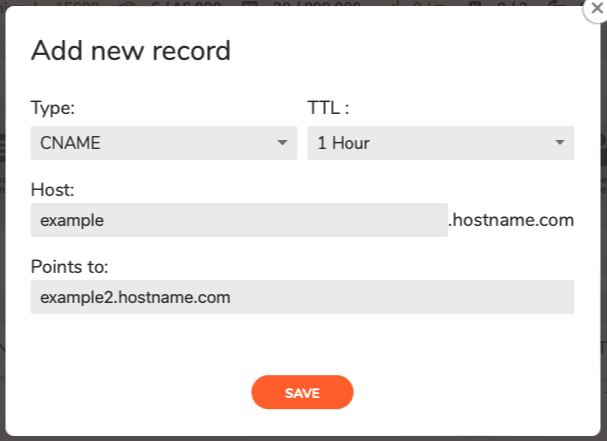
Next, add a Custom Domain field in Site24x7 to configure your own domain for the customer portal. Once done, map your custom domain to Site24x7's domain customer-sp.site24x7.com (or customer-sp.site24x7.eu for European customers) by adding a CNAME record in your DNS zone file.
Here are the steps to add the CNAME record easily:
- Log in to your domain control panel.
- Navigate to the section that states DNS or Name servers.
- Add a new CNAME record; specify the Custom Domain. Please check the table below for mapping details related to Data centers:
Data center
Domain
USA
customer-sp.site24x7.com
Europe
customer-sp.site24x7.eu
China
customer-sp.site24x7.cn
India
customer-sp.site24x7.in
Australia
customer-sp.site24x7host.com.au
Japan
customer-sp.site24x7host.jp
Canada
customer-sp.site24x7host.ca
Saudi Arabia
customer-sp.site24x7host.sa
United Kingdom
customer-sp.site24x7host.uk
- Enter the Time to Live (TTL) record between 30 minutes and one hour; you may leave this field in its default setting.

- Once finished, Save the changes to the DNS records.
The above actions might vary depending on your domain registrar. If you can't find a way to update this in your DNS host, get help from your web administrator.
In addition to CNAME mapping, if you want us to install an SSL certificate for your custom domain, please get in touch with support@site24x7.com. However, this option is only available for paid customers.
Step 2: Add Domain Verification Key via DNS TXT record
To protect your subdomain from misuse, you must verify your domain ownership. Site24x7 and its MSP provide a unique verification key for this purpose. Enter the complete key in the TXT value field of your DNS zone file to confirm that you are the legitimate owner.
Follow the steps below to add the verification key to your DNS TXT field:
- Click the domain you need to verify for Site24x7's MSP.
- Access the DNS Management page.
- Click the Manage DNS link in the domain settings page.
- In the records table, click Add .
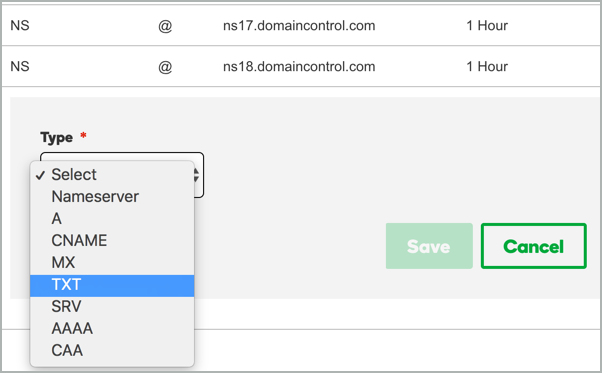
- From the Type list, select TXT.

- In the Host field, enter @. Keep the default TTL value.
- In the TXT Value field, paste the complete domain verification key that you copied from your MSP account.
NoteTo get the domain verification key, go to the My Accounts page of your MSP account, click the View Record link in the Domain TXT Verification field, copy the key from the pop-up, and paste it into the TXT Value field.

- Click Save to save the new verification record. You'll see the TXT record added to the Records table.
NoteThe above actions might vary depending on your domain registrar. If you can't find a way to update this in your DNS host, ask your web administrator for help.
The above steps complete the domain verification process. Once the first two steps are done, the domain is verified. If you want your email to be validated, you will need to follow the step below.
Step 3: Validate sender email using DKIM authentication
DomainKeys Identified Mail (DKIM) is an authentication method used by email providers to verify the sender's identity and ensure that emails have not been altered during transmission. DKIM helps prevent spam and spoofing by adding a digital signature to the email header, protecting the sender's reputation and improving email deliverability to the intended recipient's inbox.
To implement DKIM, publish a TXT record in your domain's DNS settings.
Key purpose
- Verify that emails originate from a legitimate source.
- Ensure emails remain untampered with during transit.
Set up DKIM text records for your domain
Contact your domain hosting provider or system administrator to set up the DKIM records in your DNS settings. Below are the setup steps for popular domain hosts.
GoDaddy
To add the DKIM record for your domain in GoDaddy, follow these steps:
1. Log in to the GoDaddy account.
2. From the Navigation toolbar, choose domains.
3. Search for your domain to add the DKIM record.
4. Under the Records section, click ADD .
5. Enter the following information:
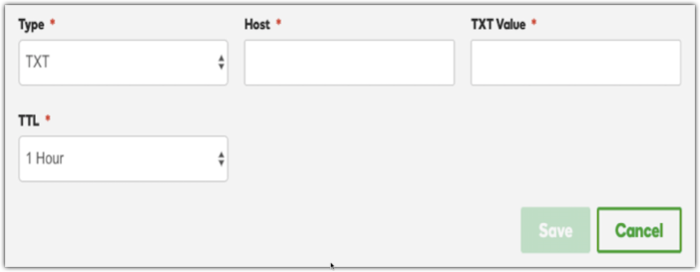
- Type: Select TXT as the type of record to be added.
- Host: Enter the domain name.
- TXT Value: Paste the DKIM record details provided by Site24x7.
NoteTo get the domain record, go to the My Accounts page of your MSP account, click the View Record link in the From Email field, copy the record from the pop-up, and paste it into the TXT Value field.
- TTL: Enter how long the server should take to cache the information.
6. Click Save.

Domain-based Message Authentication, Reporting, and Conformance (DMARC) is an email authentication protocol designed to prevent email spoofing, which occurs when someone sends emails that appear to be from your domain.
The DMARC check incorporates DKIM alignment. Adhering to the DMARC policy informs recipient systems that the email sender has taken steps only a legitimate sender can perform: aligning the DKIM domain with the From domain visible to the recipient.
Therefore, if you have DKIM authentication, you will successfully pass the DMARC check, which will not negatively impact your email deliverability.
Conversely, if you lack DKIM authentication, the DKIM alignment will fail, resulting in your email not passing the DMARC check. Site24x7 recommends authenticating your domain with DKIM to ensure compliance with DMARC and enhance your email deliverability.
Benefits
- Branding and trust: If you are an MSP or you want the customer experience to look like your brand (not site24x7.com), then easily and efficiently customizing your entire portal with your logo and other visual identifiers is a popular option.
- Security and ownership: Ensure that you legitimately own the domain to prevent misuse (for example, someone else claiming your domain), and ensure it aligns with DNS and email best practices.
- Email deliverability and anti-spoofing: Without DKIM, your emails might be rejected or be designated as spam. Authenticating via DKIM helps systems verify that the email truly comes from you and hasn’t been tampered with.
Summary
Following these three steps, you can successfully rebrand your portal and secure your domain and email communications. This integrated approach provides a professional, consistent experience for your customers, builds trust, and protects your brand from security threats like spoofing and spam.
