Import Monitors in Bulk
The Import Monitors in Bulk feature accelerates the monitor set-up process by facilitating the bulk import or export of all monitors and their configurations from another monitoring tool into Site24x7. It accomplishes this by simply importing multiple monitors at once via a CSV file. Multiple monitors can be imported in bulk, or while migrating a set of monitors from any other monitoring tool. Monitors supporting import bulk are listed in the Monitor Types drop-down list in the Import Monitors page.
Use cases
- Let's say you want to create multiple website monitors in your Site24x7 account. To achieve this via the Bulk Import feature, specify the header parameter name as Website, then provide the URLs in the subsequent rows—one after the other in the CSV file. Browse and attach the file using the Upload CSV file option in the UI. Gradually, the monitors start getting added to your Site24x7 account.
- Some monitors might have attributes that are password protected. While importing these monitors with the same exported CSV file, the passwords are masked. So, replace the attribute's password with the corresponding value.
Import Monitors in Bulk
Bulk installation of monitors in Site24x7 via the Bulk Import task is an easy process. Overall, the steps involved in performing the import task involve three major steps
Building CSV file for Import
Follow these steps to build a CSV file:
- For bulk importing specific monitor types, there is a list of required parameters at the bottom of the Import Monitors page on the web client. Save and update these parameters in a CSV file with either a .csv or .txt extension, and then upload this file to Site24x7.
- Download the sample CSV file for the chosen Monitor Type from the web client and customize the downloaded template to build a CSV file for each Monitor Type.
- While importing them, ensure:
- Profile names follow proper casing. Notification, location, and threshold profiles, and user groups are mandatory for adding a monitor.
- When importing monitors via a CSV file, the profile names in the CSV should match exactly with those in the target account.
- When they do not match, override invalid or void entries with default options to set default profiles to continue smoothly.
- For the CSV format, the first line should have a Header:
followed by all the parameters, each separated by a comma. From the second line onwards, provide the input values according to the column names in the header. Ensure the values given in the second line match with the input parameters. - Add comments by including the # symbol at the beginning of a line.
- The monitor is created based on the display name provided in the file, with all associated details being linked according to this display name.
- For Mail Delivery Monitor, it's mandatory to specify the verified to_emailid for successful setup. For unverified to_emailid, reimport the CSV file after the verification of email address.
During import, all Server, Network, and APM monitor configurations listed in the CSV file are excluded automatically. Likewise, while importing, the agent-based and On-Premise Poller-based monitors can only be updated and not added.

Uploading CSV to Site24x7
Upload the built CSV file to Site24x7 using the following steps:
- Log in to Site24x7.
- Click Admin > Inventory > Import Monitors.
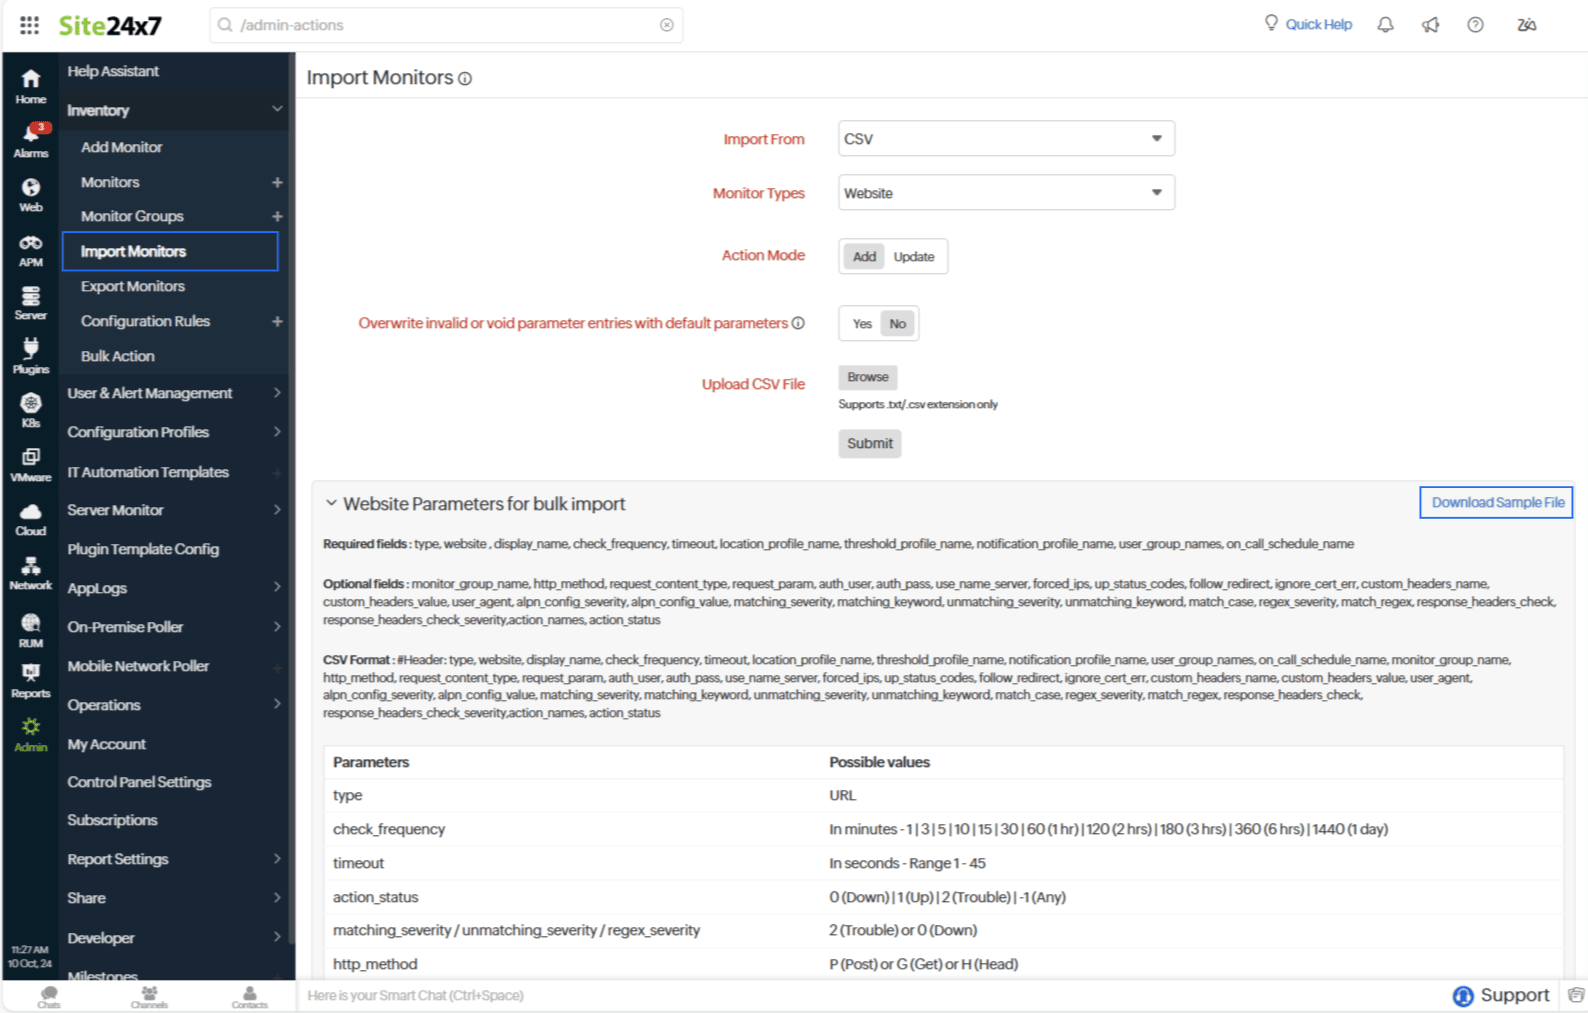
- Specify the following parameters to import monitors in bulk:
- Monitor Types: Specify one or more monitor types to import and set up in your account in one session. Below the configuration page, there is a list of required, optional, and sample parameters.
 Note
NoteFor REST API Monitor, import the monitor configurations in CSV/JSON or YAML (swagger definition) /HAR formats.The Zip file should contain Swagger 2.0 JSON or YAML files.However, when the REST API monitor is part of the bulk selection, import all monitors via Text/CSV file alone.
For REST API monitor only selection, import files with .txt/ .csv/ Swagger 2.0 YAML/JSON/ZIP/ .har file extensions. - Action Mode: Specify the action to execute with the monitor import. Pick Add to create new monitors of the specified type. Use Update to modify an existing monitor configuration in your account.
- Overwrite invalid or void parameter entries with default parameters: By enabling this option, Site24x7 will overwrite any invalid or void parameters with a default profile or parameter value during import. If disabled, any invalid or void parameters in your TXT/CSV format file will disrupt monitor addition during the import task. Overwritable fields are mentioned under the Parameters for bulk import section.
- File Name: Click Browse to select a CSV file (with .txt/.csv extension) from your local machine for upload—a maximum file size of 10 MB can be uploaded.
- Monitor Types: Specify one or more monitor types to import and set up in your account in one session. Below the configuration page, there is a list of required, optional, and sample parameters.
- Click Submit to initiate a new import.

Parsing, Validation, and Import Task Completion
Import CSV files by following these steps:
- During the import process, the imported CSV file is successfully parsed to validate the data.
- Click Stop Import during the file parsing to block the import process.

- On the results of the data validation page, there is a quick preview of the number of monitors that are yet to pass validation.

- Soon after the validation, the monitor creation process takes over. Monitor addition may take several minutes to complete, depending on the size of the CSV file.
- You will receive a task completion notice soon after the import task is completed and an email confirmation about the status.

- Click Show Results to view the task completion status with probable reasons for monitor failure. Click Show Imported Monitors to view all the imported monitors.

Checking Monitor Status
The Monitors List View page displays the new monitors added via the Import Monitors form. Additionally, a new Monitor Group with the name Imported on
Export Monitors in Bulk
Export all your existing Site24x7 Monitors with their configurations in a CSV flat file in .txt/.csv file format. Use the exported CSV file to update or add monitors while importing or exporting. Refer to the Export Monitor feature to learn more.
Related topics