Microsoft Teams integration
Microsoft Teams is an advanced ChatOps platform for modern teams in Office 365. It offers a true hub for teamwork where all conversations, meetings, files, and notes can be accessed by everyone, all in one place, and collaboration and work happen in the open. In Microsoft Teams, every team can have its own set of channels and each channel allows teammates to have focused conversations about specific topics. Microsoft Teams offer a seamless model, providing notifications and updates from third-party applications like Site24x7, Twitter, GitHub etc. Site24x7 Bots for Microsoft Teams allow you to have natural interactions with the bot using dialogue inputs. You can query the bot, which inturn processes the data using an advanced AI-engine and fetches instant answers from Site24x7 on your various monitoring stats. You can also add Site24x7 Custom Dashboard tabs inside Teams to have meaningful conversations about your monitored data.
Key Facets: Site24x7's integration with Microsoft Teams
Site24x7 users can quickly connect their Microsoft Teams account with their Site24x7 account using Microsoft Teams Tabs and Bots. Our integration allows Microsoft Teams users to receive critical status alerts and RCA from their Site24x7 account as chat messages in your desired Microsoft Teams Channel. With all the relevant incident data from Site24x7 listed in a single channel, you can quickly isolate, troubleshoot issues and increase the productivity of your staff.
Receive chat messages in your specified Microsoft Teams Channel for the following Site24x7 events:
- Monitor status alerts
- Incident Root Cause Analysis (RCA)
The integration helps you to avail these services from Microsoft Teams, which are Tabs and Bots.
Site24x7's integration with Microsoft Teams via connectors has been deprecated and is no longer supported.

Bot Alert Flow
- Log in to Microsoft Teams.
- Navigate to the Teams tab and find the team you wish to integrate with Site24x7. Then, locate the specific channel for integration.

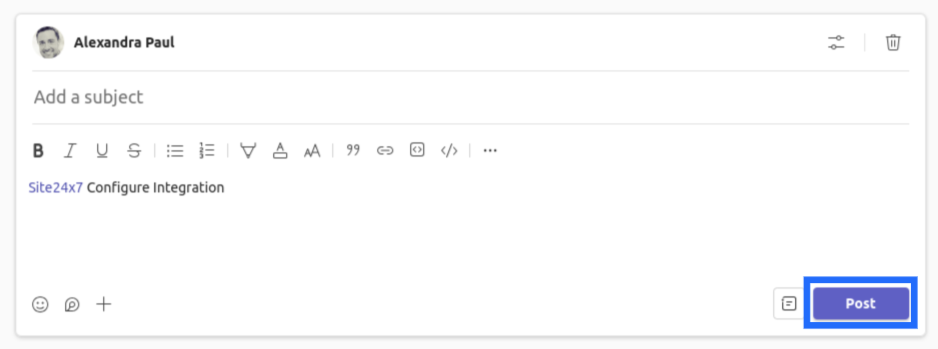
- Click Start a post.
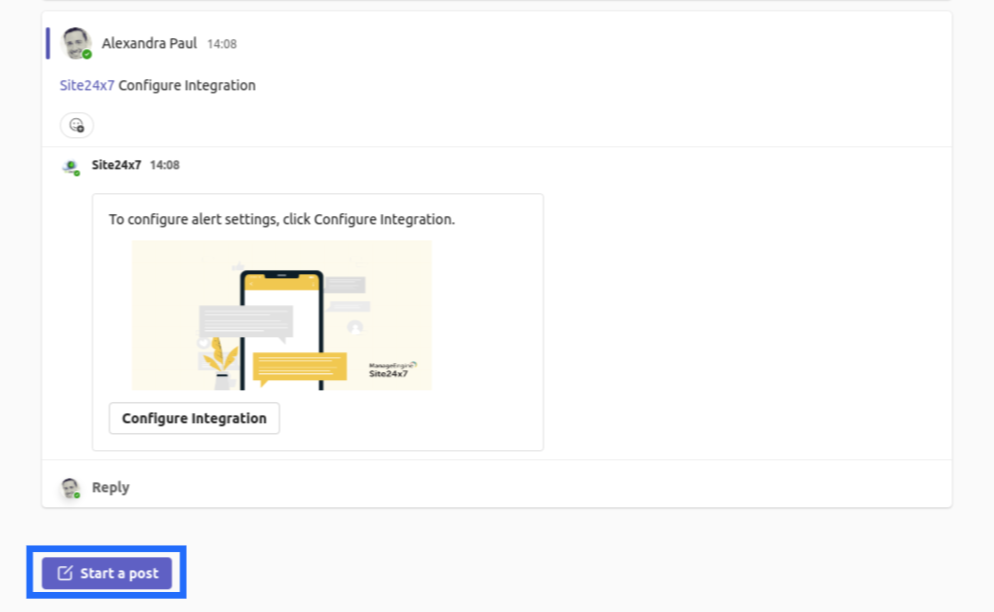
- In the input section, tag “Site24x7 Bot” and type “Configure Integration” Click Post.
- Now click “see more” to find a card posted. Click Configure Integration.
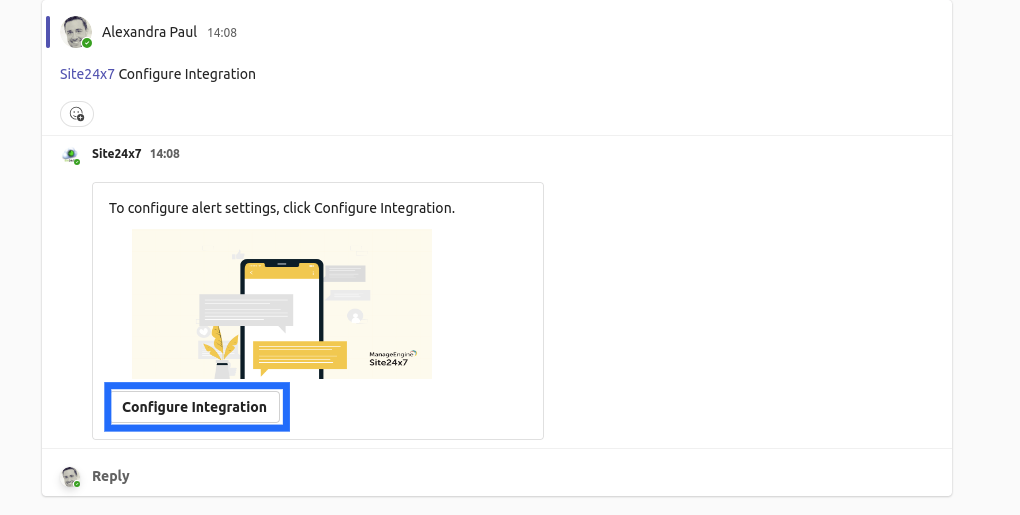
- You will now be redirected to the Site24x7 Microsoft Teams integration page.

Pre-requisites
- To enable a successful Microsoft Teams integration, you must first log into your Site24x7 account before accessing your Microsoft Teams account via the login link provided in your Site24x7 integration form.
Microsoft Teams Bot card functions
Alerts triggered in Site24x7 will be posted to Microsoft Teams as an adaptive card with an option to perform the following actions:
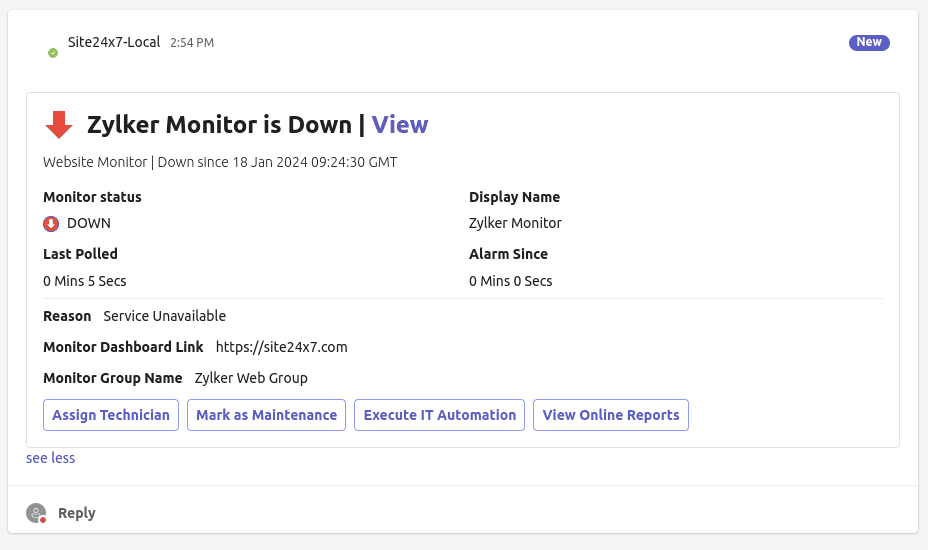
- Assign Technician:
- In the adaptive card for the alert of your preference, click on the Assign Technician button.
- Choose your technician from the drop-down option with the list of the technicians available in Site24x7.
- This selected technician will be then assigned to resolve the alarm.
- Mark as Maintenance:
- In the adaptive card for the alert of your preference click on the Mark as Maintenance button.
- Click on the Confirm Mark as Maintenance that appears and it will mark the monitor as under maintenance.
- Maintenance will be marked as over when the monitor status changes to Up.
- Execute IT Automation:
- In the adaptive card for the alert of your preference click on the Execute IT Automation button.
- Choose an automation of your preference from the drop-down list of automation available in Site24x7 and execute it for that particular alarm.
Refer who can perform actions listed in the adaptive card to learn who can opt to assign a technician, mark as maintenance, or execute IT automation.
Link Site24x7 account and Microsoft Teams account
To perform an action you should link your Site24x7 account and your Microsoft Teams account. To link Site24x7 account and Microsoft Teams account,
- Click Sign-in link in the message triggered when an action is clicked.

- Log in to your Site24x7 account.

- Pick your Microsoft Teams account that has to be linked.

- Now your Site24x7 account will be linked to MSTeams account.
Who can perform actions listed in the adaptive card?
- Admin
- Super Admin
Users with all other Site24x7 roles will be shown "You are not authorized to perform this operation." when they try to execute an action.
Microsoft Teams Integration in Site24x7
In Site24x7 integration form, provide the following details to complete the integration:
- Integration Name: Specify the name for your Microsoft Teams integration.
- Message Title: Enter the "$ symbol" and pick from available incident parameters to customize your message title for Site24x7 notifications. Learn more about incident parameters. You can also use Site24x7 global parameters to customize your message titles.
- Select Integration Level: Based on the integration level that you select, you can either send notifications to Microsoft Teams channels for selected monitors, monitors/monitor groups associated with selected tags or all your configured monitors.
NoteFor tags associated to your monitor group that have monitors in parent level and a few monitors in sub group level, alerts from only the parent monitors get logged in Microsoft Teams.
- Tags to be sent with Alerts: Select the tag keys associated with the monitor that need to be sent with the alert. When an alert is triggered, tags that match with the monitor will be included in the alert notifications. If no tags are selected, all the tags associated with the monitor will be present in the alert notifications.
- Trigger incidents when my Monitor is in Critical status: Based on the status of the monitor, an incident will be triggered.
- Trigger incidents when my Monitor is in Trouble status: Based on the status of the monitor, an incident will be triggered.
- Click the Save and Test button to save the integration and to receive a test alert. Or, you can click the Save button to finish the integration.
Once the setup process is completed, the Microsoft Teams integration will be listed in the Third-Party Integration dashboard. You can setup multiple such Microsoft Teams Integrations in your Site24x7 account.

Suspend/Activate/Test Alert/Delete Microsoft Teams Integration
Follow the steps below to suspend an active Microsoft Teams Integration:
- In Site24x7, navigate to Admin > Third Party Integration.
NoteAll your preconfigured integrations will be listed in the Third Party Integration dashboard.
- You can initiate a Test Alert to check whether the Microsoft Teams integration is a success or has any configuration error.
- Click your active Microsoft Teams integration that you wish to suspend.
- Click the Suspend button listed on the top right corner of the integration window.
Note- On suspending your Microsoft Teams integration, all notifications to your dedicated Microsoft Teams channel will be stopped temporarily.
- To reactivate a suspended Microsoft Teams integration, click the Activate button. To delete an integration permanently, click Delete.

Adding Tabs - Add Custom Dashboard in Microsoft Teams
By integrating Custom Dashboard Tabs in Microsoft Teams, you get a dedicated canvas inside your Teams channel to have meaningful conversations over your Site24x7 data. You must login to view any Site24x7 Custom Dashboard(s) inside the Microsoft Teams Channel Tab. It lets you collaborate and troubleshoot monitor issues faster by enabling you to have contextual conversations over the performance of specific monitors in your Site24x7 account. Follow the steps below to setup a tab in your Microsoft Teams channel:
- Open your Microsoft Teams channel. Find and click the '+' icon on the top layer of your channel window to add a tab.

- In the popup window, type the keyword "Site24x7" in the search bar. Click the Site24x7 icon.
- You'll be shown another modal popup asking you to Connect to Site24x7. Login using your Site24x7 credentials or use your Office365 credential (used as an IDP to log into Site24x7.)

- After logging into your Site24x7 account, you'll be able to view the list of all the Custom Dashboards configured inside your account. Pick a Custom Dashboard to view the same inside your Microsoft Teams channel. Once selected, Click Save. You can mark the check box "Post to the channel about this tab", if you wish to post this in the channel conversations.
NoteIf you do not have a preconfigured Custom Dashboard, learn how to create one. After creating the Dashboard, refresh this window once again to view the Dashboard listed here.
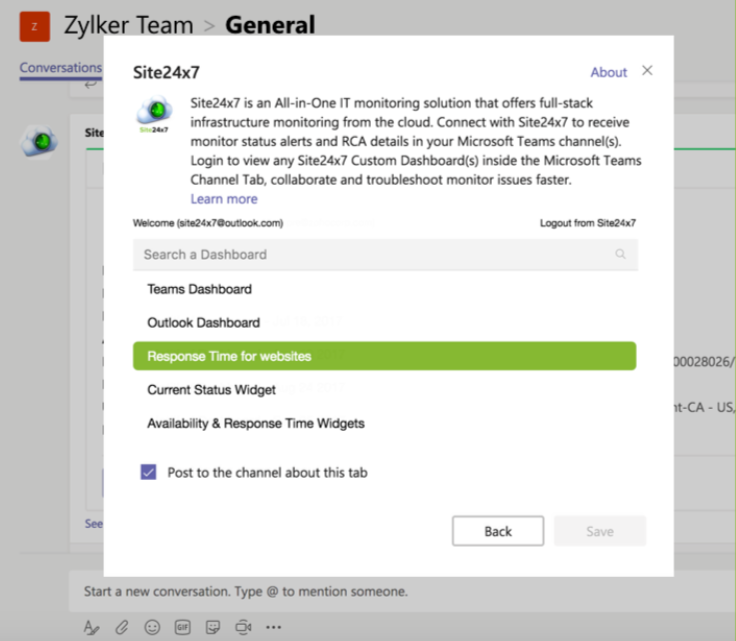
- Once the selected Dashboard is embedded inside the Teams channel window, click the chat icon on the top right corner to start meaningful conversations over your Dashboard data. You can maximize the window, refresh the dashboard frequently and even view the Dashboard inside a separate browser tab.

Set up Site24x7 Bot for Microsoft Teams
Site24x7 Bot is a custom automated program based on an advanced AI-engine that responds to queries and shares interesting updates and notifications about your monitor's status, availability, performance, outages, SLAs, RCAs, and alarms within your Microsoft Teams channels or private chat. By enabling Site24x7 Bots, you can easily interact with Site24x7's monitoring services using dialogue inputs and fetch monitoring results with ease without actually having to access the Site24x7 web client. You can interact with bots in private chats and channels within a team. Learn how to manage your IT operations with the conversation-driven Site24x7 bot:
- In the Microsoft Teams app store, search for the Site24x7 app.

- You're now prompted with a pop-up. In the pop-up, pick the Team where you wish to install the Site24x7 Bot. Click Install.

- Access your personal chat window and click on the Site24x7 Bot. Authenticate with your Site24x7 account credentials to start interacting with the Site24x7 Bot.

- After the successful authentication, initiate the conversation with the bot by greeting it with a 'Hi, Hello, Hey, Help, Thank you, Thanks' message. The bot will respond with a Welcome card. The message buttons can also be used to initiate sample bot queries in the chat window.

- You're done! Have your queries answered instantly by Site24x7 Bot without having to access the Site24x7 webclient.
Basic Query Types and Response from Site24x7 Bot
Interaction with Site24x7 bot in Microsoft Teams is done using dialog inputs and other interaction elements as opposed to pure text commands. Dialog inputs are a way of interacting with a bot through classical input boxes. When you query the bot, you can insert simple natural language texts insead of complex text command lines. Although, the queries doesn't follow any fixed template, it's important to mention the keywords in the dialogue input. For example, let's say you've a monitor with the name Zylker in your Site24x7 account. Questions like "Status of Zylker", "Status Zylker", "Tell me the status of Zylker" or any other combination of texts should fetch you the same result, as long as you've specified the keywords "status" and "Zylker" in the dialog input.
While performaing the Availability Summary, Performance, or Outages operations, you can fetch data for the following time periods: yesterday, this week, this month, this year, last six months, last 30 days, last week, last month, and last year. You can also key in customized queries combining specific metrics of certain monitors. For example, "Tell me the CPU Utilization of Zylker Server during last week".
Below we've listed the common metrics that can be queried with the Site24x7 bot:
1. Monitor Status
After logging into your Site24x7 account, you can query the Site24x7 bot to find the actual operational status, (i.e., UP, DOWN, TROUBLE) of the monitors. You can query the current status for all monitors, monitor names, and monitor group name.
For the resource types: All monitors, Monitor Names and Monitor Group Names, the stats in the images below are shown in the response.

Fig.1: Status of all Monitors

Fig.2: State of Monitor Name

Fig3: State of Monitor Group Name: For a specific monitor group name, all relevant monitors are listed one-by-one in the response. You can click an individual monitor from the list to find its individual status.
2. Availability Summary Report
You can use the conditions to query and fetch the availability summary details of your monitor names or monitor group names for a specific time period of your choice.
For the resource types: Monitor Names and Monitor Group Names, the given stats in the images below are shown in the response.

Fig.4: Availability Summary for Monitor Name

Fig.5: Availability Summary for Monitor Group Name
3. Outages
Query the bot to fetch the outage of monitors, monitors in specific monitor groups and monitor types for a specified time period. The response will contain only the top two monitor outages for the day.

Fig.6: Outages report for Monitor Name
4. Performance Report
You can query the bot to fetch the performance of monitors, monitor groups, or monitor type for a specified time period. When you haven't specified the time period, the response will showcase the last hour data, by default.

Fig.7: Performance Statistics for Monitor Name

Fig.8: Peformance Statistics for Monitor Group Name: Statistics from all the monitors of the selected monitor group will be listed one-after the other. If you've multiple monitors of similar type, then those monitors will be clubbed together to calculate the average value.

Fig.9: Peformance Statistics for Monitor Type: Statistics from all the monitors of the selected monitor type will be listed one-after the other.
5. Root Cause Analysis (RCA) Report
You can query the Site24x7 bot to view the RCA report for a monitor name. The response provides RCA details and an RCA permalink. You can create a ticket remotely in SDP On-Demand for the outage monitor. RCA cannot be viewed for poller-based and AWS monitors.

Fig.10: RCA of Monitor Name
6. SLA Report
Query the Site24x7 bot to fetch the SLA settings of all the monitors, monitor name, and monitor group name. Only availability and response time SLA details are supported and not the composite SLA details. The SLA details will additionally show the business hours selection, if associated with the monitor.

Fig.11: SLA Details of Monitors
7. Alarms
You can request Site24x7 bot to remotely perform actions such as pick alarms of a monitor or even gather the top 10 acknowledged or unacknowledged monitors list.

Fig.11: Pick Alarms for Investigation

Fig.12: List of Acknowledged or Unacknowledged Alarms
Troubleshooting Tips
-
On this page
- Key Facets
- Bot Alert Flow
- Pre-requisites
- Microsoft Teams Bot Card Actions
- Microsoft Teams Integration in Site24x7
- Suspend/Activate/Test Alert/Delete Integration
- Adding Tabs - Add Custom Dashboard in Microsoft Teams
- Set up Site24x7 Bots for Microsoft Teams
- Basic Query Types and Response from Site24x7 Bot
- Troubleshooting Tips