Integrate with ServiceNow IT Service Management Platform
ServiceNow is an IT Service Management software as a solution offering from the cloud. It helps you reduce incident resolution times, improve customer satisfaction, and mitigate human errors by enabling you to hook your alerts with the ServiceNow platform. By tightly integrating Site24x7 with Service Now ITSM platform, you'll be able to:
- Monitor the performance of servers and applications; and take corrective actions automatically within the ServiceNow console.
- Manually or automatically open, resolve, and close ServiceNow incidents based on Site24x7 monitor alerts. You can additionally investigate the root cause of incidents, assign alerts to technicians, and manage alerts seamlessly.
Site24x7-ServiceNow Integration for Monitoring Servers and Applications
The Site24x7-ServiceNow integration focuses on understanding the performance of servers and providing automation capabilities, thereby accelerating ticket resolution time.
Site24x7-ServiceNow Integration for Managing Tickets
- Features
- Prerequisites
- Creating an instance in ServiceNow
- Integration procedure
- Handle incidents in ServiceNow IT Service Management Platform
- Binding alerts to a host configuration item (CI) in ServiceNow
Features
- Automatic incident creation based on a new alert triggered in Site24x7.
- Automatic incident update with changes to alert severity level in Site24x7 .
- Incidents resolve or close automatically when alert clears in Site24x7.
Prerequisites
- You must have a pre-configured ServiceNow ITSM Account with sufficient user privileges to create this integration.
- You must be a Site24x7 customer to utilize this integration. You must additionally have a Super Admin or Admin privilege.
- Compatible with all versions from the Geneva version.
- You must generate an Instance URL and login credentials after requesting an Instance on your ServiceNow build. Copy and retain the Instance URL and login credentials to successfully integrate with Site24x7. Learn more about ServiceNow Instance creation.
- You must install the Event Managment plugin in ServiceNow to receive alerts as Events in ServiceNow.
Creating an Instance in ServiceNow
To create an instance in ServiceNow, follow the steps below:
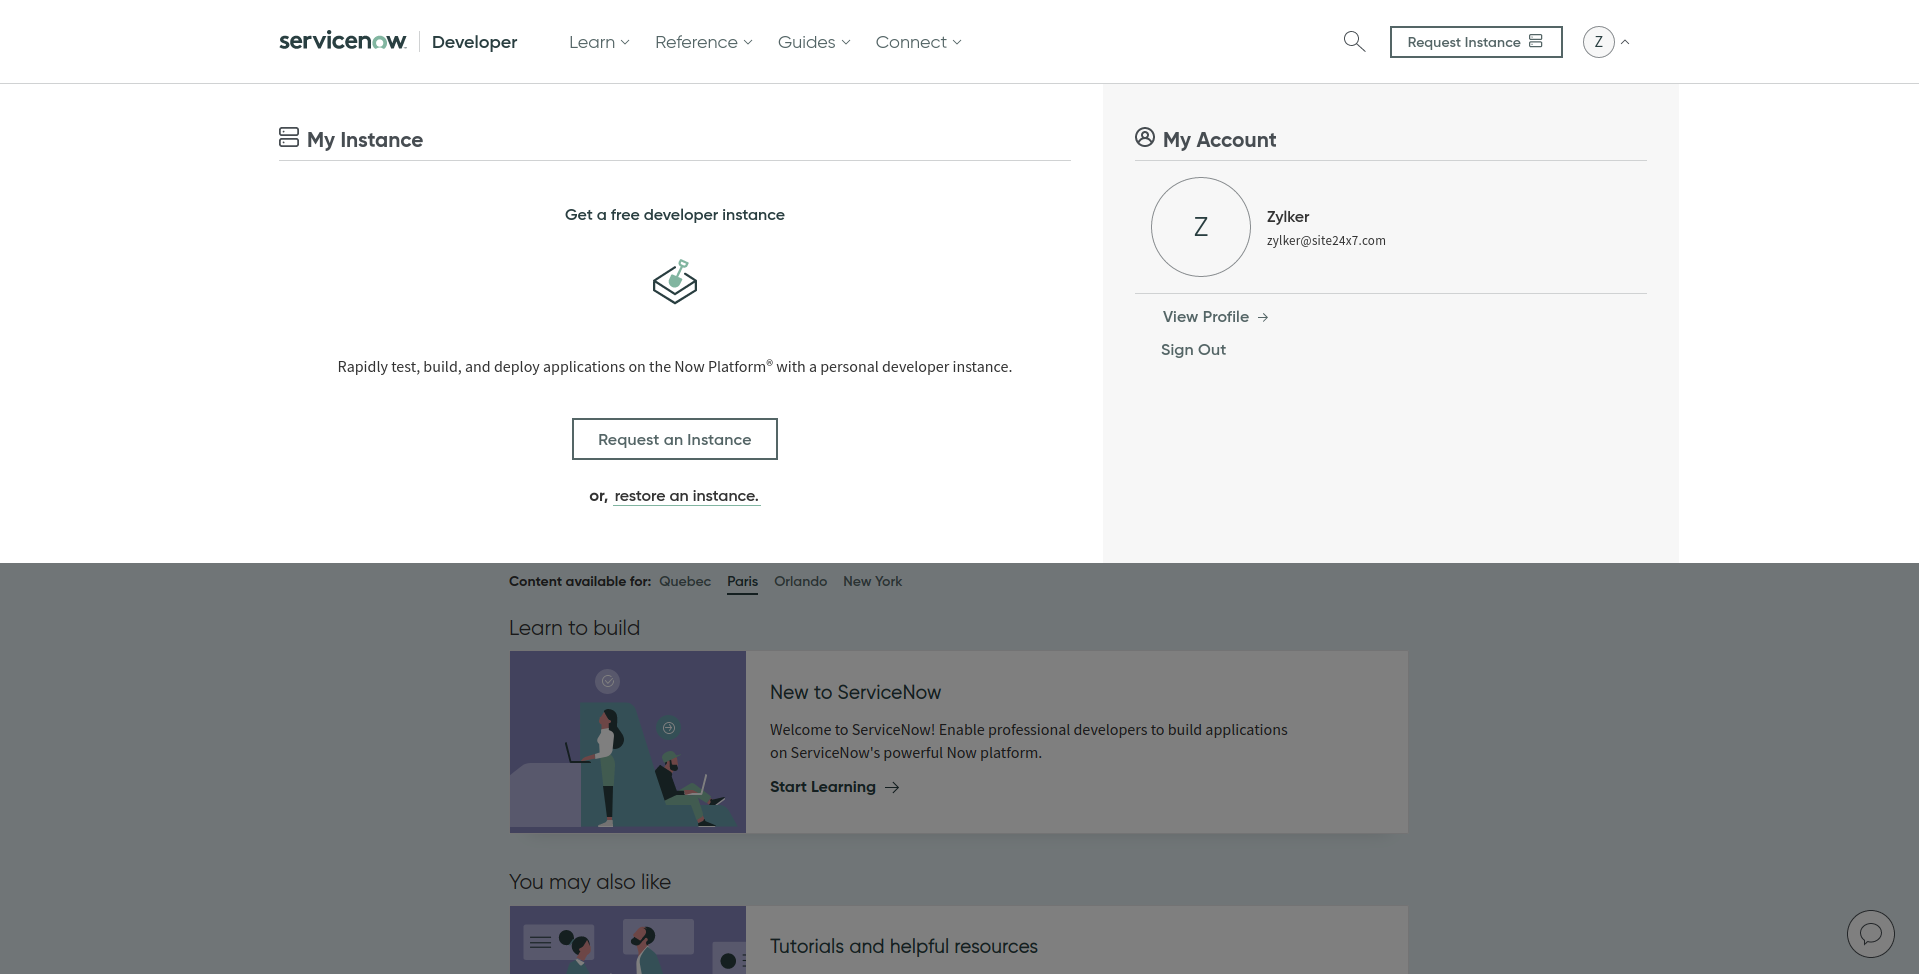
- Log in to the Developer Portal of ServiceNow account.
- Once logged in, click Request Instance button.
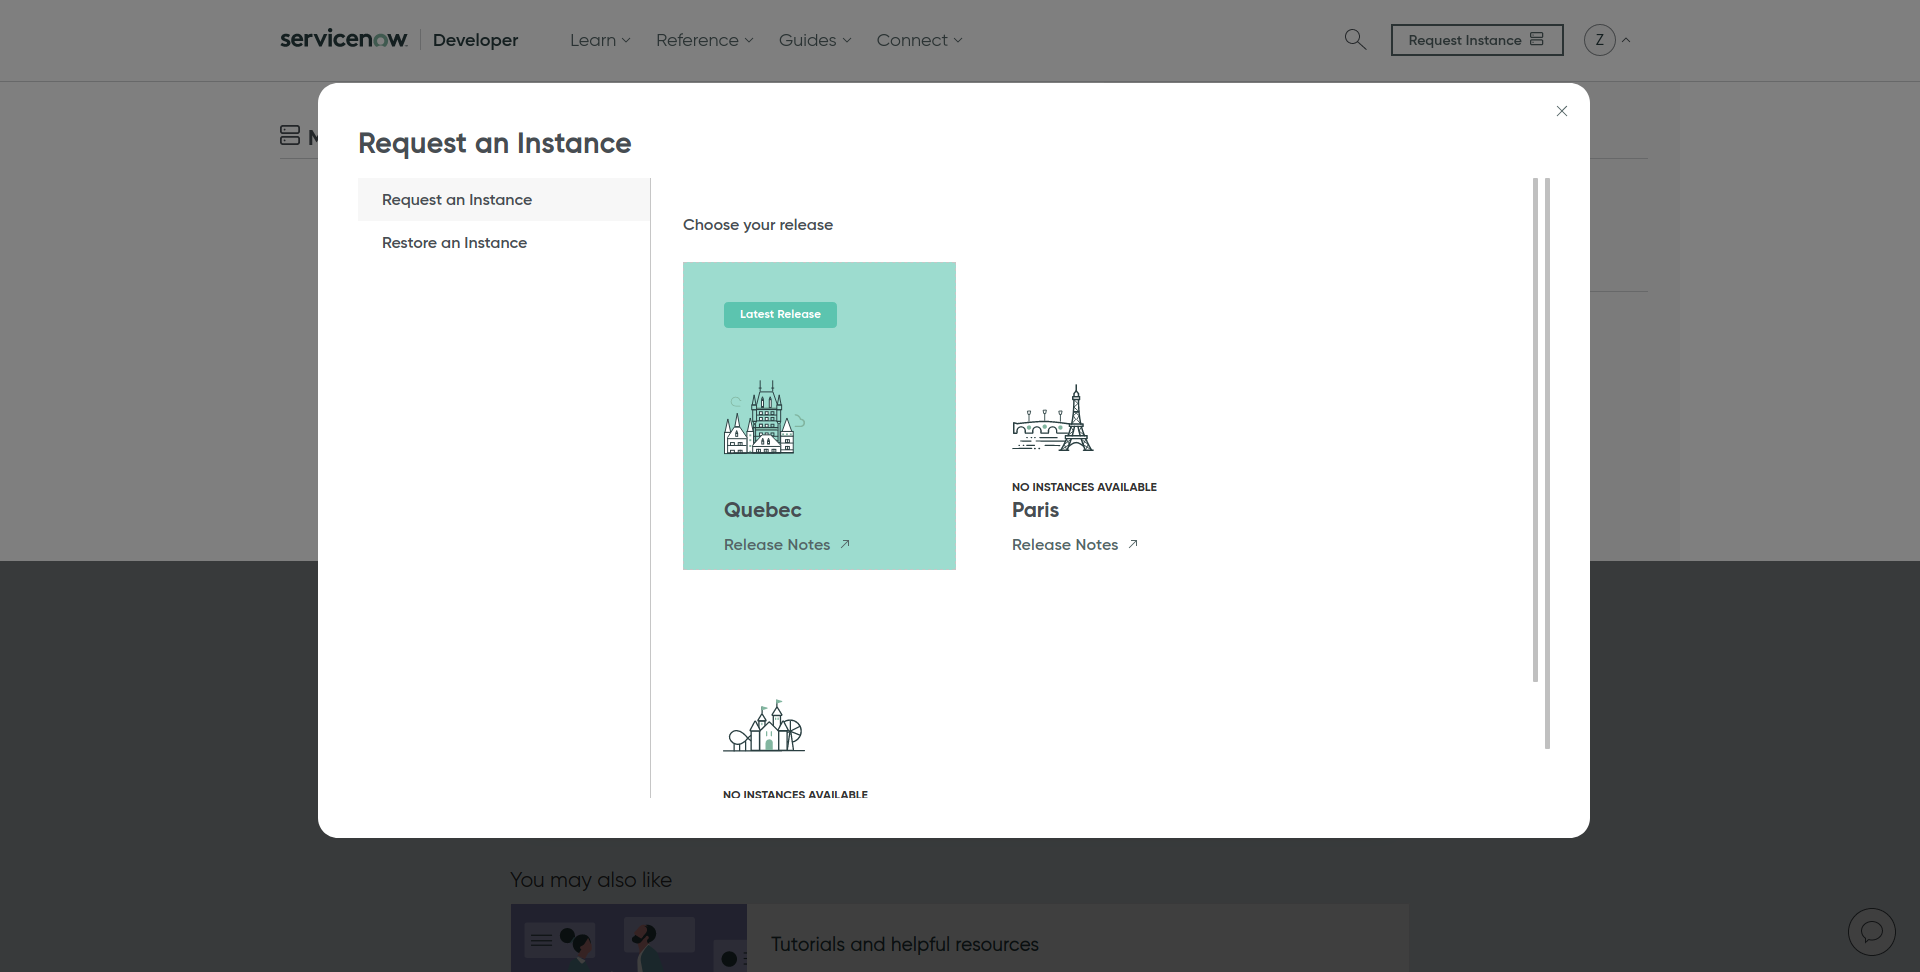
- In the Request an Instance pop-up that opens, choose the release of your preference and click Request Instance.
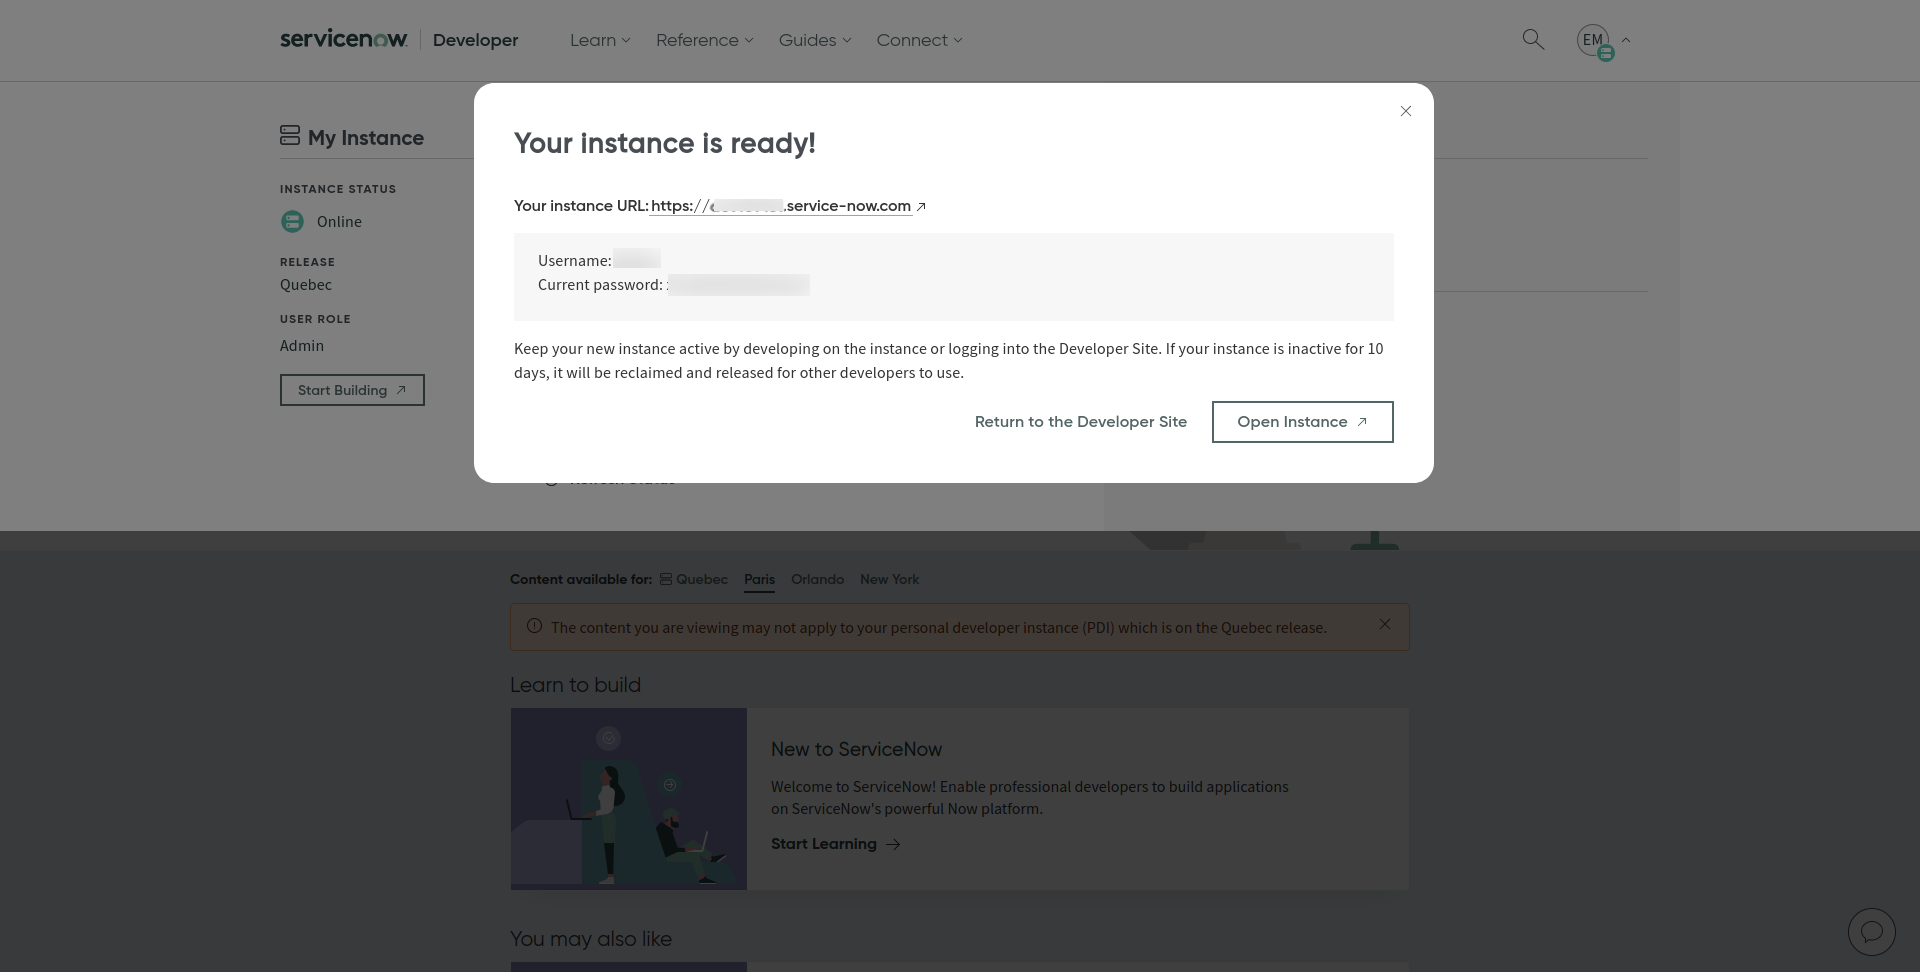
- Once your ServiceNow instance is created, you'll be provided with a unique Instance URL and the credentials to access the instance. You must copy and retain the Instance URL and Instance Login credentials for the integration.
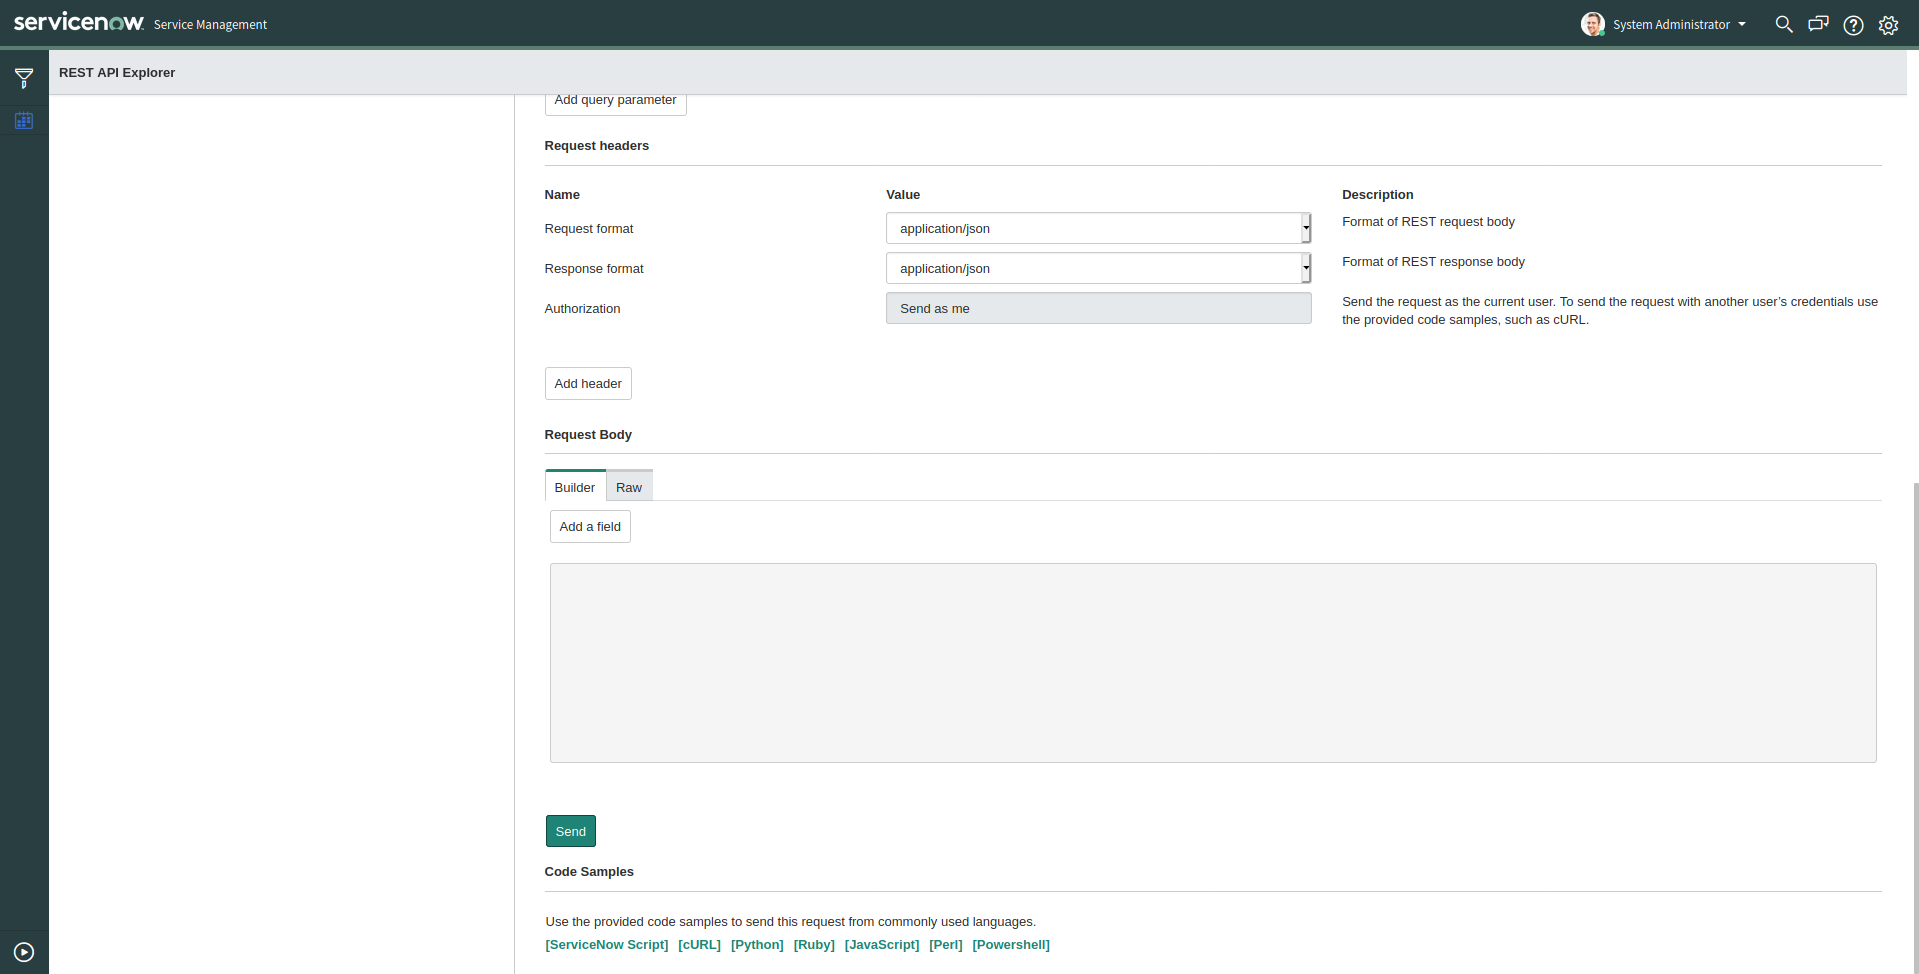
- You can access the Instance URL to view the Service Management portal. In the Service Management portal, you can quickly construct your requests to access the ServiceNow inbound REST API. You can use this data to build REST requests for integrations. Additionally, you can use the Table information from your instance to provide a list of endpoints, methods, and variables.
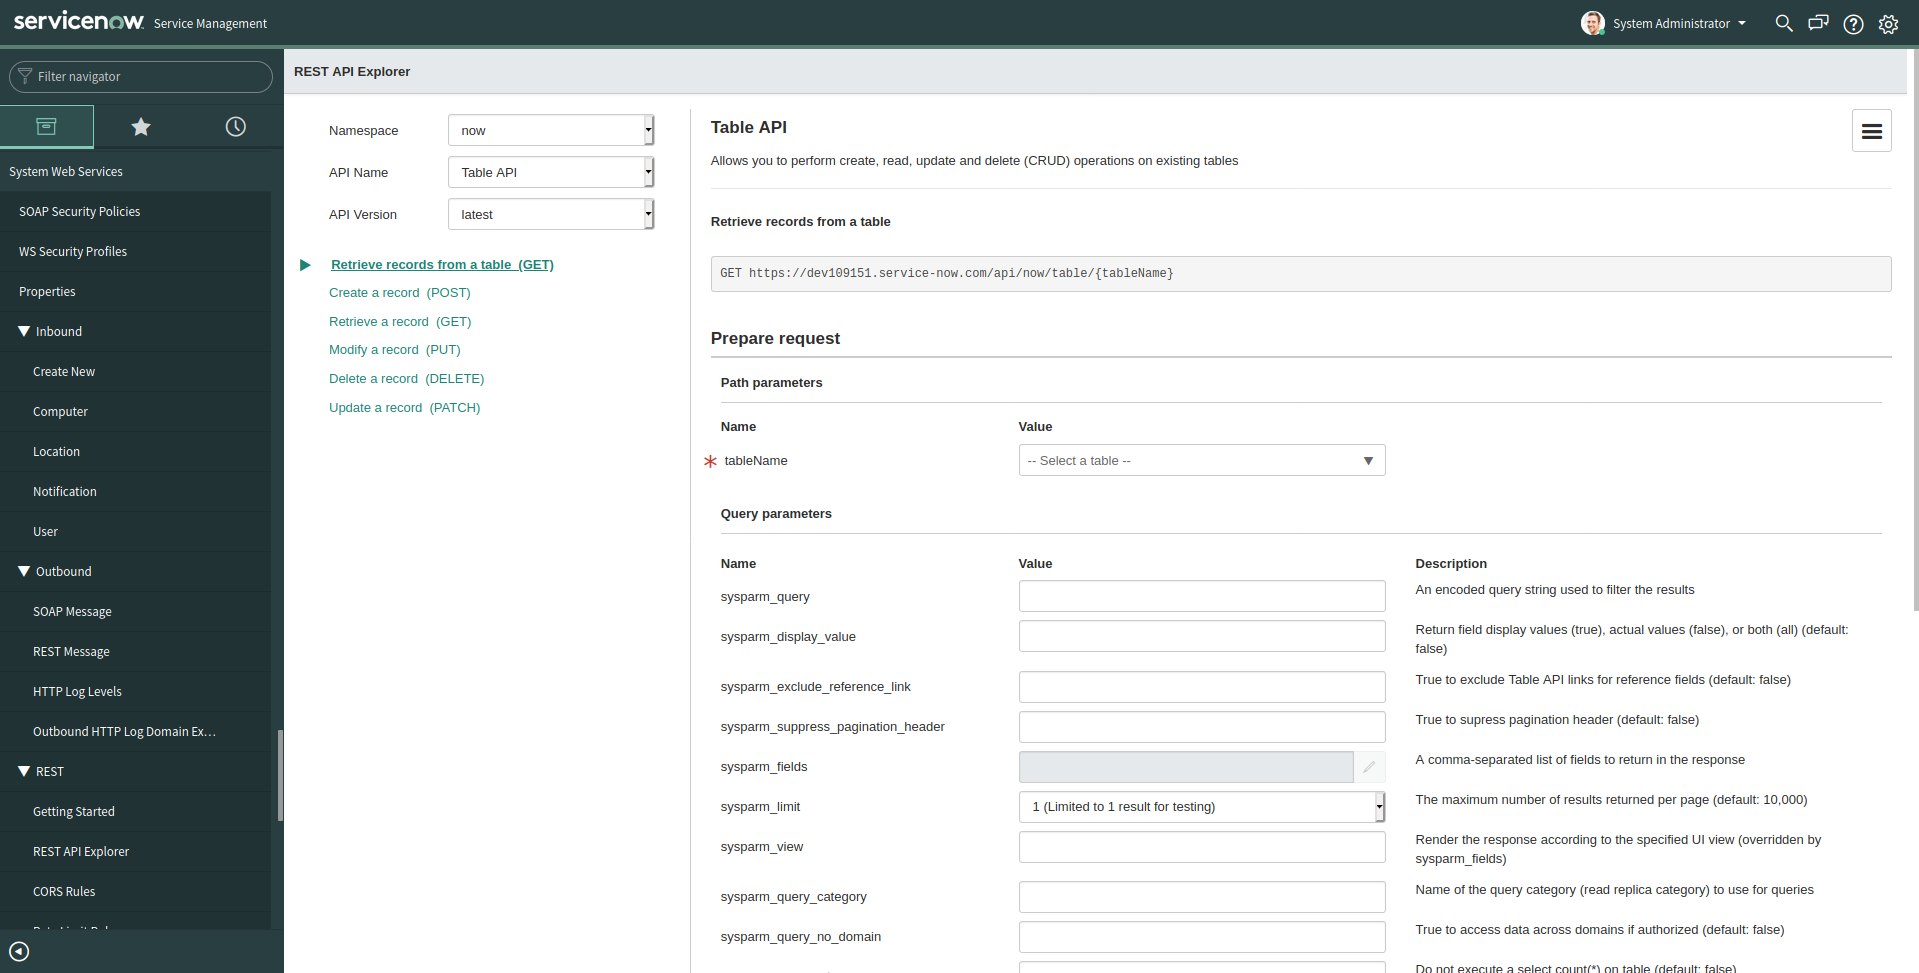
- The Table API Allows you to perform CRUD operations on existing tables so you can generate custom parameters using the Request Body builder.
Integration Procedure
To connect your Site24x7 account to ServiceNow, follow the steps below:
- Log in to Site24x7.
- Navigate to Admin > Third-Party Integration.
- Choose ServiceNow from the list of integrations.
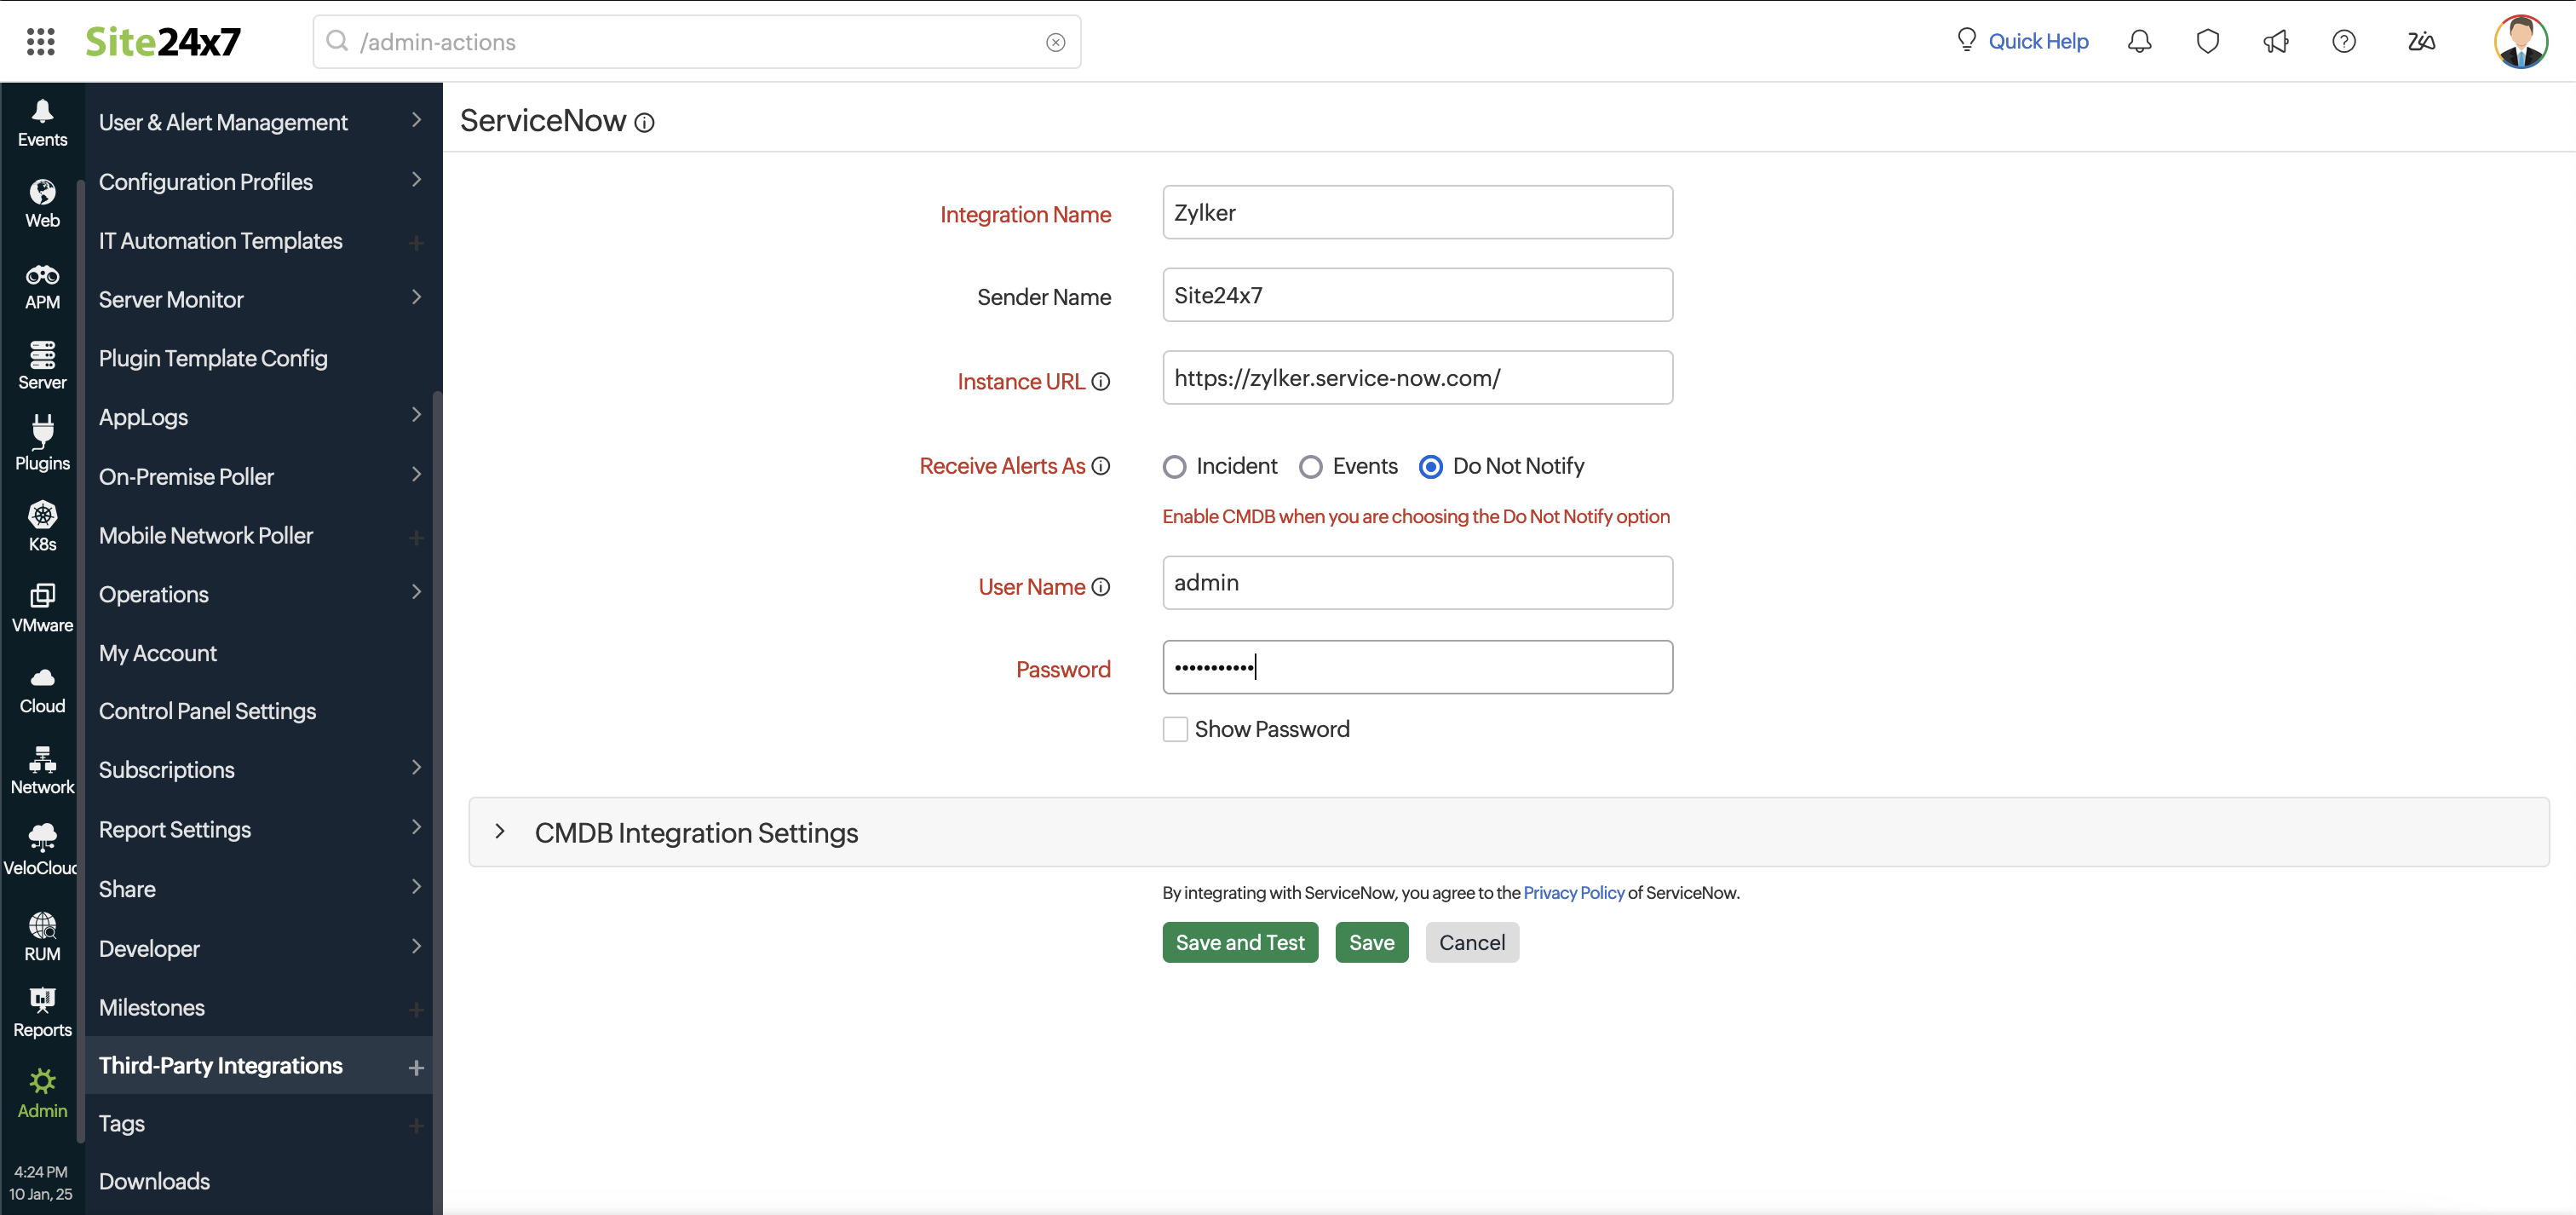
- You will be redirected to the ServiceNow integration page. Fill out the integration form as follows:
- Integration Name: Provide a name for your ServiceNow Integration
- Sender Name: Specify the User ID or User Name from the ServiceNow portal.
- Instance URL: Specify the Instance URL used to access the ServiceNow IT Service Management portal (eg: https://zylker.service-now.com). Learn how to generate your Instance URL.
- Receive Alerts As: Choose the format in which you want to receive alerts in ServiceNow. You can opt to receive them as Incidents, Events, or Do Not Notify.
- An Incident refers to an unplanned disruption or service failure that must be resolved to restore normal operations.
- An Event is a notification or signal from monitoring tools that indicate changes or issues, which may lead to the creation of an incident if necessary.
- The Do Not Notify option turns off all notifications. This option is mainly used by customers who want to work with the configuration management database (CMDB) in ServiceNow.
When you select this option, all fields related to alerts will be hidden. You can then directly input the CMDB integration settings and save the integration.
 Note
NoteEnable Mapping for Attribute Alerts With the ServiceNow Assignment Group drop-down will be available only to events-enabled users.
- User Name: Provide the user name to access your ServiceNow instance.
- Password: Provide the password to access your ServiceNow instance.
-
Note
Learn how to obtain the User Name and Password for your ServiceNow Instance.
- Remotely Manage Incident in ServiceNow When My Monitor Status Changes to Up: Select any one action among No Action, Resolve Incident, Close Incident, and Custom Status to remotely manage incidents in ServiceNow.
-
- No Action: The incident will remain open until you manually resolve or close it.
- Resolve Incident: The incident will be resolved automatically when the monitor status changes to Up.
- Close Incident: The incident will be closed automatically when the monitor status changes to Up.
- Custom Status: The incident status will be updated to the custom state of your preference when the monitor status changes to Up. You can also use Global Parameters (using $).
-
- Message Title: Use the $ tags to customize the message title of your Site24x7 notification messages. Learn more about incident parameters.
- Send Custom Parameters: Write specific code to pass parameters in the format Param name=value pair for your HTTP CRUD methods. If you want to pass multiple key-value pairs, you must specify each pair one-per-line. You cannot pass the parameters in JSON format. Learn how to generate your custom parameters in ServiceNow.
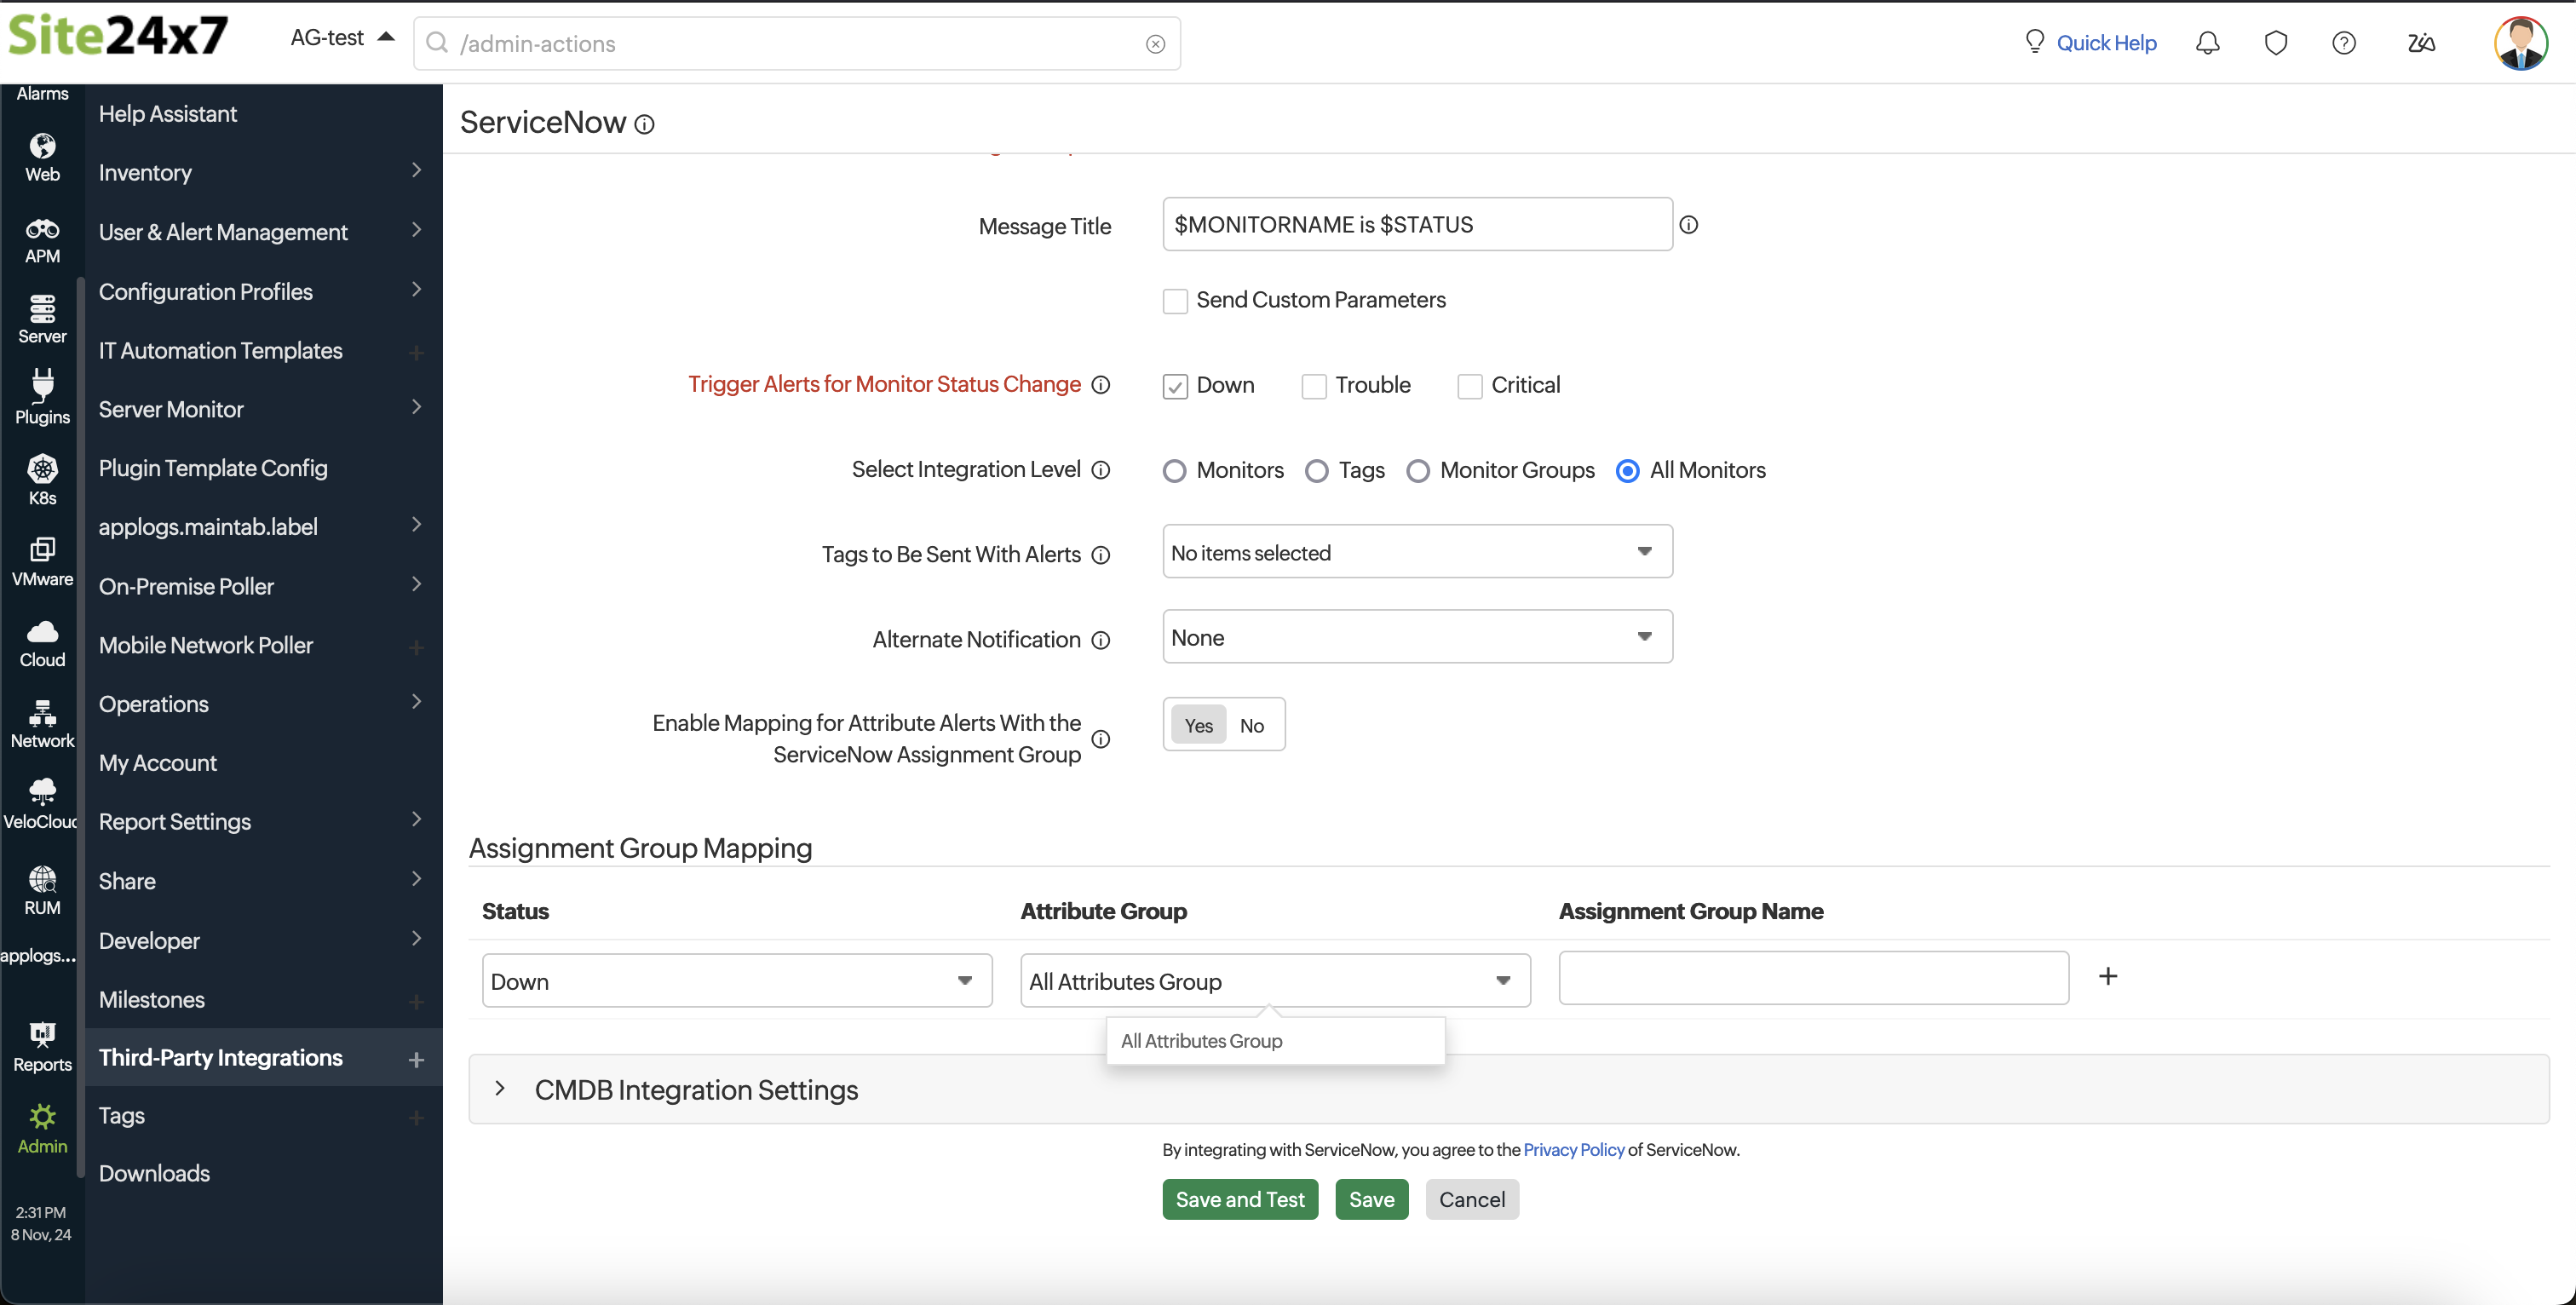
- Trigger Alerts for Monitor Status Changes: Use the check boxes to select the monitor status changes (Down, Trouble, or Critical) for which you want to receive alerts.
- Select Integration Level: Select an option to post alerts as ServiceNow incidents from specific monitors, all monitors and monitor groups associated with selected tags, or all monitors in your account. The integration level is set to All Monitors by default, thus translating into a global integration where all alarms from your Site24x7 account are pushed to ServiceNow.
Note
For tags associated with your monitor groups that have parent monitors and sub-group monitors, only alerts from the parent monitors will get logged as ServiceNow incidents.
- Tags to Be Sent With Alerts: Select the tag keys associated with the monitor that need to be sent with alerts. When an alert is triggered, tags that match the monitor will be included in the alert notifications. If no tags are selected, all the tags associated with the monitor will be present in the alert notifications.
- Alternate Notification Medium: Select an option so that if the primary third-party notification medium for sending alerts encounters an issue, an alternative notification medium will be activated to ensure that alerts are not missed.
- Enable Mapping for Attribute Alerts With the ServiceNow Assignment Group: Toggle to Yes to activate the attribute group feature. This will allow you to assign a group to a ticket in ServiceNow based on its status: Trouble, Critical, or Down. You can add multiple attribute groups, but no two groups can have the same status. By default, this field is set to No. Toggling to Yes displays the fields below:
- Status : Select the status from the drop-down list.
- Attribute Group : Select the attribute group that needs to be assigned to the ticket from the drop-down list.
- Assignment Group Name : Provide an assignment group name for the selected attribute group based on its status.
NoteEach status can be assigned to an attribute group, but each status can only belong to one group at a time.
-
Click the Save and Test button to save the integration and receive a test alert. Alternatively, click the Save button to finish the integration.
Handle Incidents in ServiceNow IT Service Management Platform
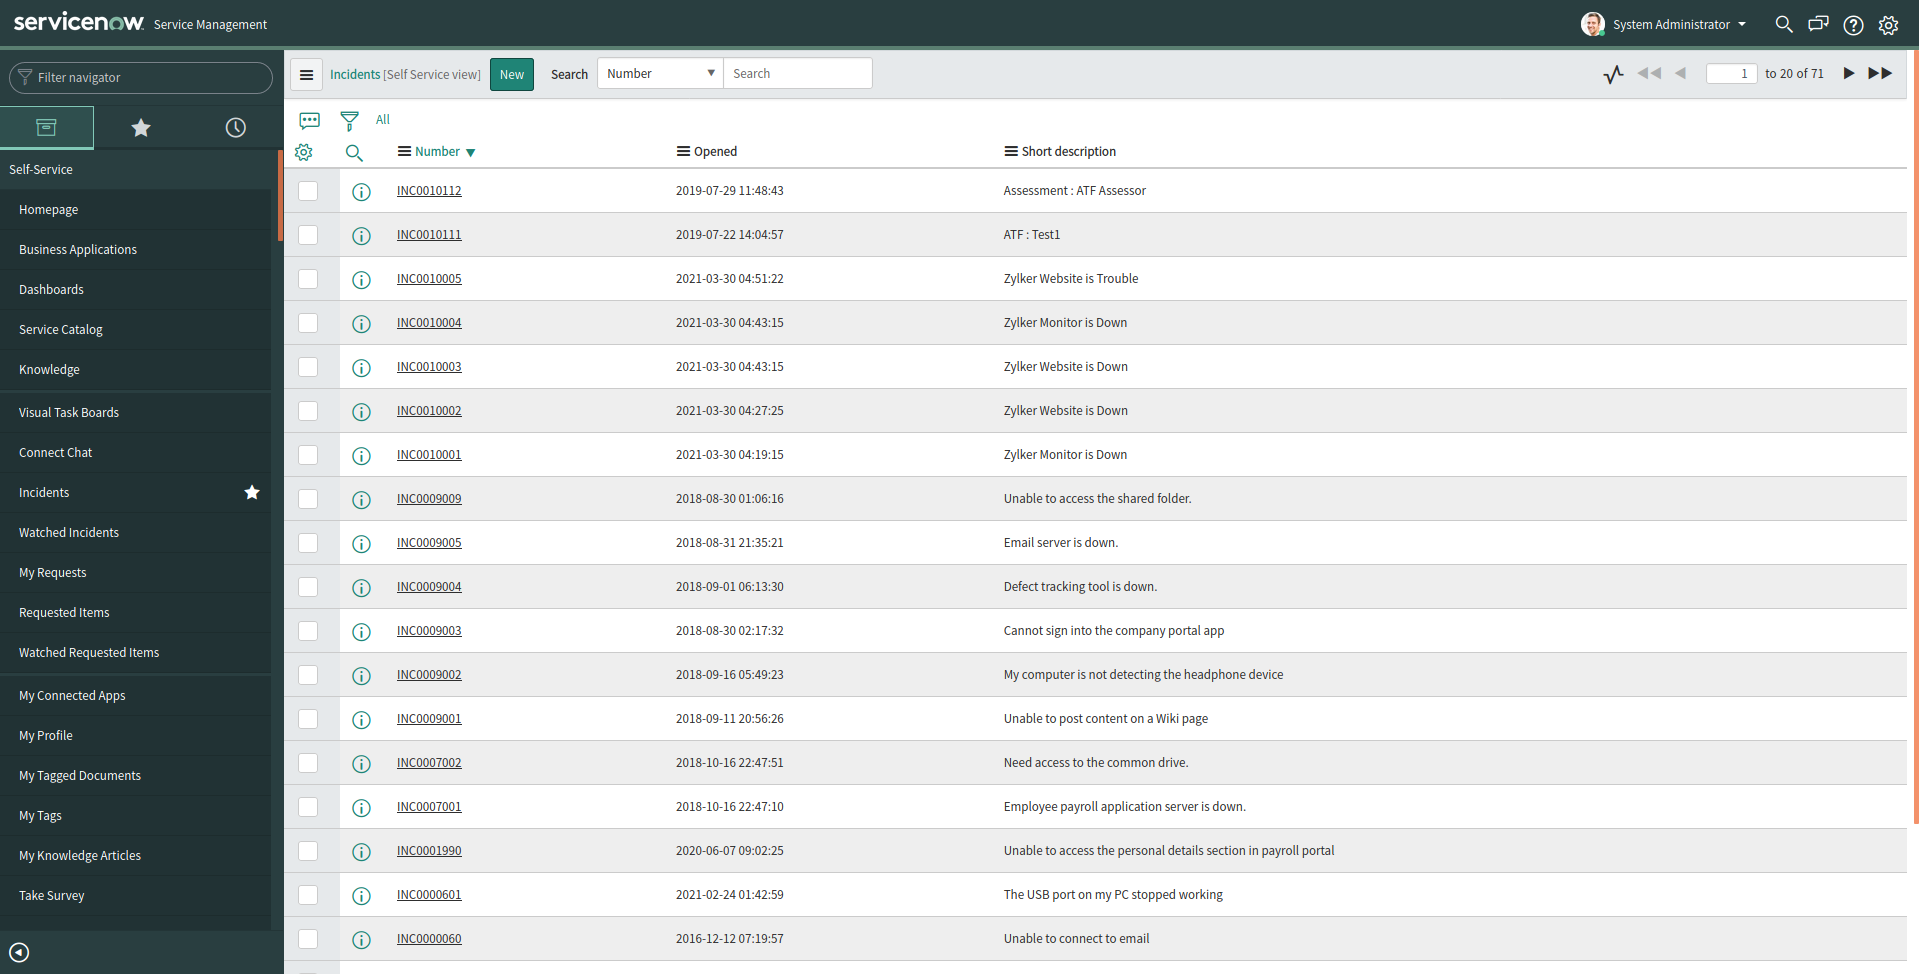
Once you've integrated your Site24x7 account with ServiceNow's ITSM Platform, you'll be able to view all your incident tickets in a single dashboard inside the ServiceNow portal. By using the Filter Navigator icon on the left side panel of your ServiceNow portal, you can access the following views:
- Incident - All: View all the logged incidents in a single dashboard view.
- Incident - Open: View all the Open incidents in a single dashboard view.
- Incident - Resolved: View all the resolved incidents in a single dashboard view.
- Change - Closed: View all the closed incidents in a single dashboard view.
| Site24x7 Alert Status | ServiceNow Incident Status |
| Down |
Alert creates incident in ServiceNow portal |
| Trouble |
Alert creates incident in ServiceNow portal. This depends |
| Trouble monitor turns Down |
Trouble alert creates incident in ServiceNow portal. |
| Down/Trouble monitor turns UP |
Incident is automatically resolved/closed inside the |
| Down/Trouble monitor is suspended |
Incident remains open inside ServiceNow portal, until the |
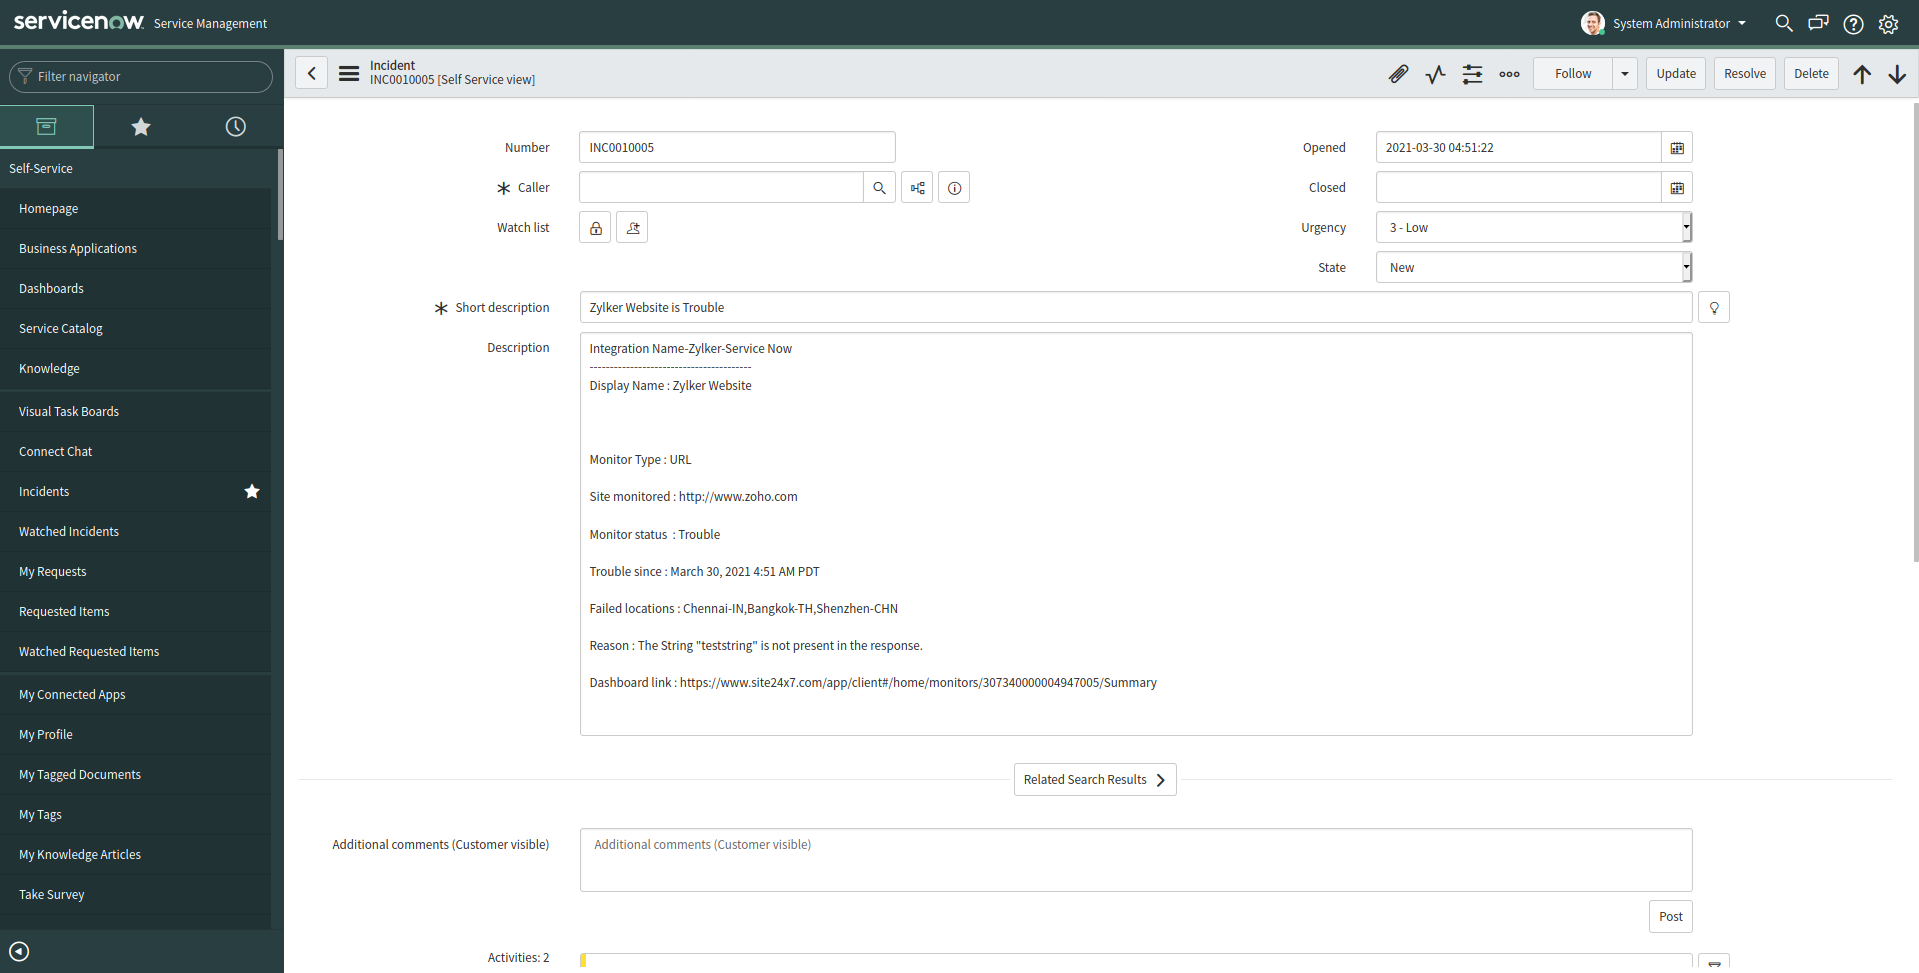
Fig. 2: Incident Status - Fresh incident logged when monitor is down
During a Site24x7 monitor outage, an incident is logged in ServiceNow portal, where details like Display Name, Monitor Type, Site Monitored, Monitor Status, Outage Status Since, Failed Locations, Reason, and the Dashboard link are provided in the description card.
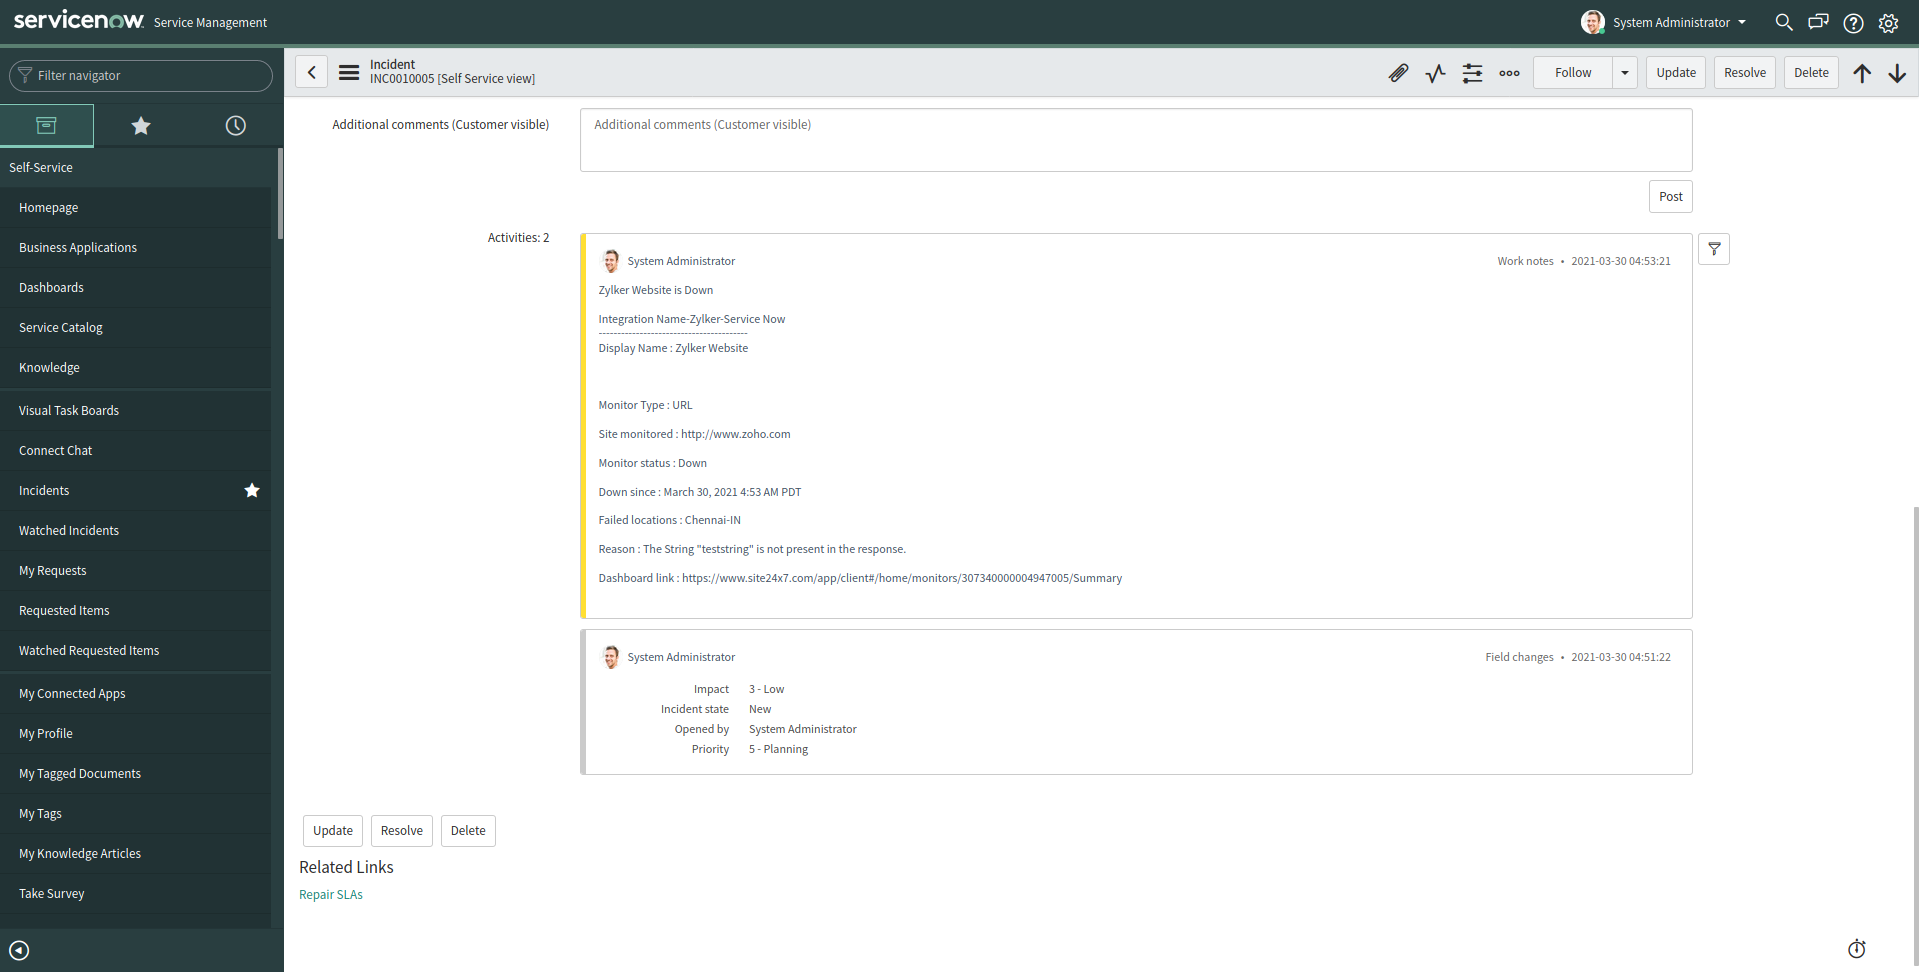
Fig. 3: Incident Status - Incident log when the monitor's status changes from Trouble > Down > Closed
Binding alerts to a host configuration item (CI) in ServiceNow
You can now bind alerts within a specific integration to a CI in ServiceNow for easy event remediation. To bind alerts, you need to create event rules in ServiceNow.
To create the event rules, you can refer to the ServiceNow help documentation.
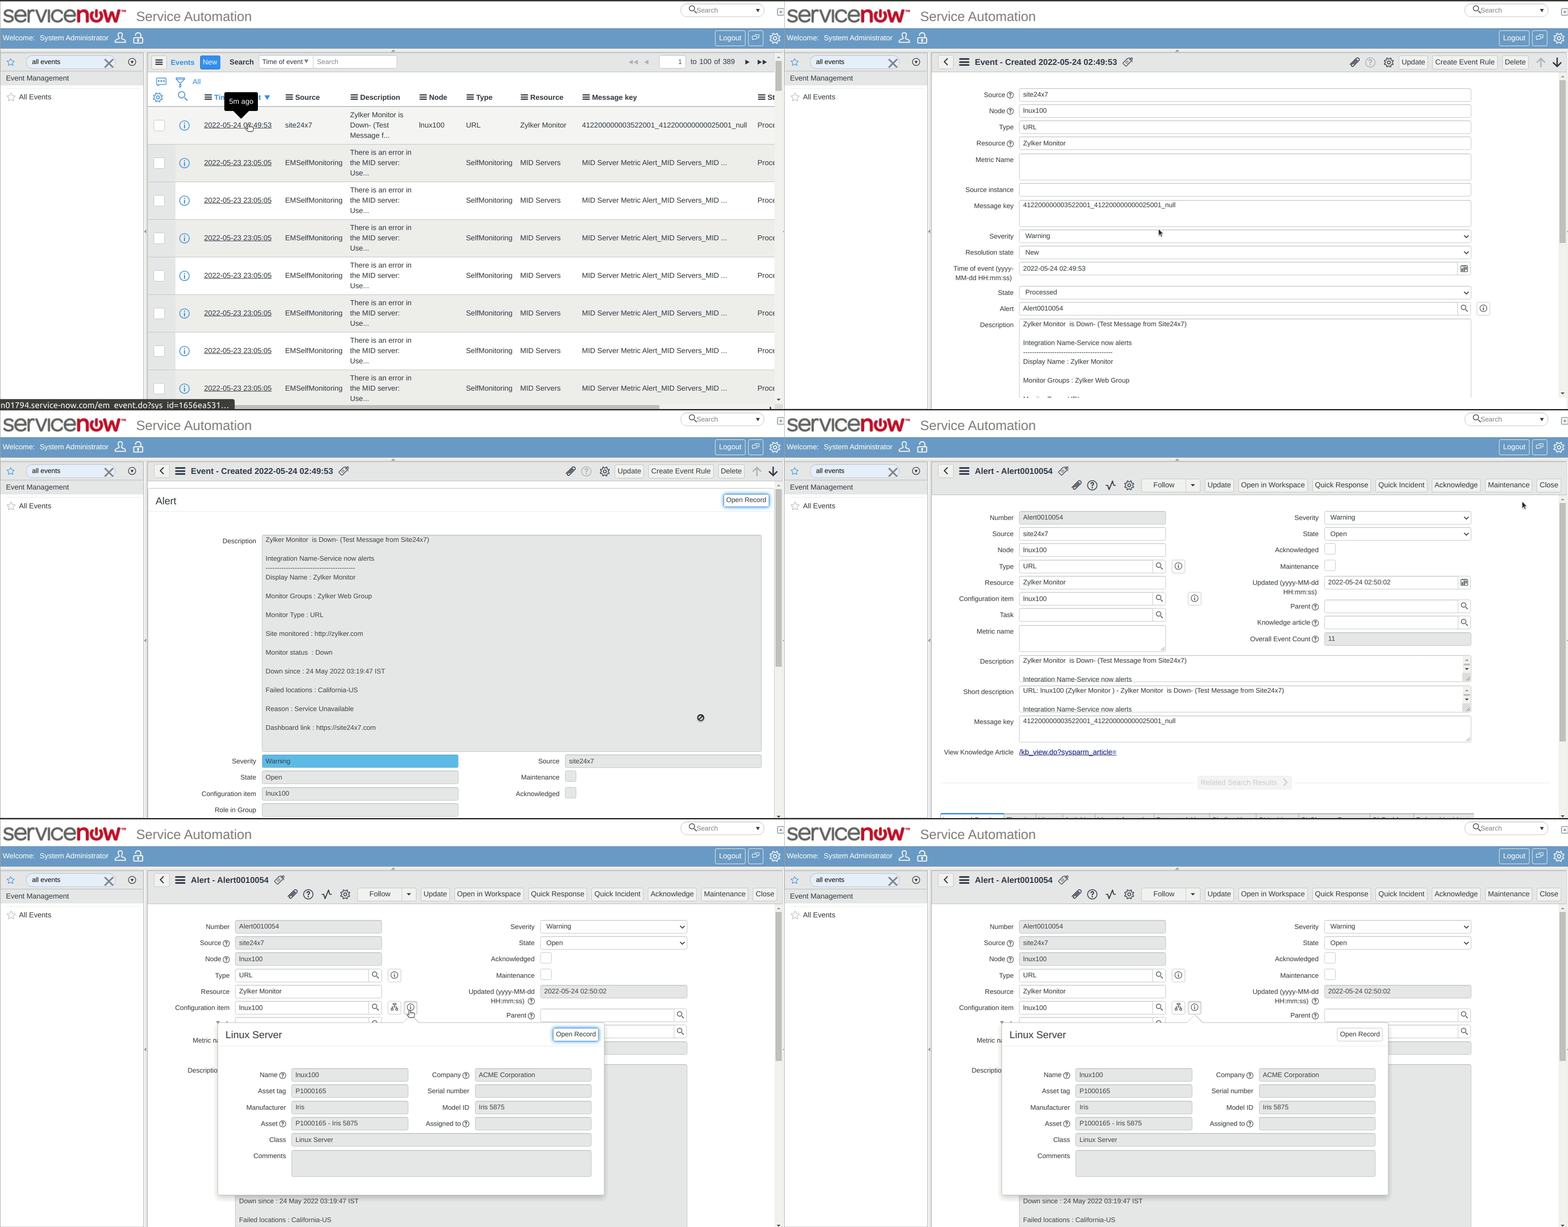
An event created will bind to an alert which will be bound to a CI using the node value. The node value should be the CI name.
By default, the URL of the associated monitor is the node value. To change this node value:
- Log in to Site24x7.
- Navigate to Admin > Third-Party Integrations > click the ServiceNow integration you've created.
- In the form that opens, enable the checkbox next to Send Custom Parameters and provide the node value from ServiceNow in the text box below.
- Click Save.
For instance, if you've configured the node value as 'lnux100' to be in sync with the CI name, then events and the alerts created will be bound to the CI 'lnux100'.
-
On this page
- Site24x7-ServiceNow Integration for Monitoring Servers and Applications
- Site24x7-ServiceNow Integration for Managing Tickets
- Features
- Prerequisites
- Creating an Instance in ServiceNow
- Integration Procedure
- Handle Incidents in ServiceNow IT Service Management Platform
- Binding alerts to a host configuration item CI in ServiceNow
