Enable access to your AWS account
Site24x7 provides comprehensive monitoring and alerting for your IaaS and PaaS services powering your cloud application.
Monitor resource usage for key AWS resources, gain more insight into your EC2 ecosystem by combining infrastructure metrics from CloudWatch with the agent-driven system and application data and compliment metric data with dashboards, reports, policy-driven thresholds, integrated notification channels and more.
Supported regions
With Site24x7 you can monitor resource usage and performance of your PaaS services no matter where they are deployed in the AWS cloud.
- AWS Global Region
- AWS GovCloud(US)
- AWS China Region
Supported AWS services
Currently we support monitoring for 60 and more AWS services as mentioned here.
Enable Site24x7 access to your AWS account
For a comprehensive AWS infrastructure monitoring, Site24x7 needs to auto discover all instances of various supported services currently running in your account. For this to happen you need to authenticate and authorize us to access your resource. To know more read below.
- Role ARN for cross-account access
- CloudFormation IAM role-based access
- AWS Control Tower lifecycle events-based access
- AWS IAM Identity Center-based access
- Delegated Admin-based access
- Create access keys for IAM user
Before your begin
Make sure you have administrative level access in the AWS console to create to create IAM roles.
Role ARN for cross-account access
You can securely connect your AWS account with Site24x7, create an IAM role, establish a trust relationship, and enable cross-account access between your AWS account and Site24x7's AWS account.
- If you wish to monitor services in AWS GovCloud (US) or China Region, sign in to their respective management console and open the IAM console.
- Site24x7's AWS account ID may vary depending upon where the cloud resources powering your deployments are located (Global, GovCloud (US) and China). To view the Account ID, log in to the Site24x7 console, select AWS > Integrate AWS Account. Here, select the appropriate Account Type and scroll down the Register with IAM role section to copy the 12-digit number.
- To get your External ID, log in to the Site24x7 console, select AWS > Integrate AWS Account. Here, select the appropriate Account Type (Global, GovCloud US or China) and scroll down the Register with IAM role section to copy the unique ID generated.
- The External ID is an unique customer identifier and is regenerated every time you navigate to the Integrate AWS Account form. So, make sure you paste the correct External ID while establishing trust.
- For discovery to occur, you need to provide ReadOnly permissions for all the AWS services you've selected in the Services to be discovered field.
Watch the video below, which explains how to connect your AWS account with Site24x7 using IAM role.
Prerequisite
Ensure that you have the required policies for Site24x7. If not, create your own policy before you create an IAM role.
Create a custom policy
To do create and attach a custom policy to the cross-account IAM role, follow the steps mentioned below:
- Navigate back to the AWS IAM console.
- Select Access Management > Policies from the left navigation pane.
- Click Create policy.

- Choose the JSON tab and delete the existing JSON policy snippet.
- Copy and paste the JSON policy shown below in the JSON tab.
This policy was last updated on November 11, 2025.{ "Version":"2012-10-17", "Statement":[ { "Sid":"Statement1", "Effect":"Allow", "Action":[ "cloudwatch:Describe*", "cloudwatch:Get*", "cloudwatch:List*", "dynamodb:Describe*", "dynamodb:List*", "ec2:Describe*", "sqs:Get*", "sqs:List*", "autoscaling:Describe*", "elasticloadbalancing:Describe*", "cloudfront:Get*", "cloudfront:List*", "s3:Get*", "s3:List*", "rds:Describe*", "rds:List*", "kinesisanalytics:Describe*", "kinesisanalytics:Get*", "kinesisanalytics:List*", "kinesis:Describe*", "kinesis:Get*", "kinesis:List*", "kinesisvideo:Get*", "kinesisvideo:List*", "kinesisvideo:Describe*", "firehose:Describe*", "firehose:List*", "elasticache:Describe*", "elasticache:List*", "elasticbeanstalk:Describe*", "elasticbeanstalk:List*", "directconnect:Describe*", "apigateway:GET", "ecs:DescribeServices", "ecs:DescribeContainerInstances", "ecs:DescribeClusters", "redshift:Describe*", "elasticfilesystem:Describe*", "ses:Get*", "ses:List*", "ses:Describe*", "lambda:List*", "lambda:Get*", "logs:Describe*", "logs:Get*", "route53domains:Get*", "route53domains:List*", "route53:Get*", "route53:List*", "route53resolver:Get*", "route53resolver:List*", "states:List*", "states:Describe*", "states:GetExecutionHistory", "sns:Get*", "sns:List*", "kms:Describe*", "kms:Get*", "kms:List*", "waf:Get*", "waf:List*", "waf-regional:List*", "waf-regional:Get*", "cloudsearch:Describe*", "cloudsearch:List*", "es:Describe*", "es:List*", "es:Get*", "workspaces:Describe*", "ds:Describe*", "elasticmapreduce:List*", "elasticmapreduce:Describe*", "acm:GetCertificate", "acm:Describe*", "acm:List*", "lightsail:Get*", "eks:Describe*", "eks:List*", "mq:Describe*", "mq:List*", "ec2:Get*", "ec2:SearchTransitGatewayRoutes", "ec2:SearchTransitGatewayMulticastGroups", "storagegateway:List*", "storagegateway:Describe*", "guardduty:GetFindings", "guardduty:ListDetectors", "guardduty:ListFindings", "dms:Describe*", "dms:List*", "dms:TestConnection", "fsx:Describe*", "fsx:ListTagsForResource", "inspector:List*", "inspector:Describe*", "transfer:Describe*", "transfer:List*", "ssm:ListCommands", "ssm:DescribeInstanceInformation", "ssm:ListCommandInvocations", "glue:List*", "glue:Get*", "appstream:Describe*", "appstream:List*", "appsync:List*", "appsync:Get*", "health:Describe*", "batch:Describe*", "batch:List*", "secretsmanager:DescribeSecret", "secretsmanager:ListSecrets", "secretsmanager:GetResourcePolicy", "support:DescribeTrustedAdvisorCheckResult", "support:DescribeTrustedAdvisorCheckSummaries", "support:DescribeTrustedAdvisorChecks", "kafka:ListClustersV2", "kafka:Describe*", "kafka:ListNodes", "kafka:ListReplicators", "kafkaconnect:List*", "kafkaconnect:DescribeConnector", "kafkaconnect:DescribeCustomPlugin", "kafkaconnect:DescribeWorkerConfiguration", "drs:Describe*", "drs:List*", "drs:Get*", "cognito-idp:List*", "cognito-idp:Describe*", "cognito-identity:List*", "cognito-identity:Describe*", "cognito-identity:GetIdentityPoolRoles", "logs:Start*", "organizations:List*", "organizations:Describe*", "logs:List*", "logs:GetDataProtectionPolicy", "logs:DescribeLogGroups", "logs:ListLogAnomalyDetectors", "logs:DescribeLogStreams", "logs:DescribeSubscriptionFilters", "logs:GetLogEvents", "logs:DescribeAccountPolicies", "logs:DescribeMetricFilters", "logs:DescribeFieldIndexes", "logs:ListTagsForResource", "dlm:GetLifecyclePolicies", "dlm:GetLifecyclePolicy", "ecr:DescribeRepositories", "ecr:ListTagsForResource", "ecr:DescribeImages", "ecr:DescribeRegistry", "ecr:DescribePullThroughCacheRules", "ecr:GetRepositoryPolicy", "ecr:GetLifecyclePolicy", "ecr:GetLifecyclePolicyPreview", "ecr-public:DescribeRepositories", "ecr-public:DescribeImages", "ecr-public:ListTagsForResource", "ecr-public:GetRepositoryPolicy" ], "Resource":[ "*" ] } ] }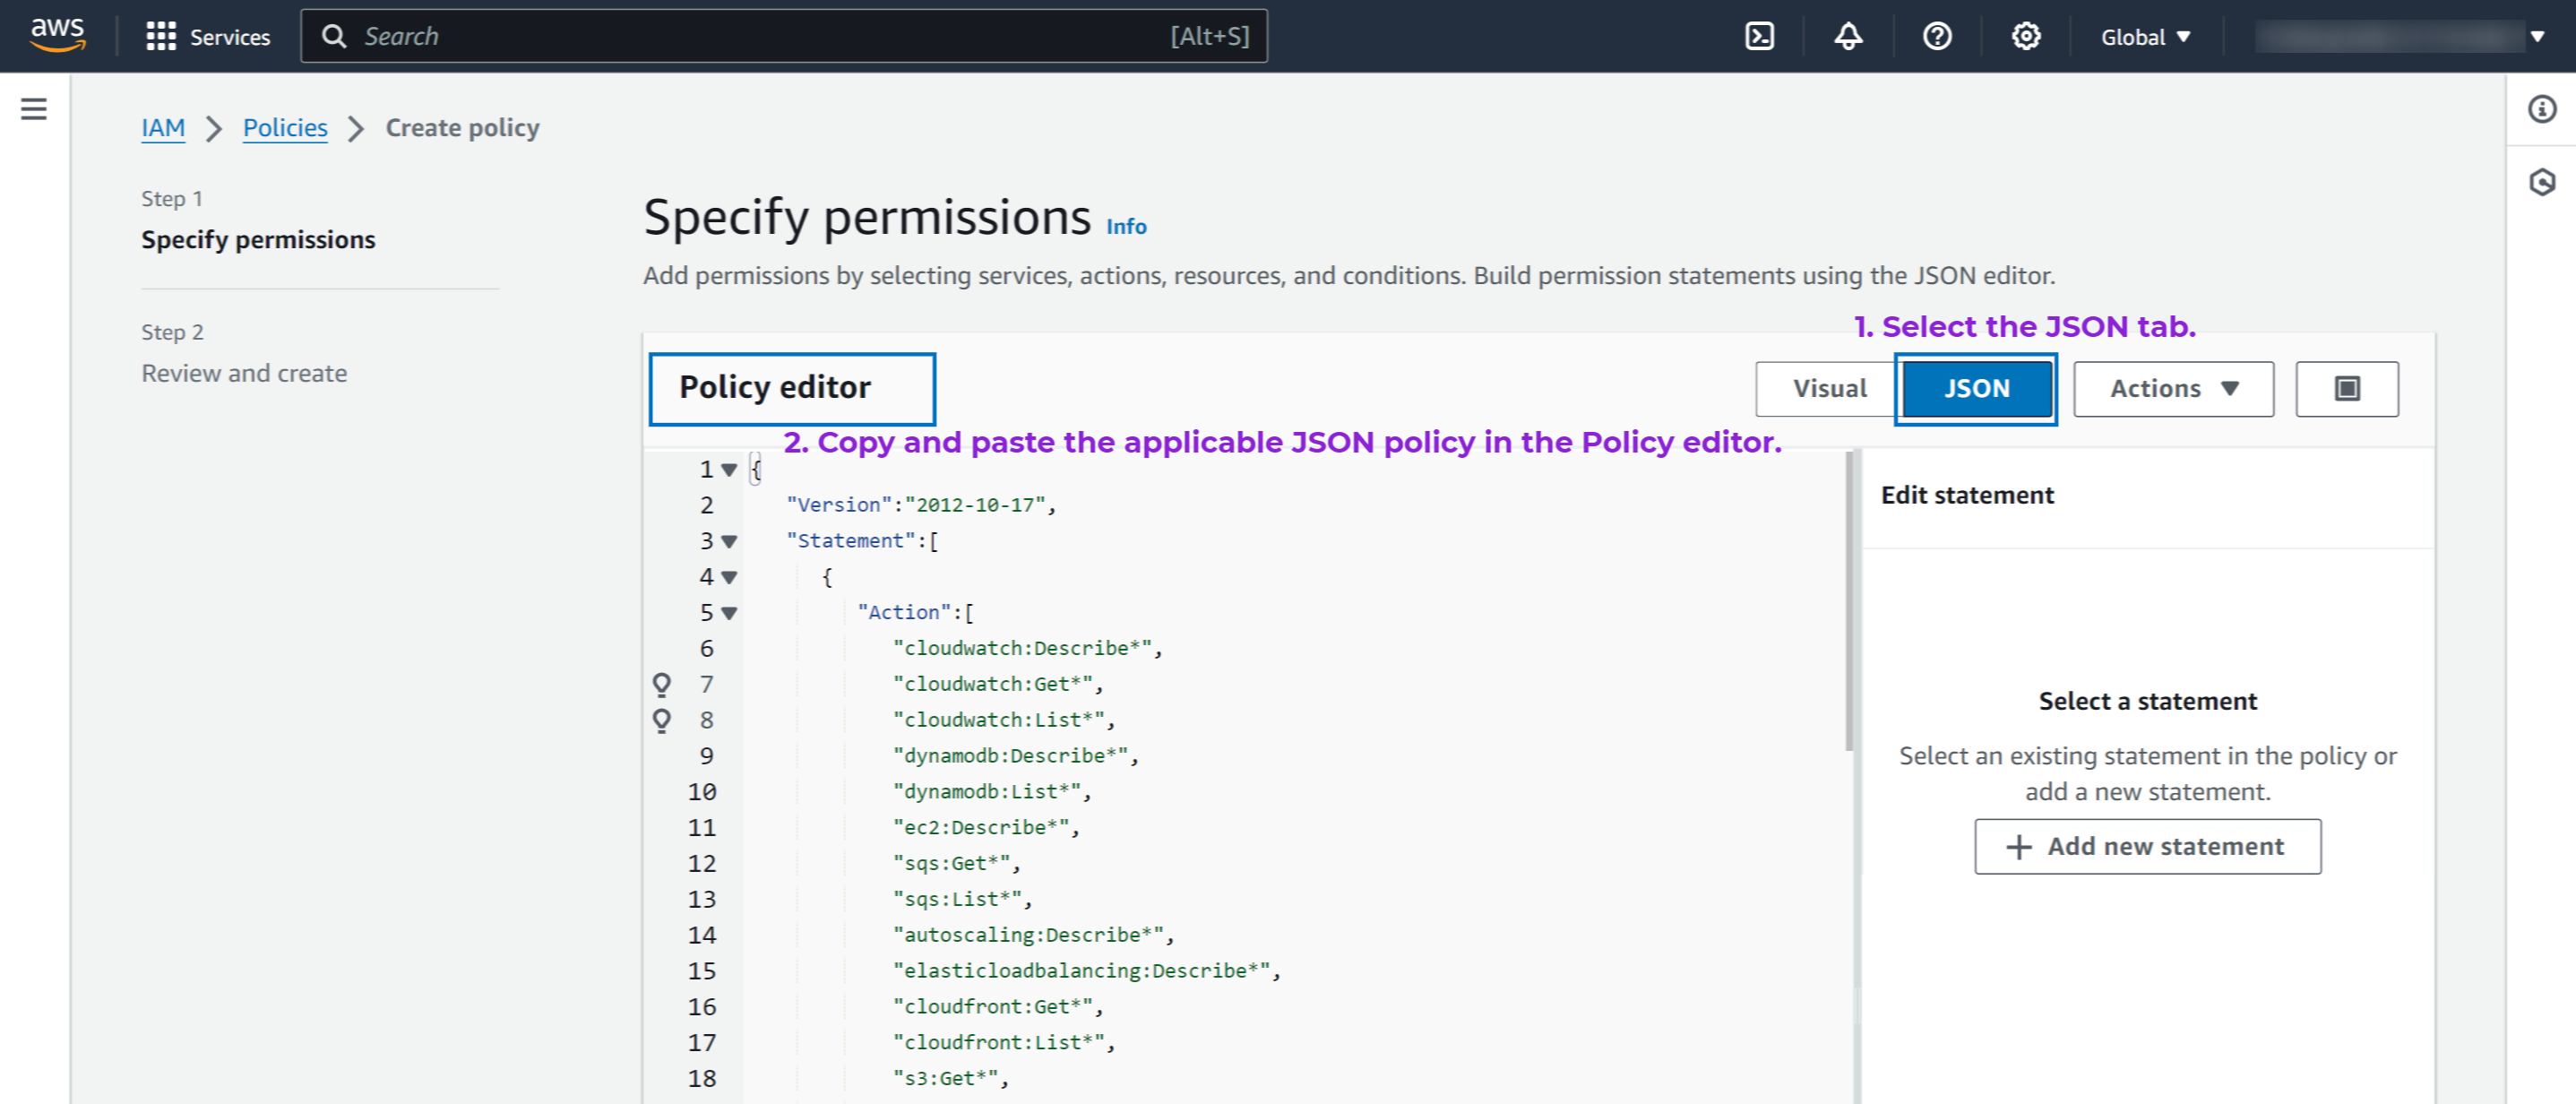
- Click Next.
- In the Review and create page, enter the Policy name and Description.
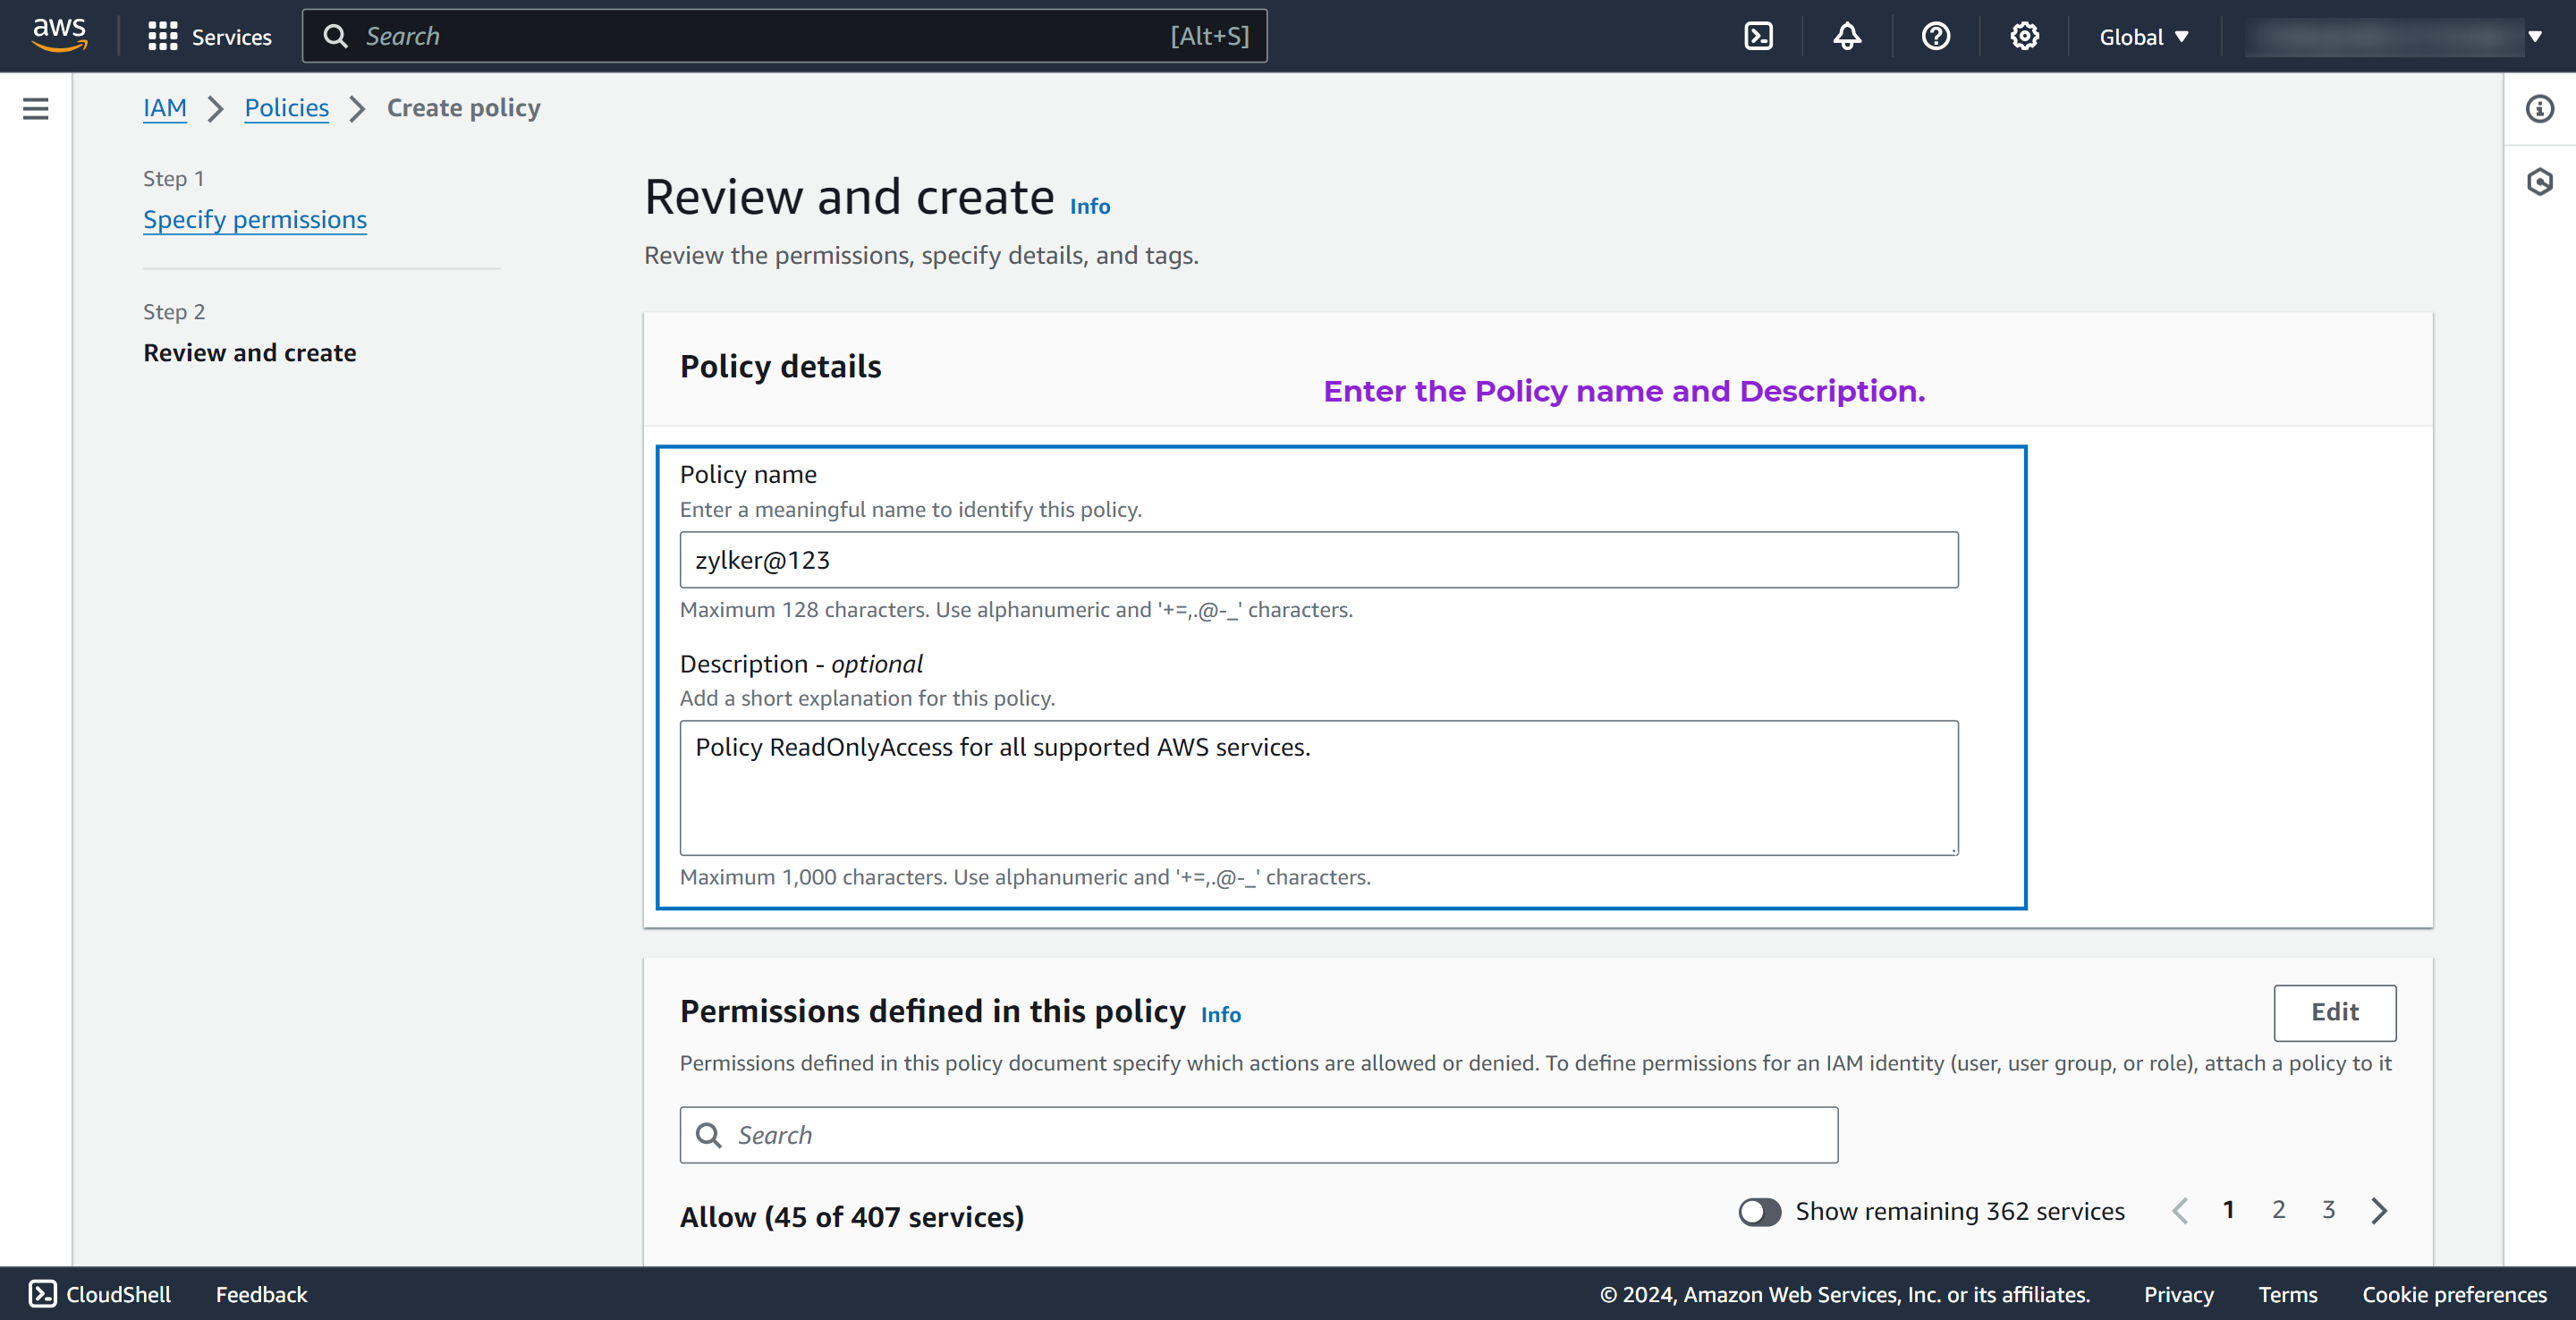
- Click Create policy.
- Follow the steps mentioned in the Step 1: Select trusted entities, Step 2: Add permissions, and Step 3: Name, review, and create sections below for creating a cross-account IAM role.
To create and enable cross-account access between your AWS account and Site24x7's AWS account follow the below steps:
Step 1: Select trusted entity
- Log in to the AWS Management Console and open the AWS IAM console.
- Select Access Management > Roles from the left navigation pane.
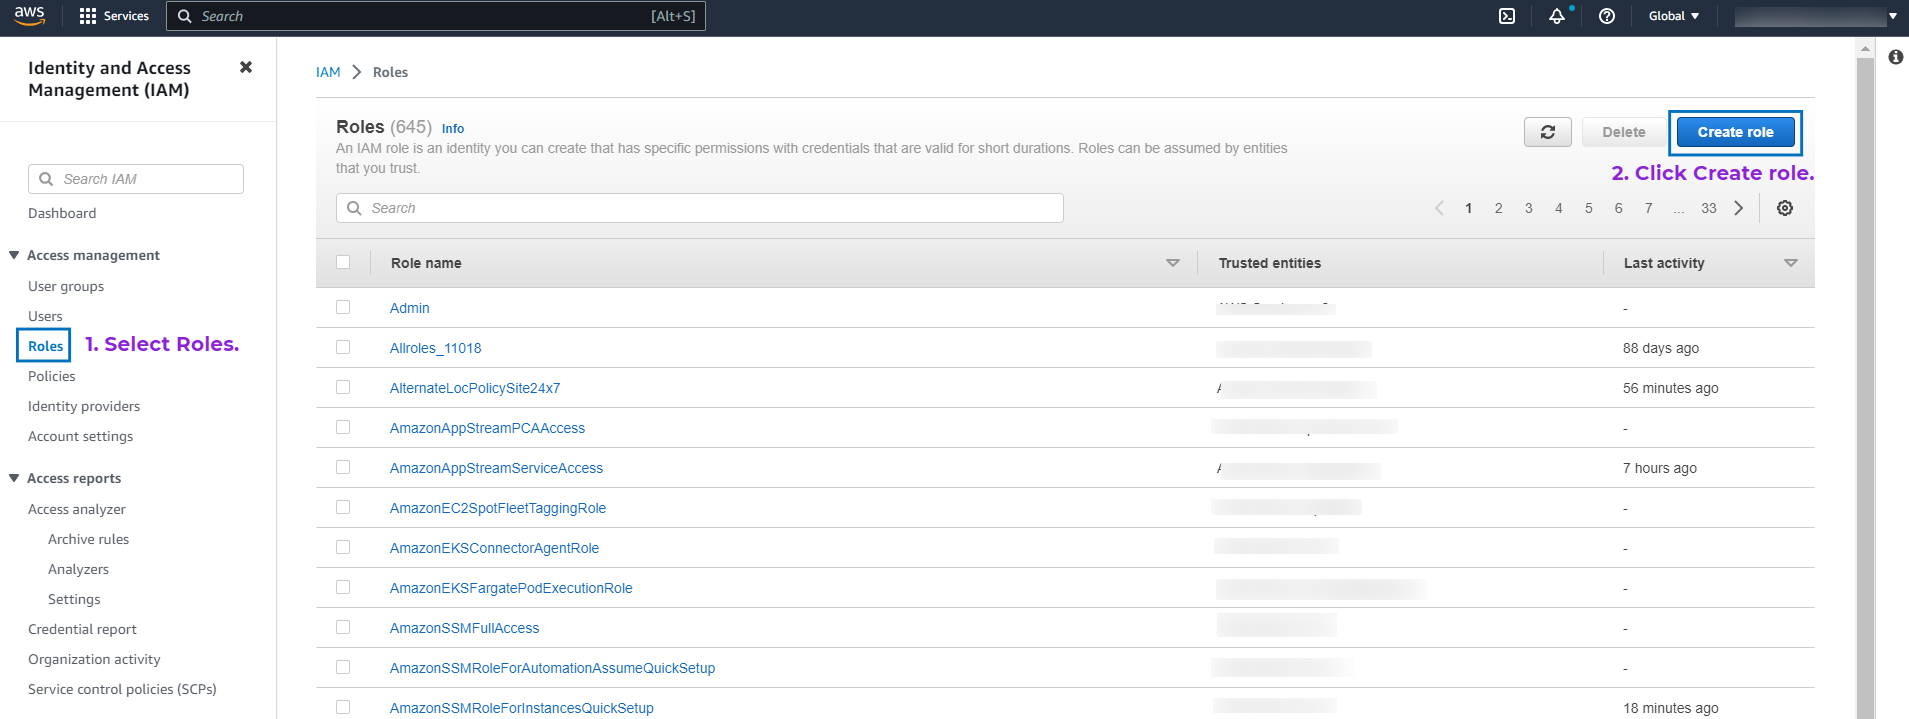
- Click Create Role.
- Select AWS Account from the Trusted entity type options.
- Select Another AWS Account option.
- Enter Site24x7's AWS account ID in the Account ID field displayed in the Integrate AWS Account page.
- Check the Require external ID box.
NoteEnsure that the box next to Require MFA is unchecked. - Enter the unique External ID displayed in the Integrate AWS Account page.
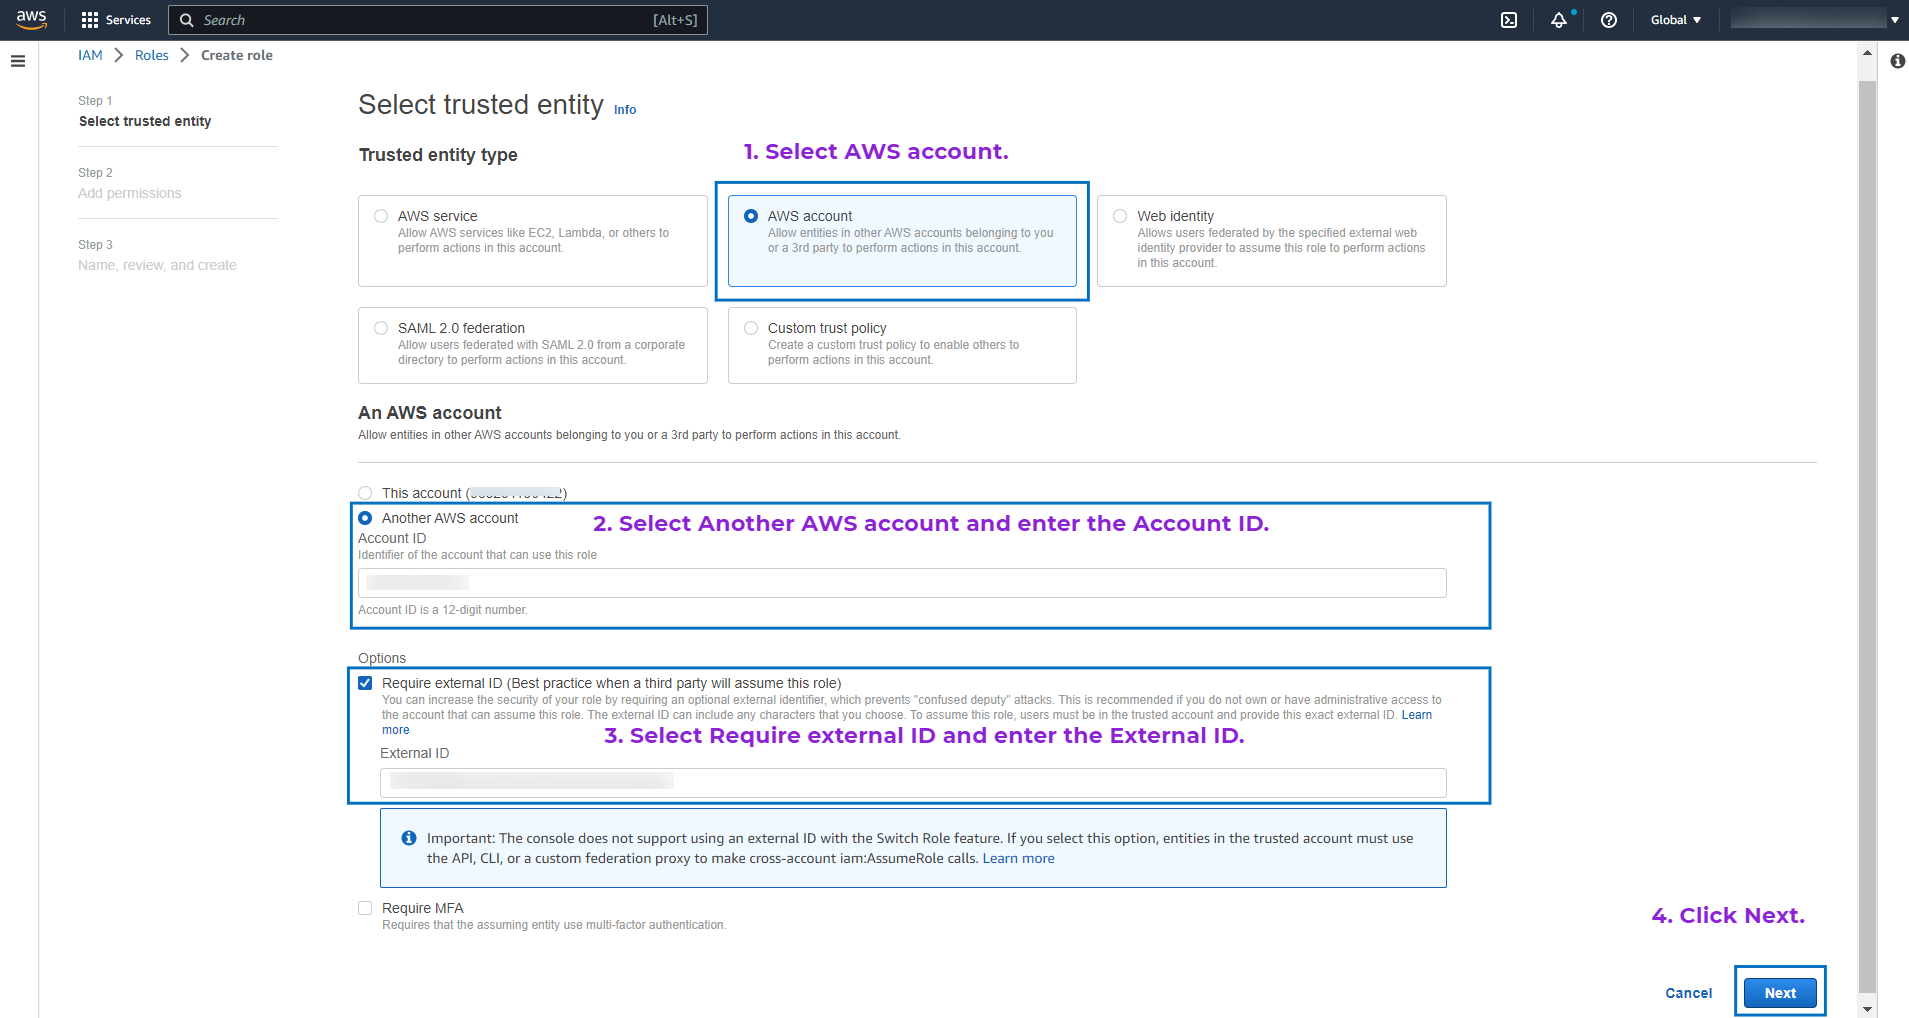
- Click Next.
Step 2: Add permissions
Site24x7 requires ReadOnly access to your AWS services and resources.
- In the Add permissions page, search for and select ReadOnlyAccess, which is the AWS managed policy.
NoteIf you wish to monitor the usage metrics of your Kinesis Video Streams, ensure that you also select AmazonKinesisVideoStreamsReadOnlyAccess.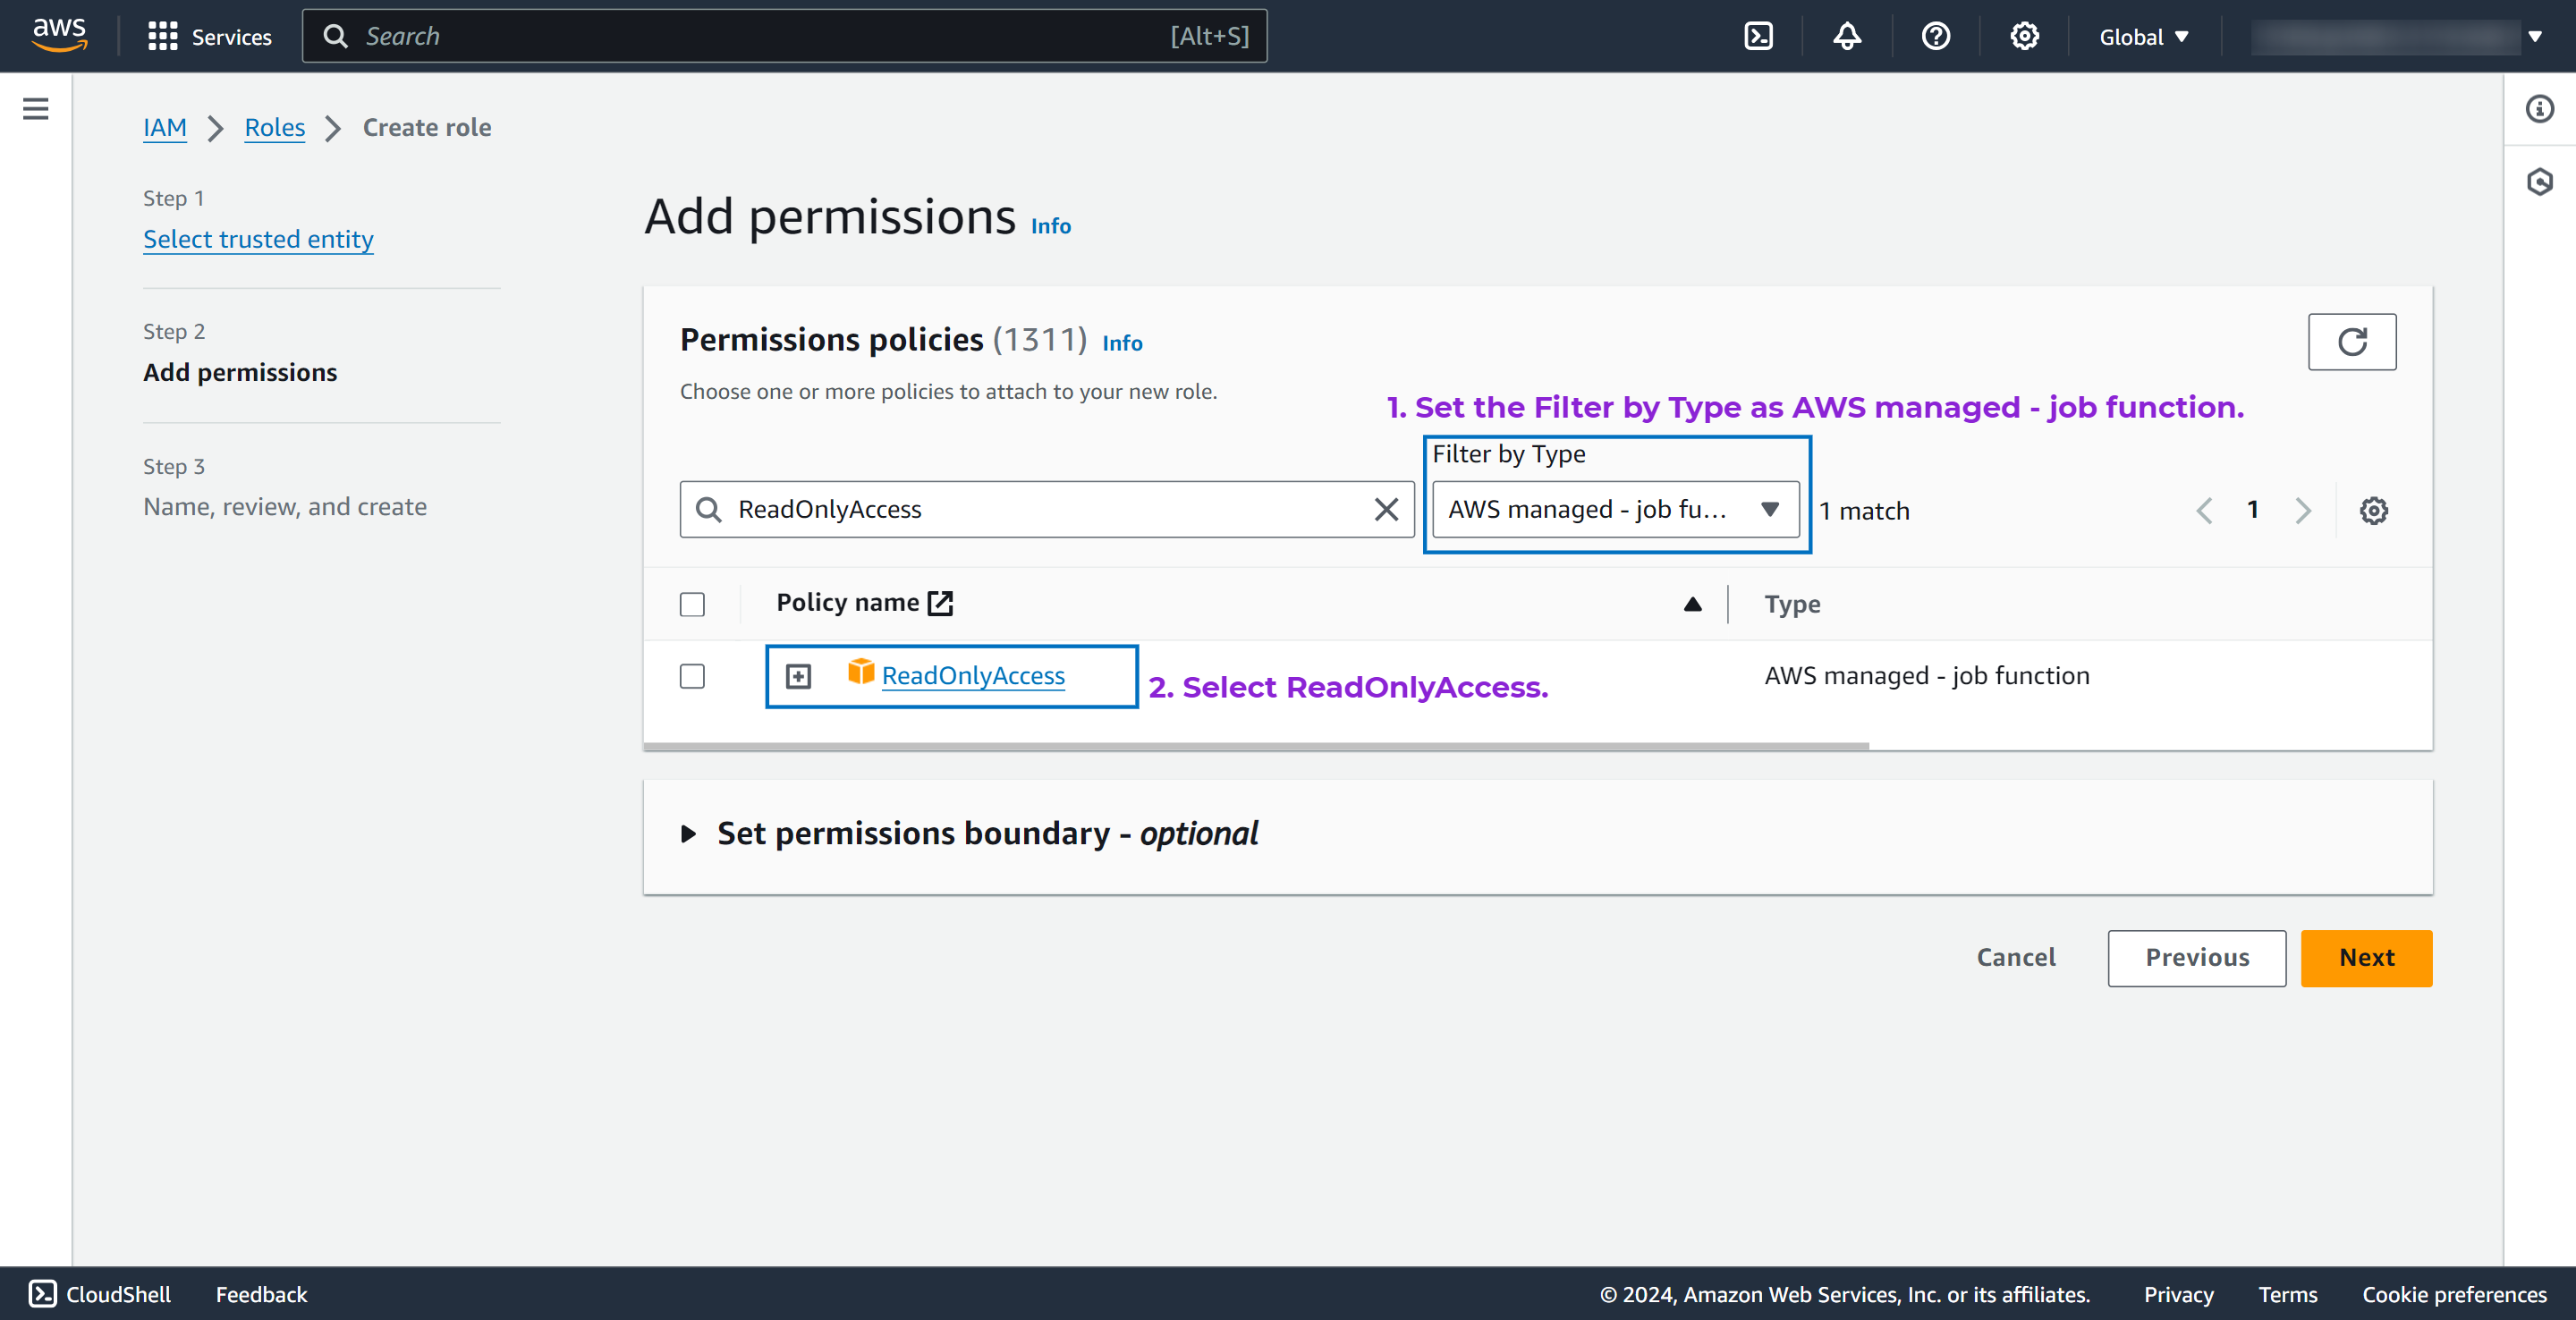
- Click Next.
Step 3: Name, review, and create
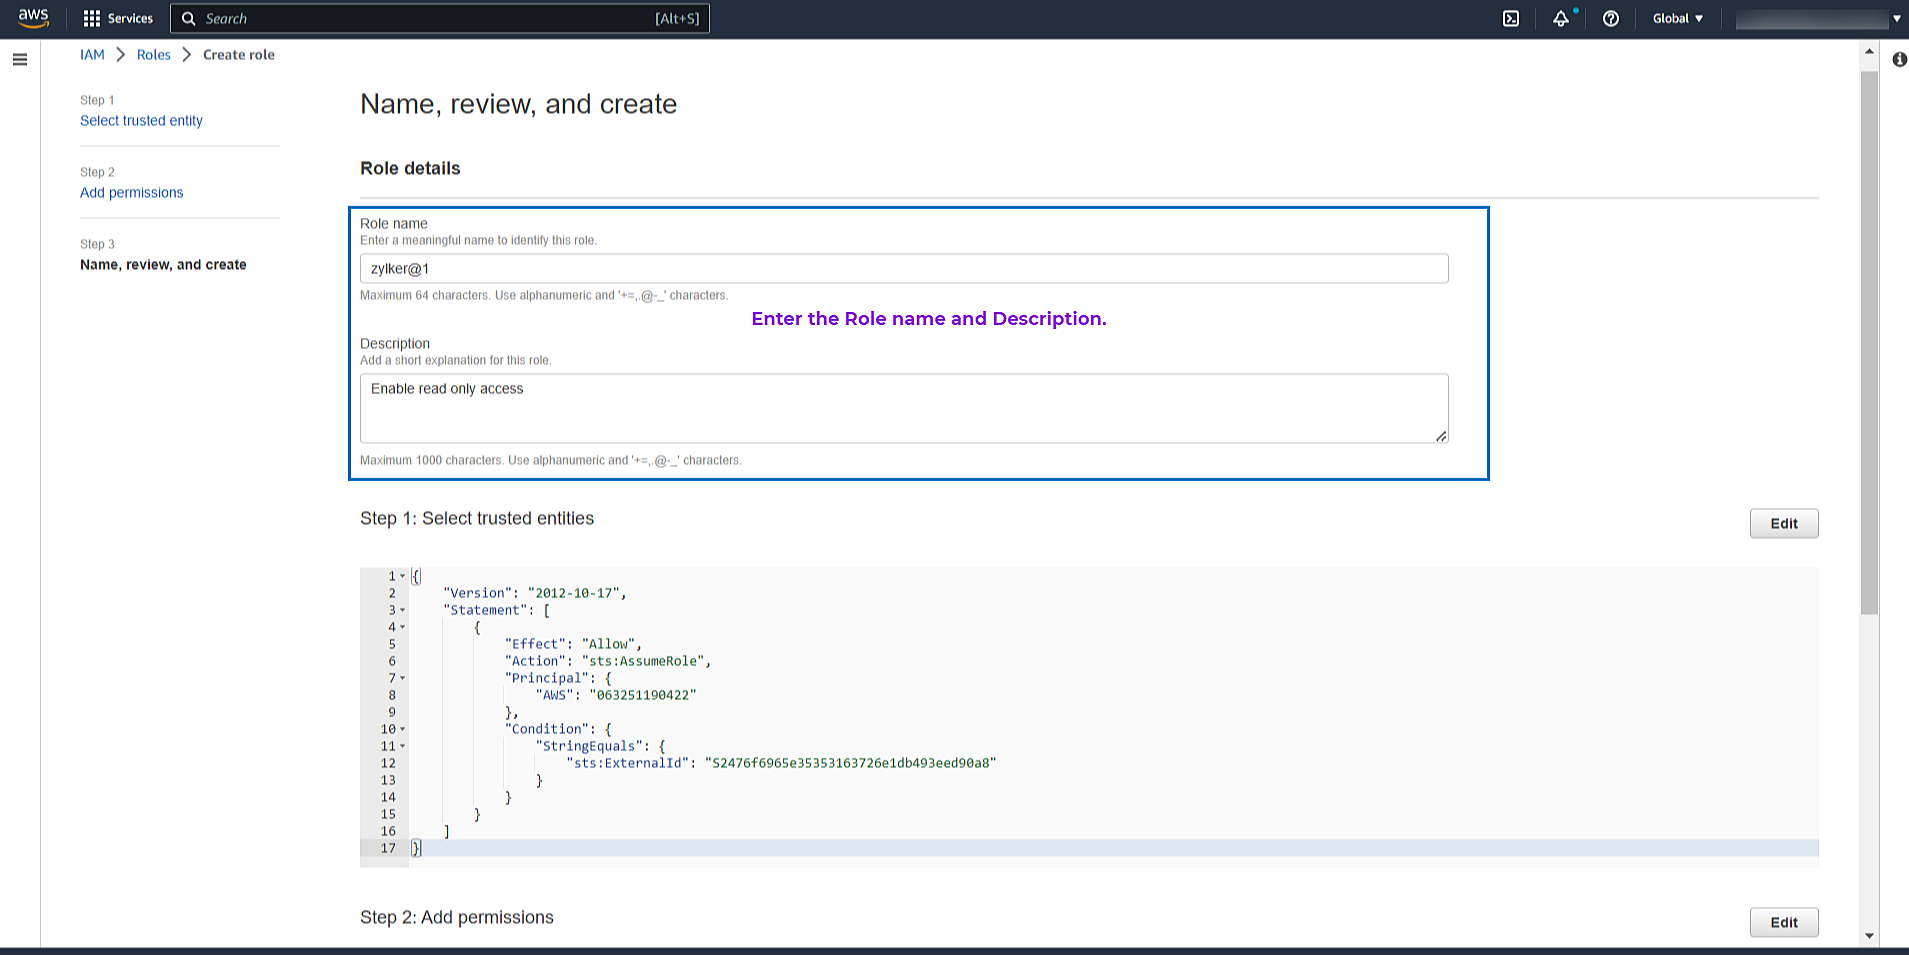
- Enter the Role name and Description.
- Review the details configured in Step 1: Select trusted entity and Step 2: Add permissions.
-
Click Create Role. Once done, an ARN role will be created for the cross-account IAM role you created.
Next step
Now to create an AWS monitor you need to connect your AWS account with Site24x7. To do so please follow the steps mentioned here.
CloudFormation IAM role-based access
You can enable access to your AWS resource by creating an IAM role-based access for Site24x7. You can automatically create an IAM role with a CloudFormation template. Learn more.
AWS Control Tower lifecycle events-based access
You can enable access to your existing and new AWS accounts with AWS Control Tower lifecycle events and automatically discover all the accounts in your organization to be integrated with Site24x7.
AWS IAM Identity Center-based access
AWS IAM Identity Center enables access to your AWS accounts with a consistent single sign-on experience and helps to integrate multiple AWS accounts with Site24x7.
Delegated Admin-based access
You can enable access to your AWS accounts with a Delegated Admin and automatically discover all the accounts in your organization to be integrated with Site24x7.
Key based access
This authentication method is deprecated. Please use the role-based authentication method to monitor your AWS resources.
You can also enable access to your AWS resource by creating Site24x7 as an IAM user. Here, the authentication is provided by security credentials and the authorization is given by policy statements. Site24x7 uses these security credentials (Access key ID and Secret access key) to make programmatic calls to the AWS APIs. To Learn more about IAM user creation and access key generation please read on.
Before your begin
You must have administrative level access in the AWS console to create IAM users and to assign policy permissions.
Add new IAM User
Create Site24x7 as an IAM user for your AWS account by following the below mentioned steps.
- Log in to the AWS Management Console and open the AWS IAM console.
Users who wish to monitor services in AWS GovCloud (US) or China Region, sign in to their respective management console and open the IAM console.
- In the navigation pane click on Users and then click on Add user
- Provide an appropriate user name (for example Site24x7_Integration) in the field provided
- Select the Programmatic access checkbox under the Select AWS access type section and click on Next:Permissions
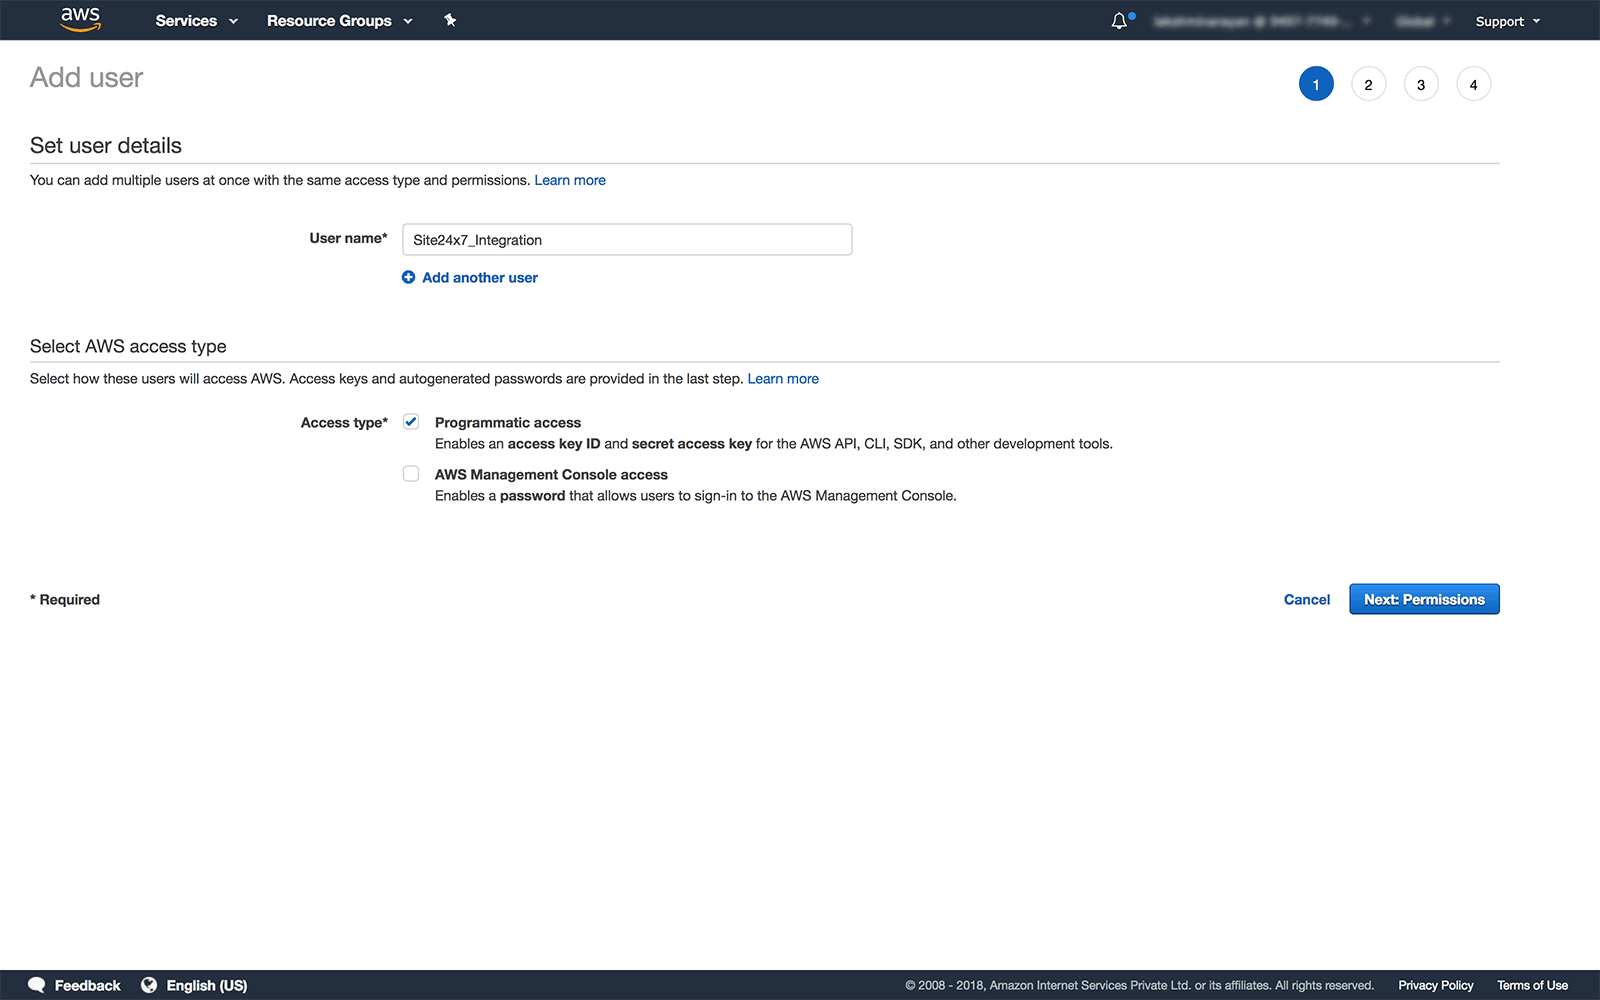
Assign policy permissions for the Site24x7 user created.
Site24x7 requires ReadOnlyAccess to your AWS services, you can either attach one or more existing policies directly to the Site24x7 user or create a new policy. This can be done by following the below mentioned steps.
Attach Existing ReadOnly policies
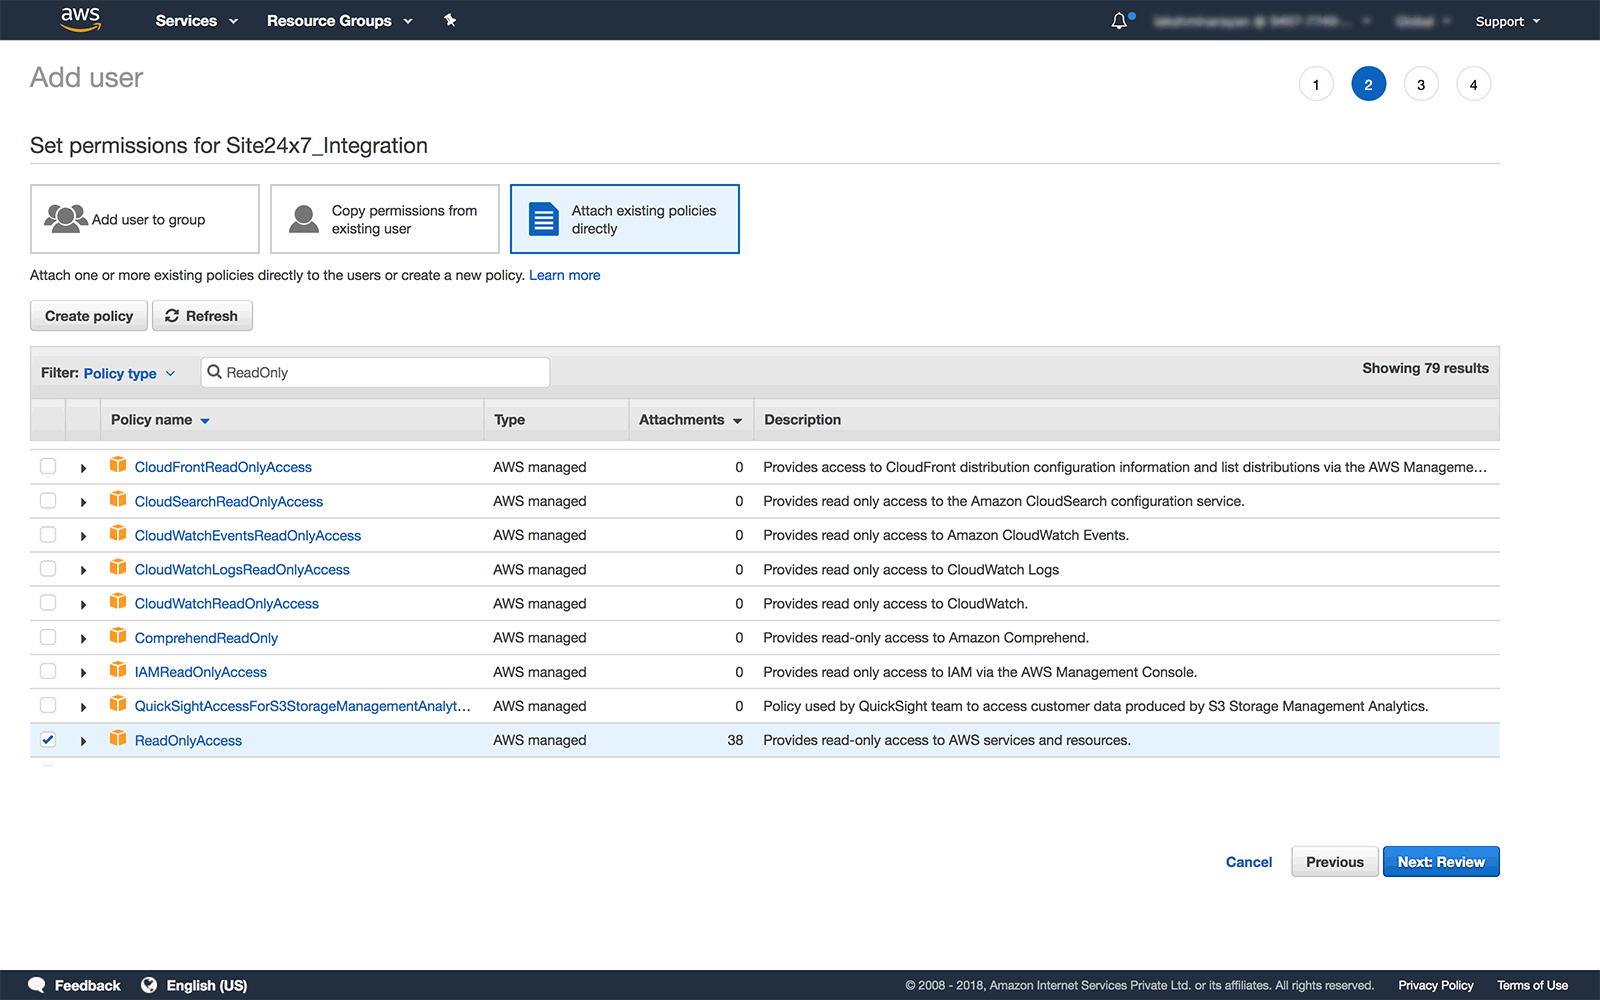
- In the Set permissions window, click on the Attach existing policies directly tab
- Using the search tab, search for the AWS Managed Policies named ReadOnlyAccess and AmazonKinesisVideoStreamsReadOnlyAccess (Mandatory, if you want to monitor usage metrics for kinesis video streams).
- Click on the checkbox to select the policies and then click on Next: Review
- Both the policies provide ReadonlyAccess to all supported AWS services and resources.
Attach a custom policy
You can create and attach a custom policy by following the below mentioned steps.
- Navigate back to the AWS IAM console
- Select Policies from the navigation pane
- Click on Create policy, select the JSON tab and paste the policy JSON shown and click on Review policy
Site24x7 uses the above mentioned permissions to retrieve data for the supported AWS services.
The above policy document specifies the minimum permissions that Site24x7 requires, to fetch metrics and metadata. If you don’t want Site24x7 to discover and monitor specific AWS resources, you can go ahead and manually edit or remove the permissions mentioned for the said resource.
For example: If you don’t want to monitor SNS topics, you can remove the permissions “sns:Get*" and "sns:List*" from the policy statement. Once done, make sure you check for errors by validating the policy. Site24x7 doesn’t have the ability to detect issues in the policy statement, so please take due care, while editing the policy JSON.
Next, provide an appropriate name, description and review the custom policy elements. If everything is in order and choose Create policy
Your new custom policy will be created. Now follow the steps mentioned above for IAM user creation: Users > Add user > Select Programmatic access, in the Set permissions window, click on "Refresh" and search for the new policy created. Once done, click on the checkbox to select the policy and then click on Next: Review.
Review
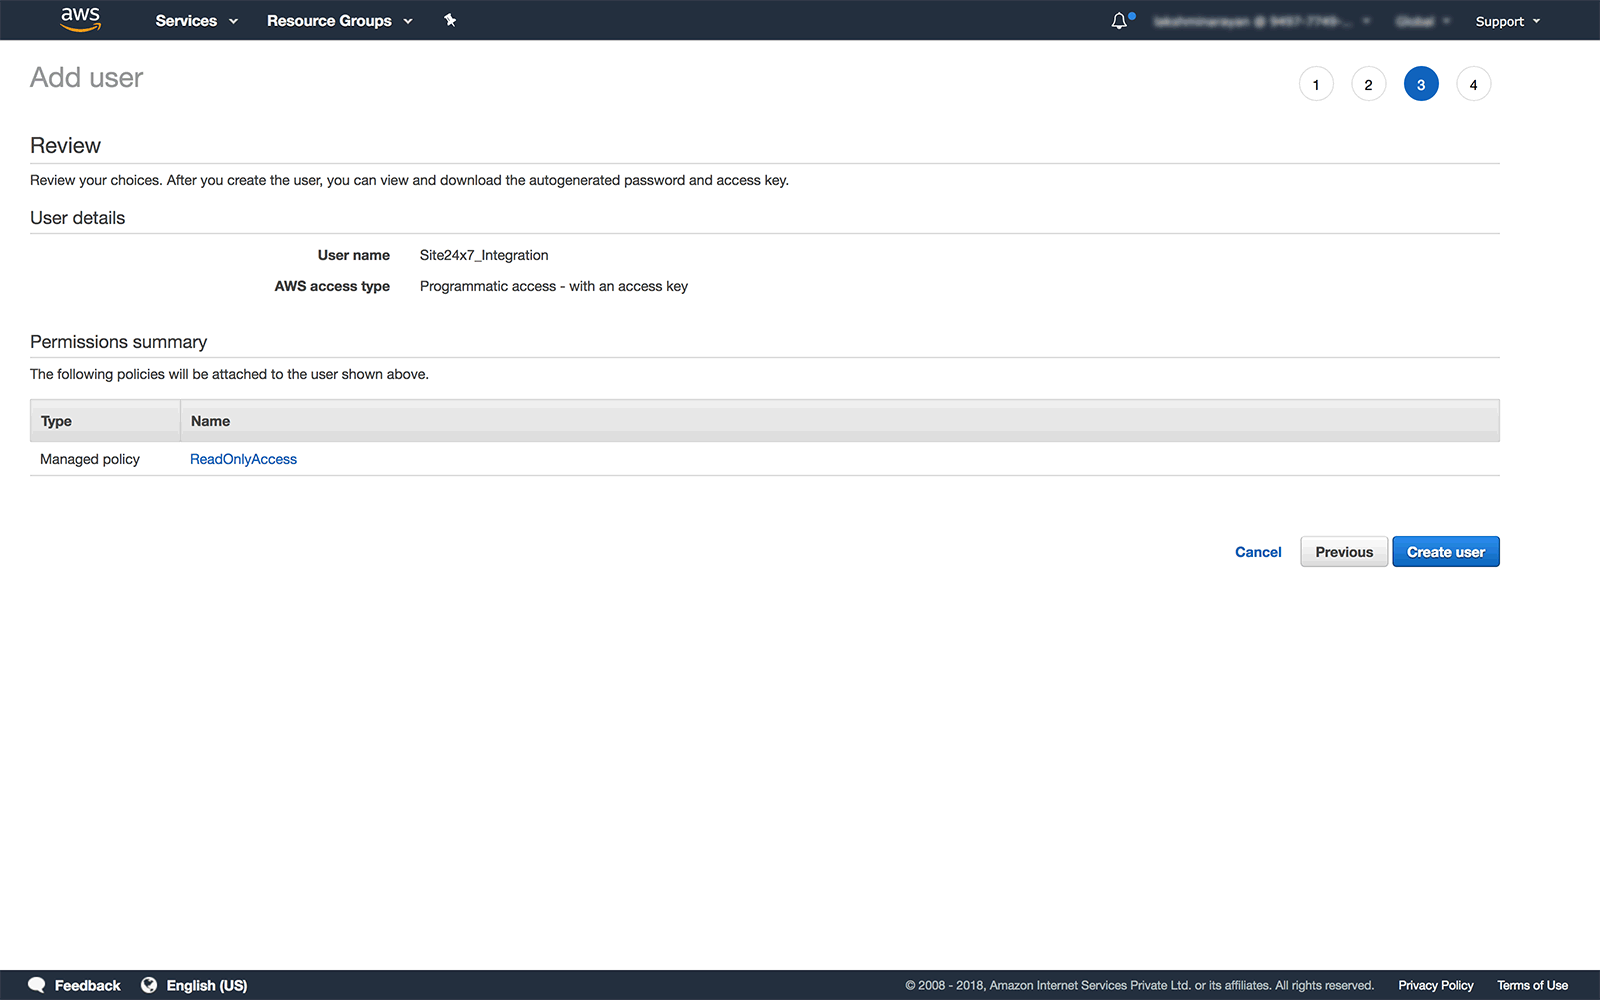
In this Section you can review the User details and the permissions attached.
- If everything is in order, finally click on Create user.
Download user security credentials
- Once you have successfully created a new IAM user, you can view the Access Key ID and Secret Access Key or download them as a .csv format.
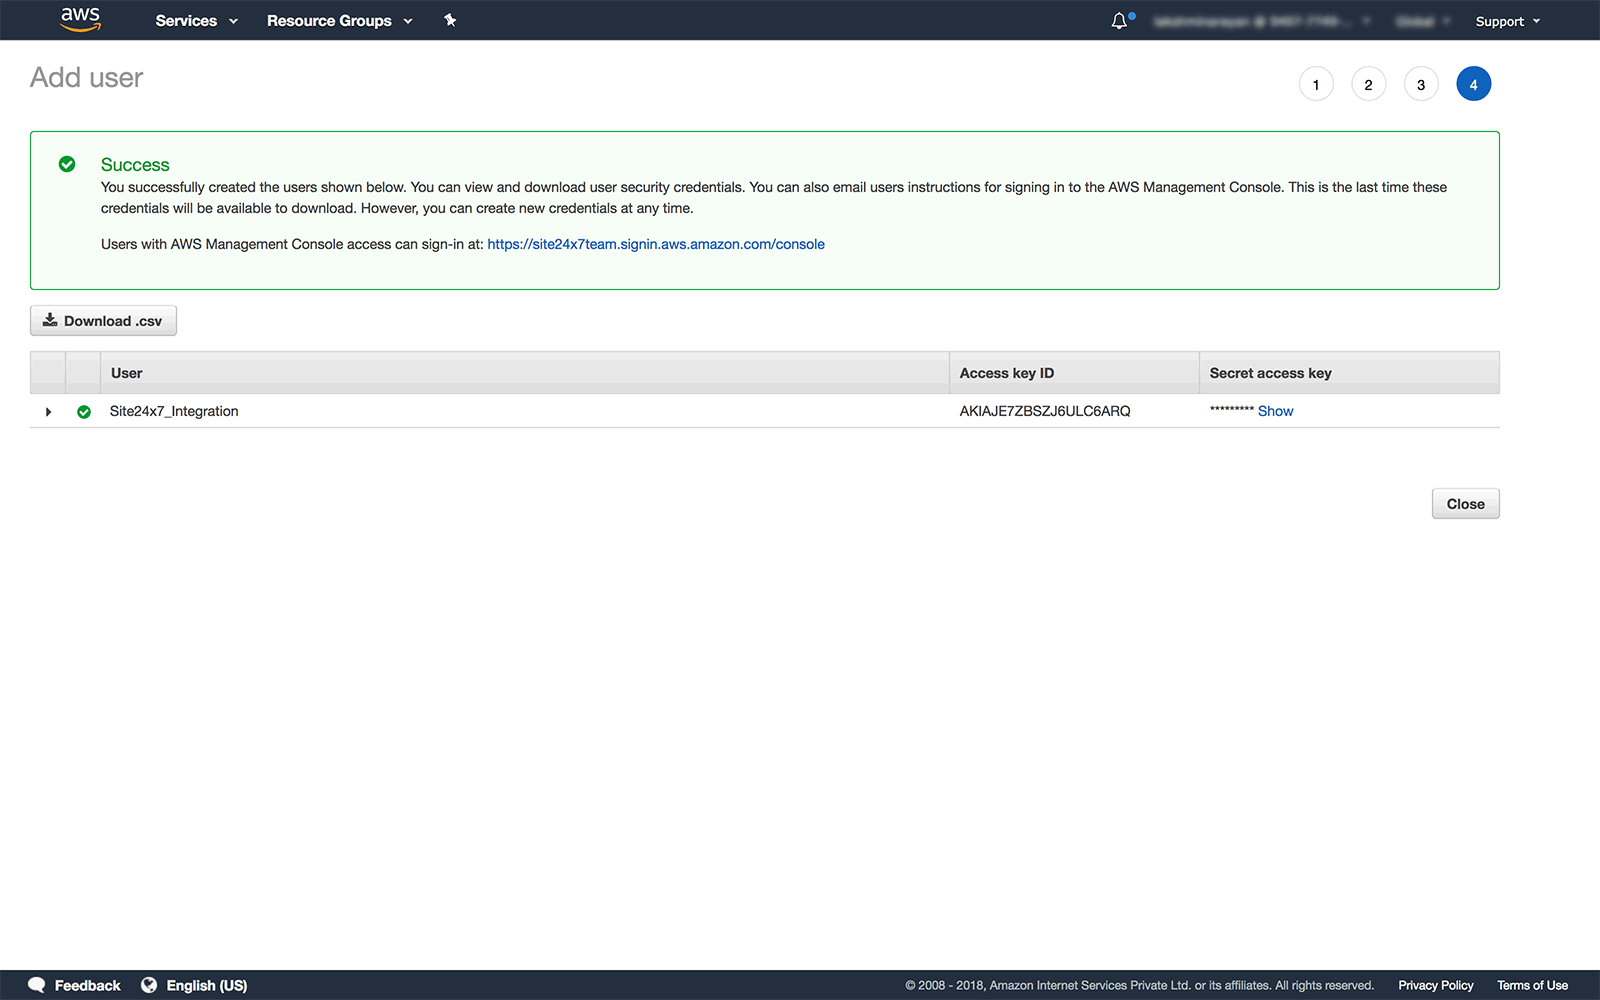
Once downloaded, the IAM security credentials will no longer be available through the AWS Management Console.
Next step
Now to connect your AWS account with Site24x7, please follow the steps mentioned here.
