Bulk Deployment Methods for Docker Agent
Docker can be monitored with the Site24x7 Linux monitoring agent, that is available in the Docker Hub (called the Docker agent) or from the Site24x7 web client. This can also be installed in multiple machines in one go using one of the following bulk deployment methods:
AWS ECS
This is done by two steps:
- Creating a task definition:
There are two ways to create a task definition: - Running the instance of task definition:
To do this, it is first essential to create an IAM role. After that, there are two ways to run the instance:
Creating a Task Definition:
Using Web UI:
- Log in to your AWS account.
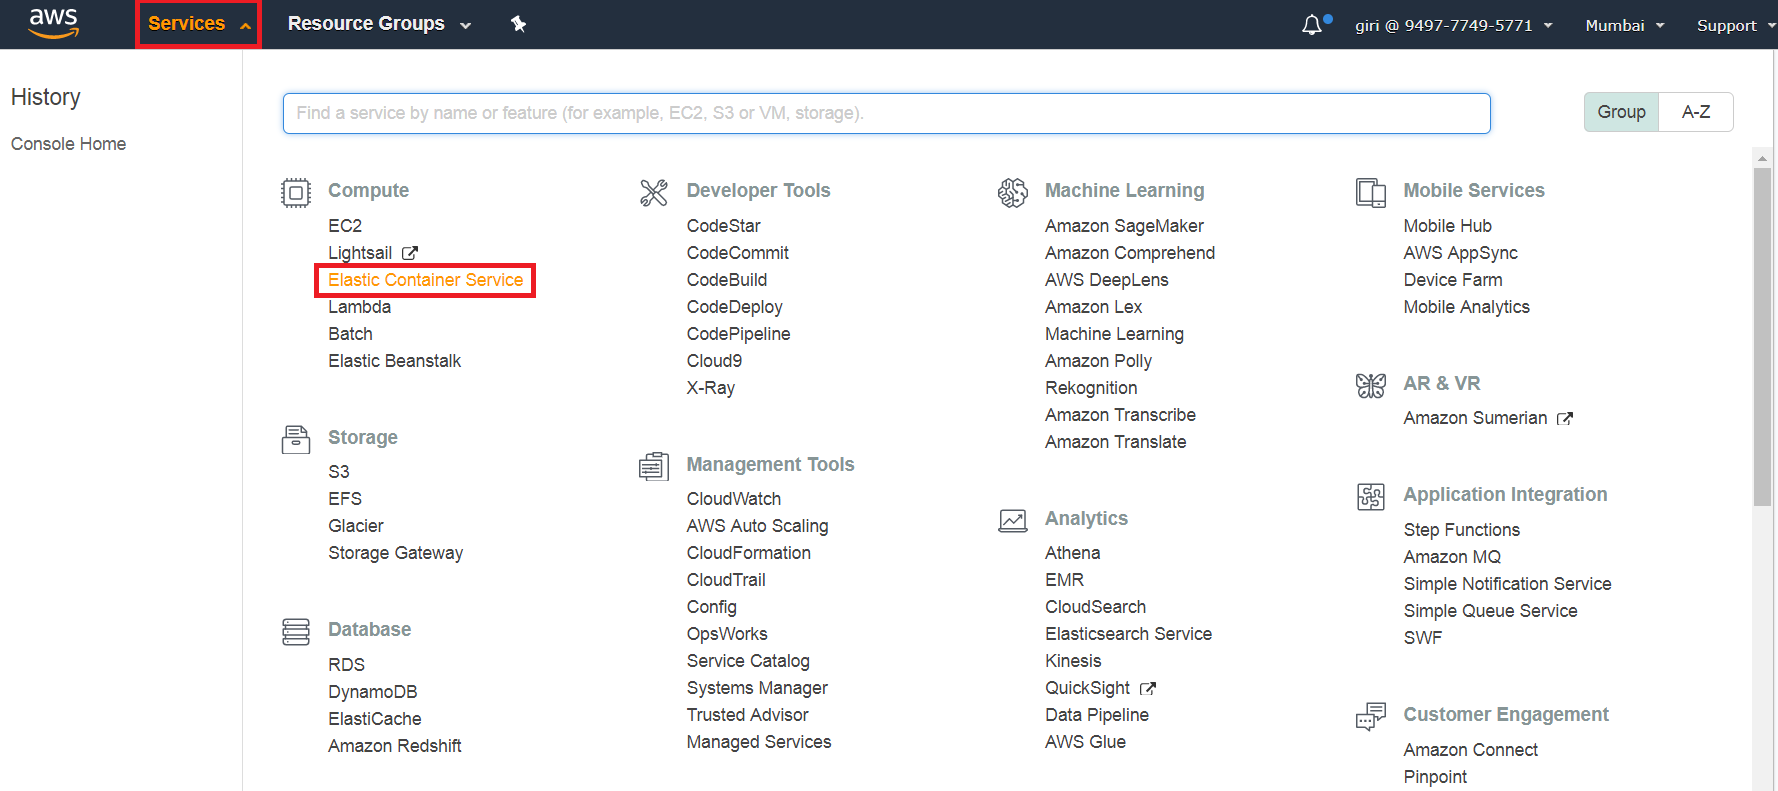
- Click on Services > Elastic Container Service
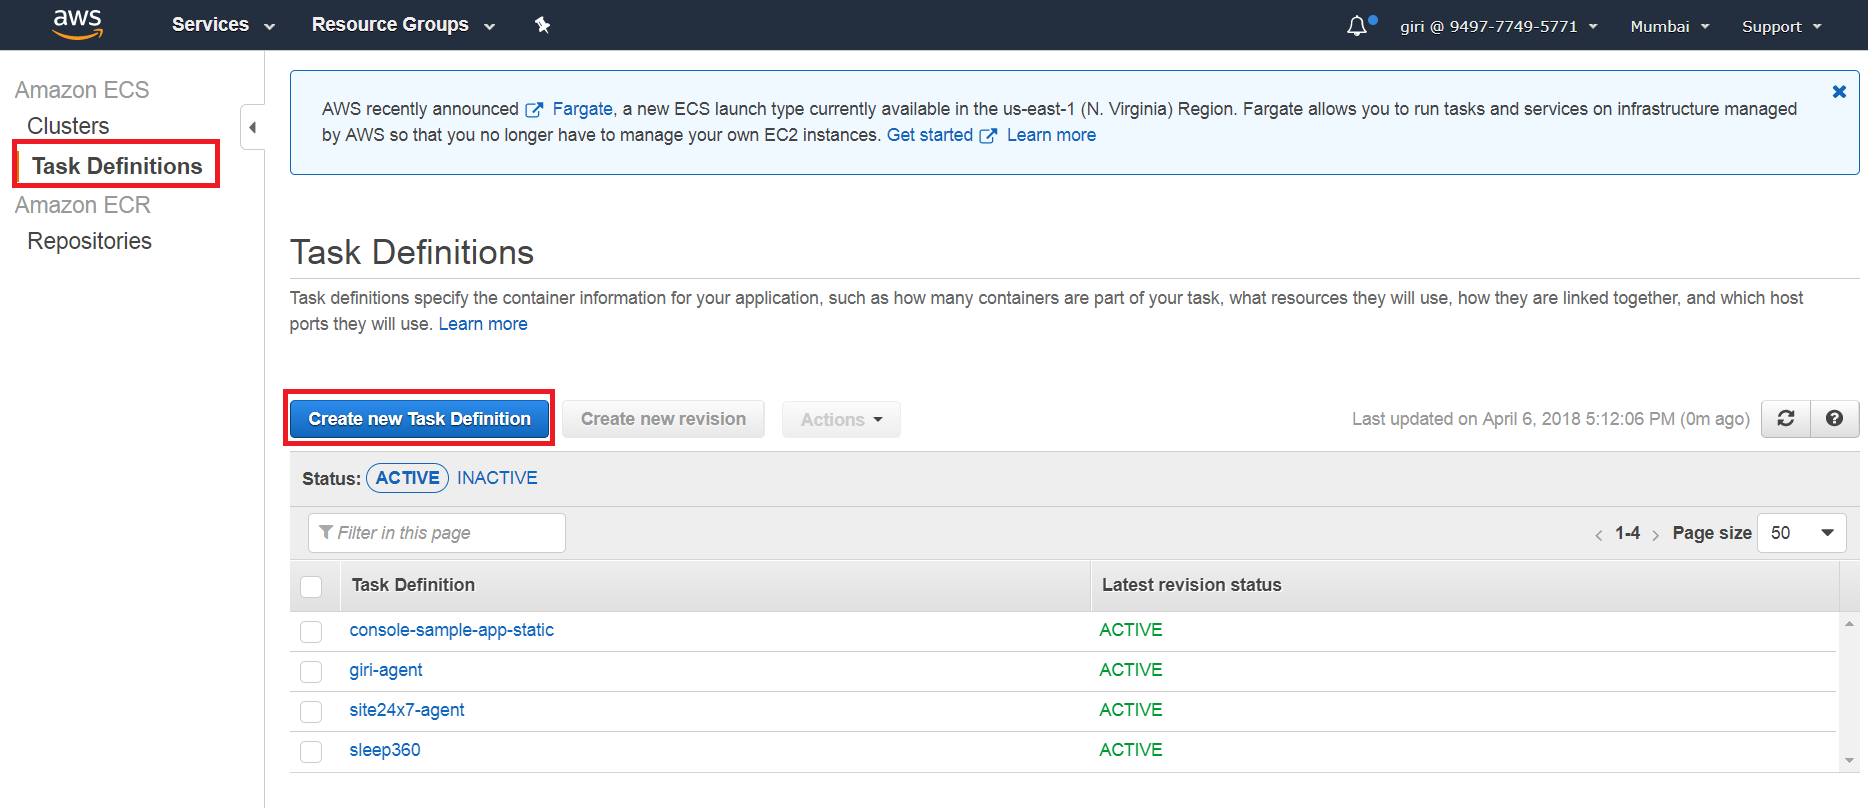
- Click on Task Definitions > Create new Task Definition
- In the Create a Task Definition page, enter Task Definition Name as site24x7-agent-task
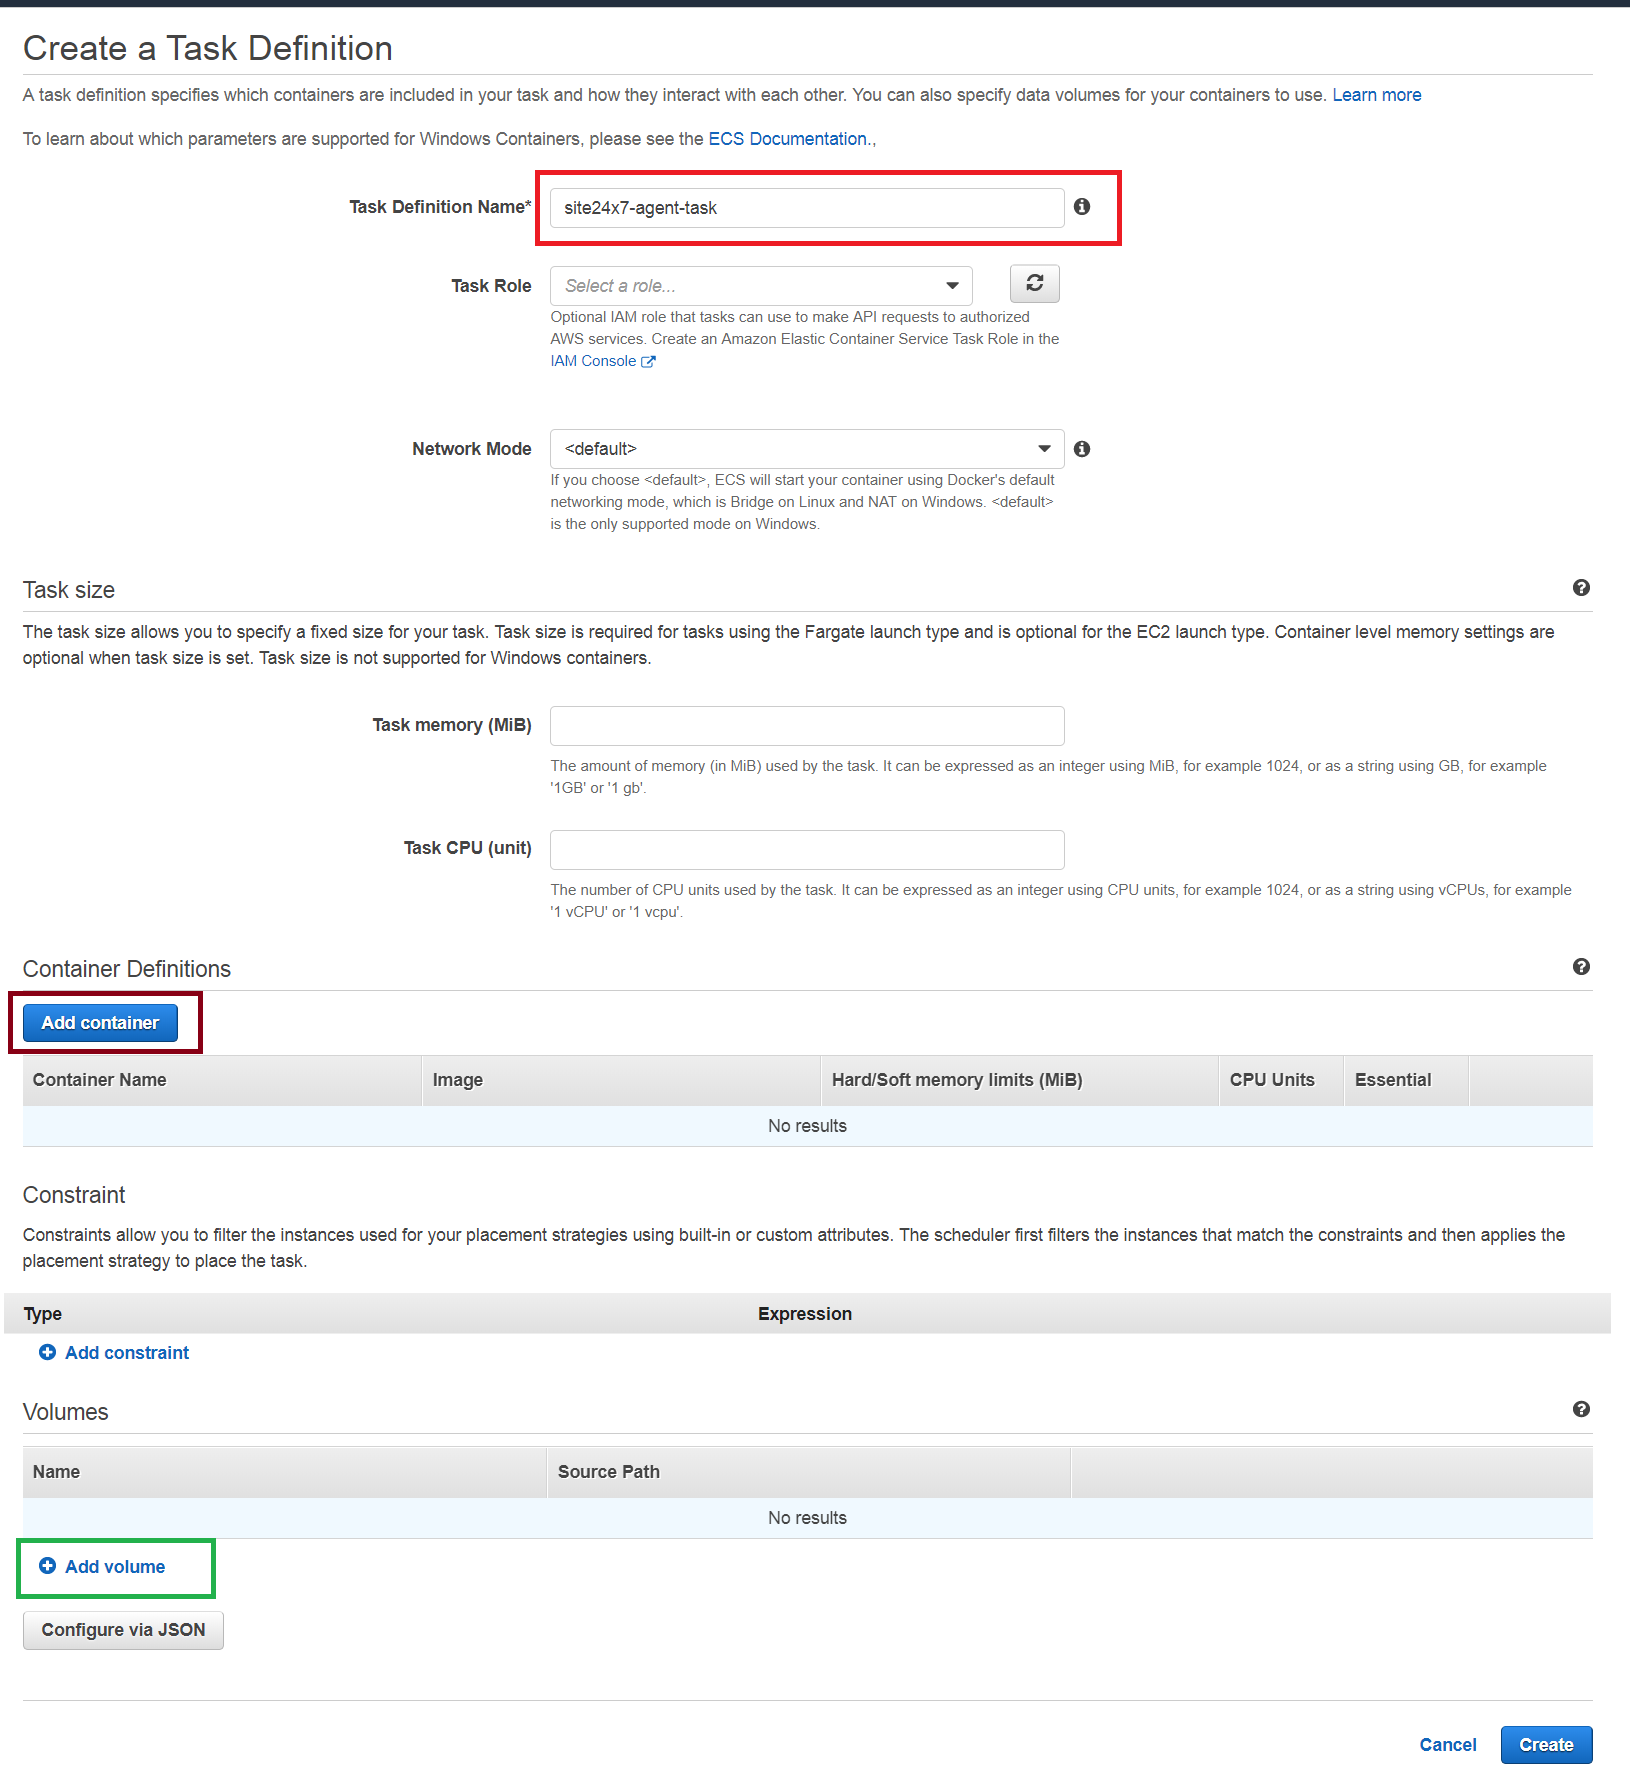
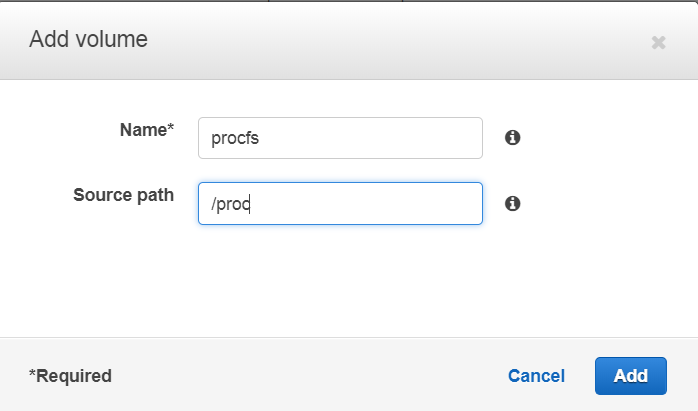
- Click on Add Volume (highlighted in green in the above screenshot) and add the following volumes:
- Name: procfs and Source Path: /proc
- Name: sysfs and Source Path: /sys
- Name: dockerfs and Source Path: /var/run/docker.sock
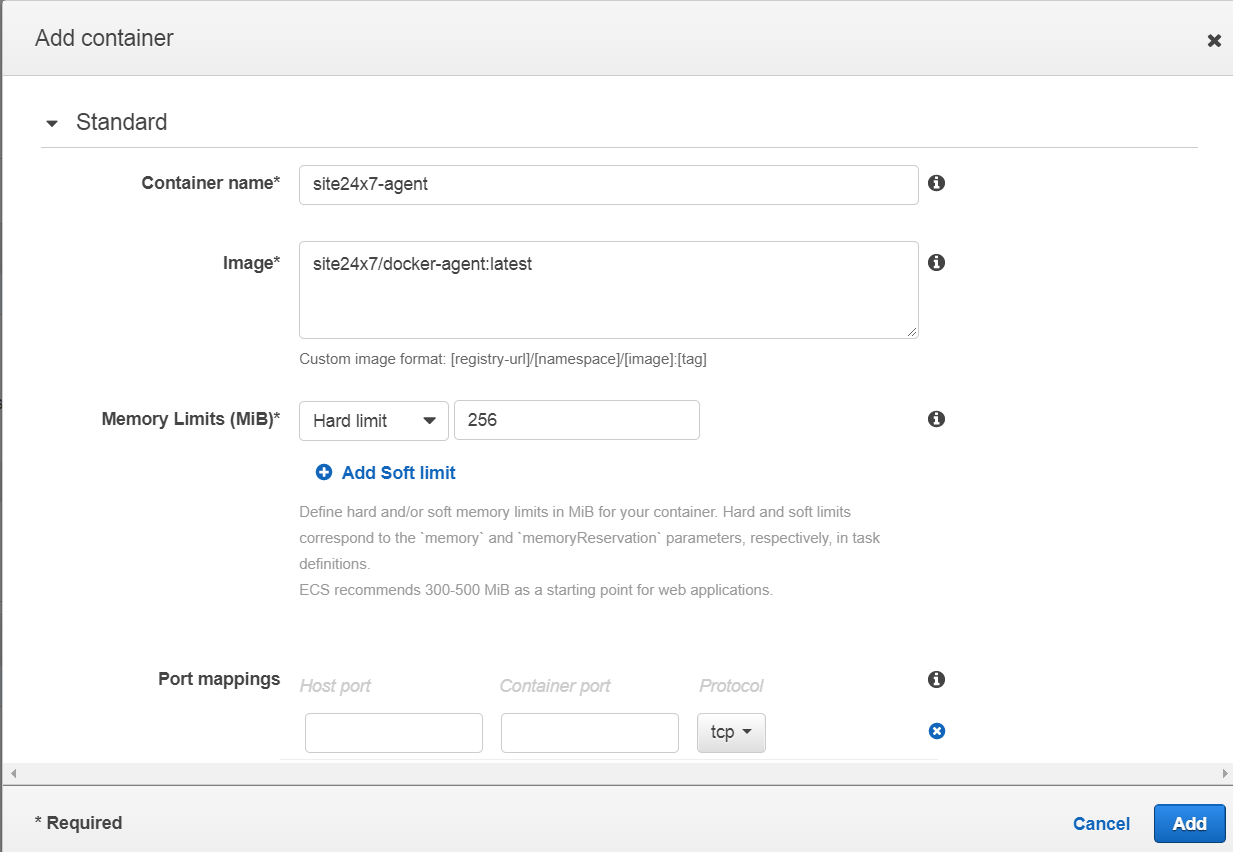
- Now click on the Add Container button and enter the following details:
- Container name: site24x7-agent
- Image: site24x7/docker-agent:latest
- Memory Limits (for both Hard and Soft Limit): 256
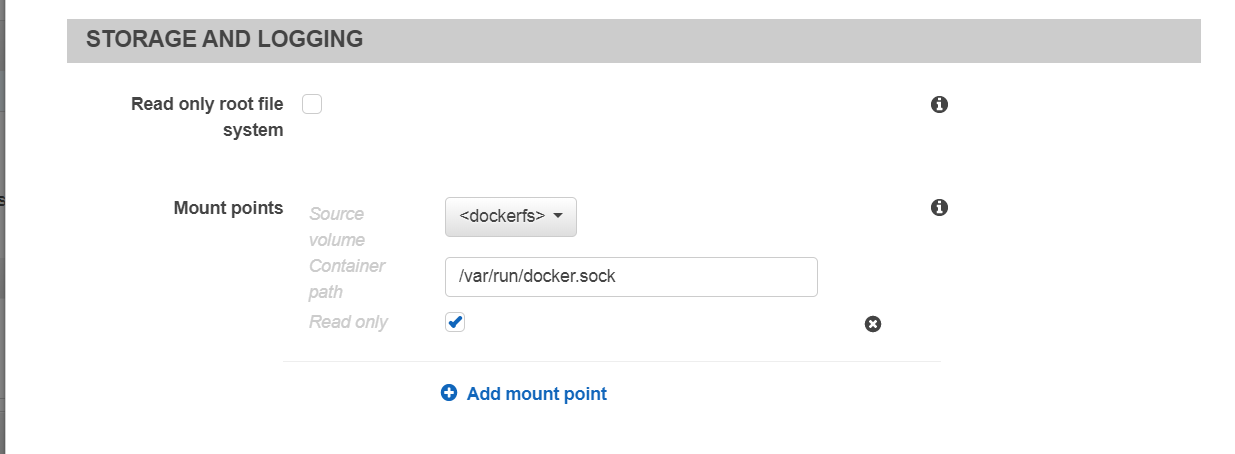
- Expand the Advanced container configuration, and under Storage and Logging Section > Mount Points
- Select Source Volume as dockerfs and enter Container Path as /var/run/docker.sock
- Select Source Volume as sysfs and enter Container Path as /host/sys
- Select Source Volume as procfs and enter Container Path as /host/proc
- Check the Read only box for all the above three options.
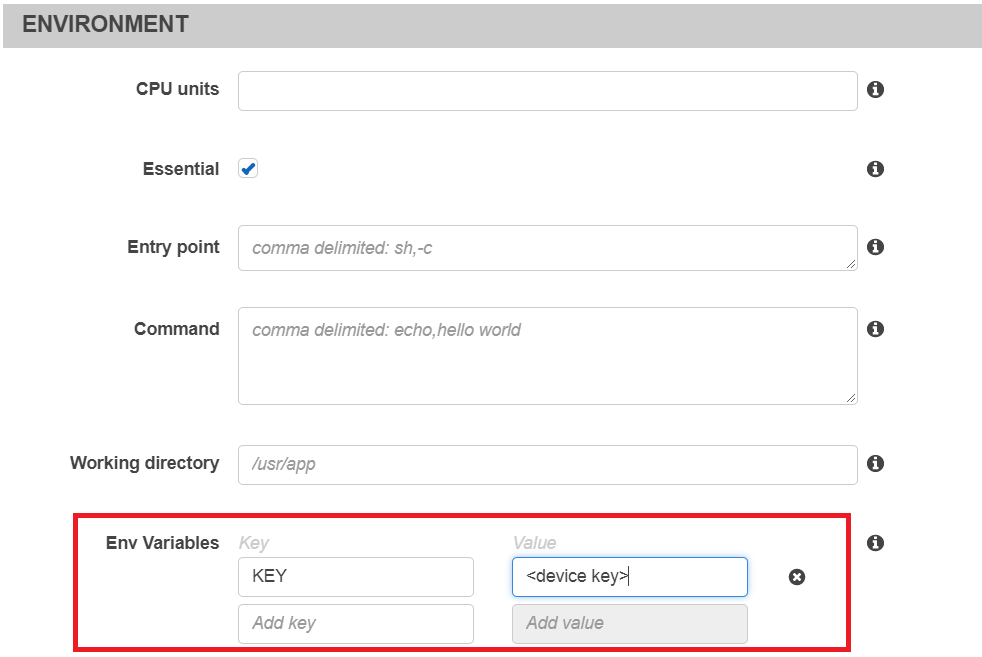
- Under the Environment section, under Env Variables, specify the Key as KEY and Value as your Device Key
- Click Add to add the container.
- Click Create to create a task definition
Using CLI:
- Download site24x7-agent-task.json and add your Device Key in the file
- Execute the following command
aws ecs register-task-definition --cli-input-json file://<above_downloaded_file_path>
Running the instance of Task Definition:
Prerequisite: Creating an IAM Role
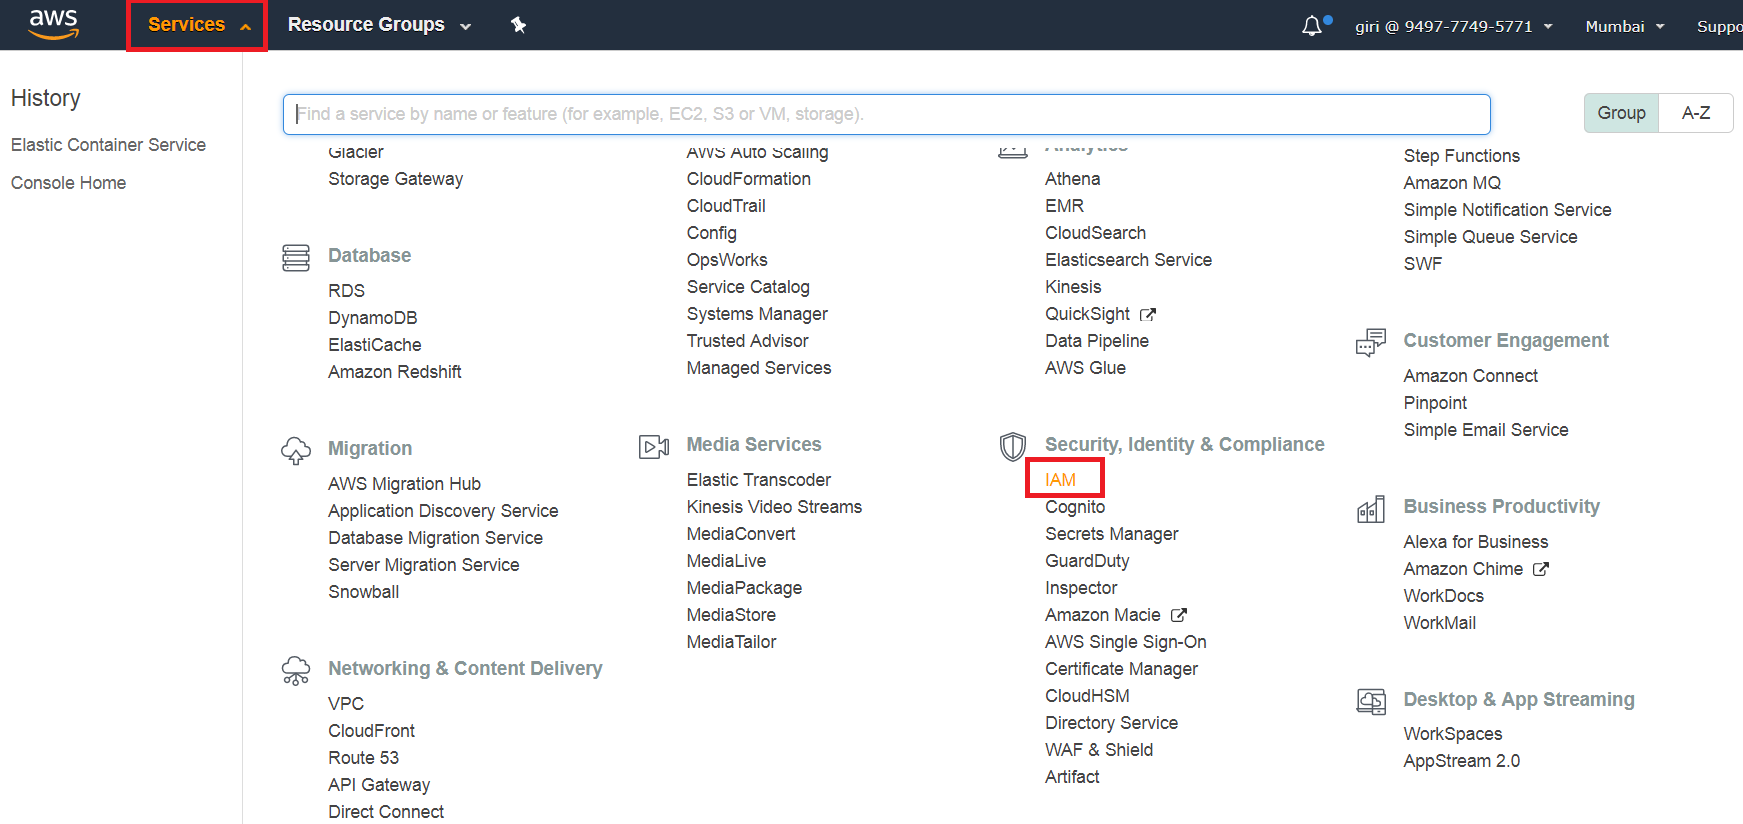
- Log in to the AWS console and then click on Services > IAM
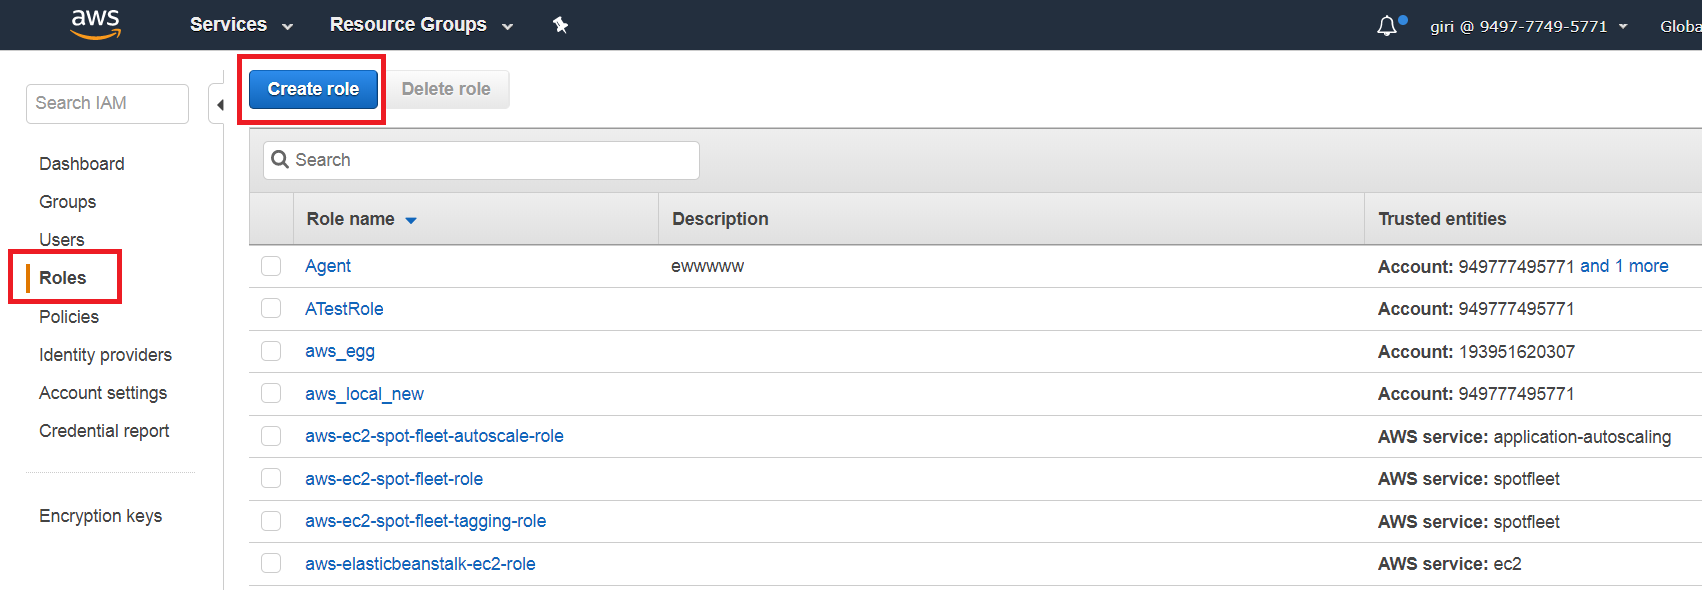
- In the left panel, click on Roles > Create Role button
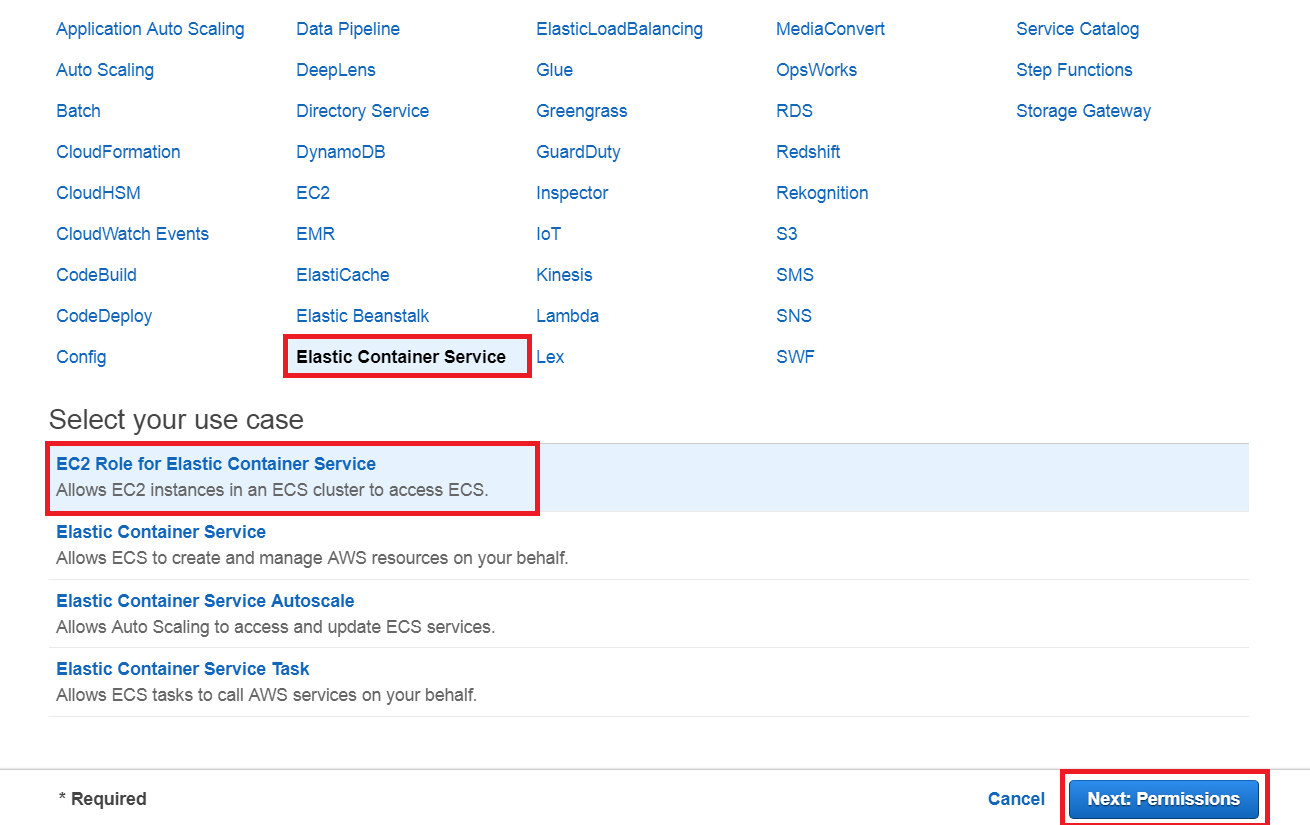
- Under AWS Service, click on Elastic Container Service and then Select your use case as EC2 Role for Elastic Container Service. Click on Next: Permission button.
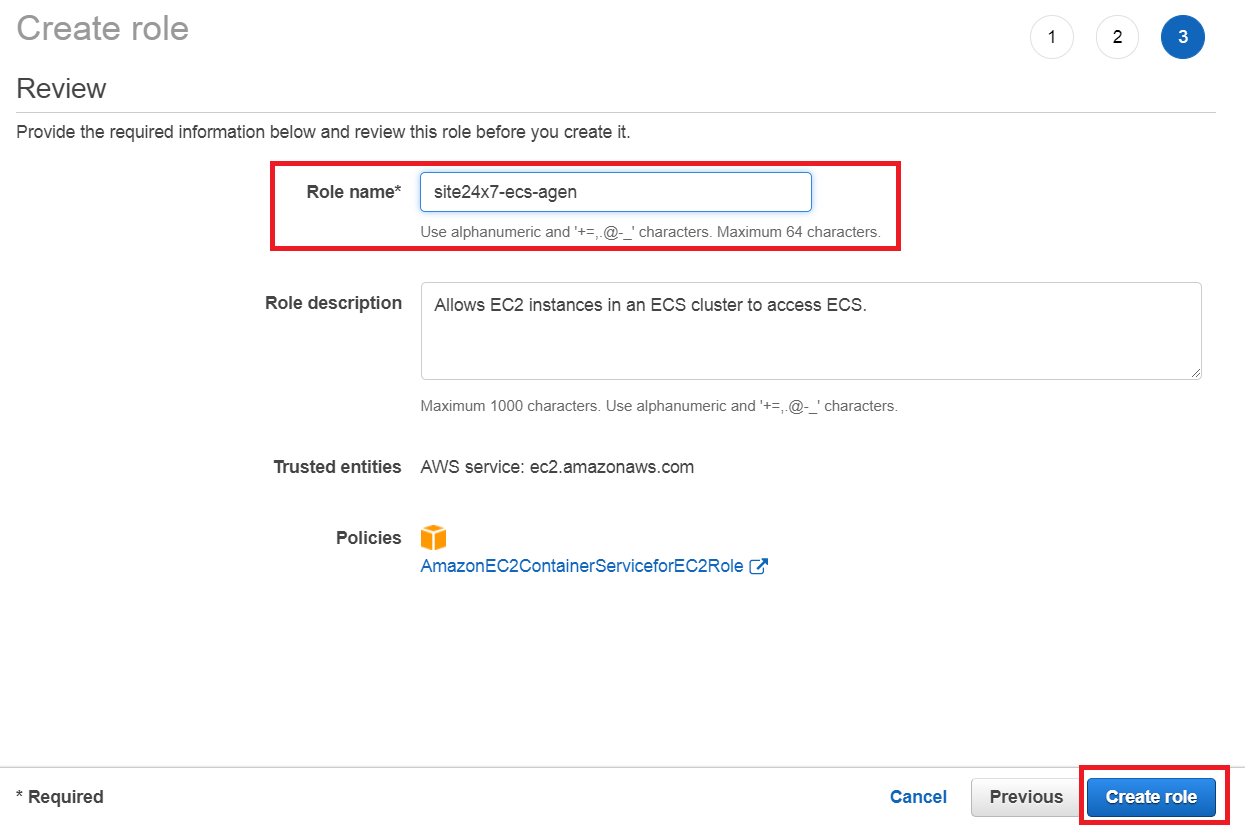
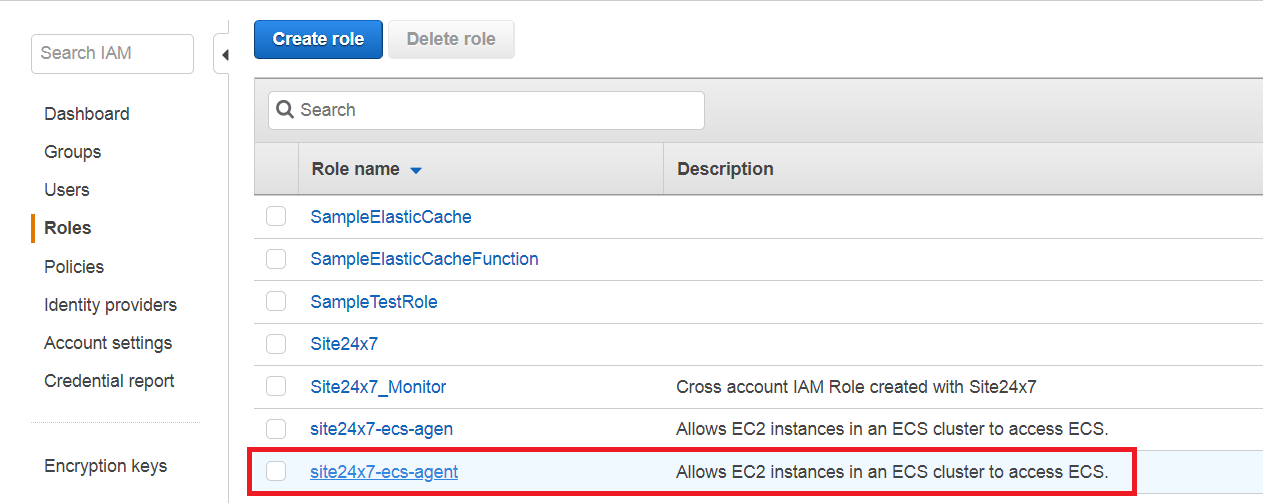
- Click on Next: Review and in the next page, enter the Role Name site24x7-ecs-agent. Click on the Create Role button.
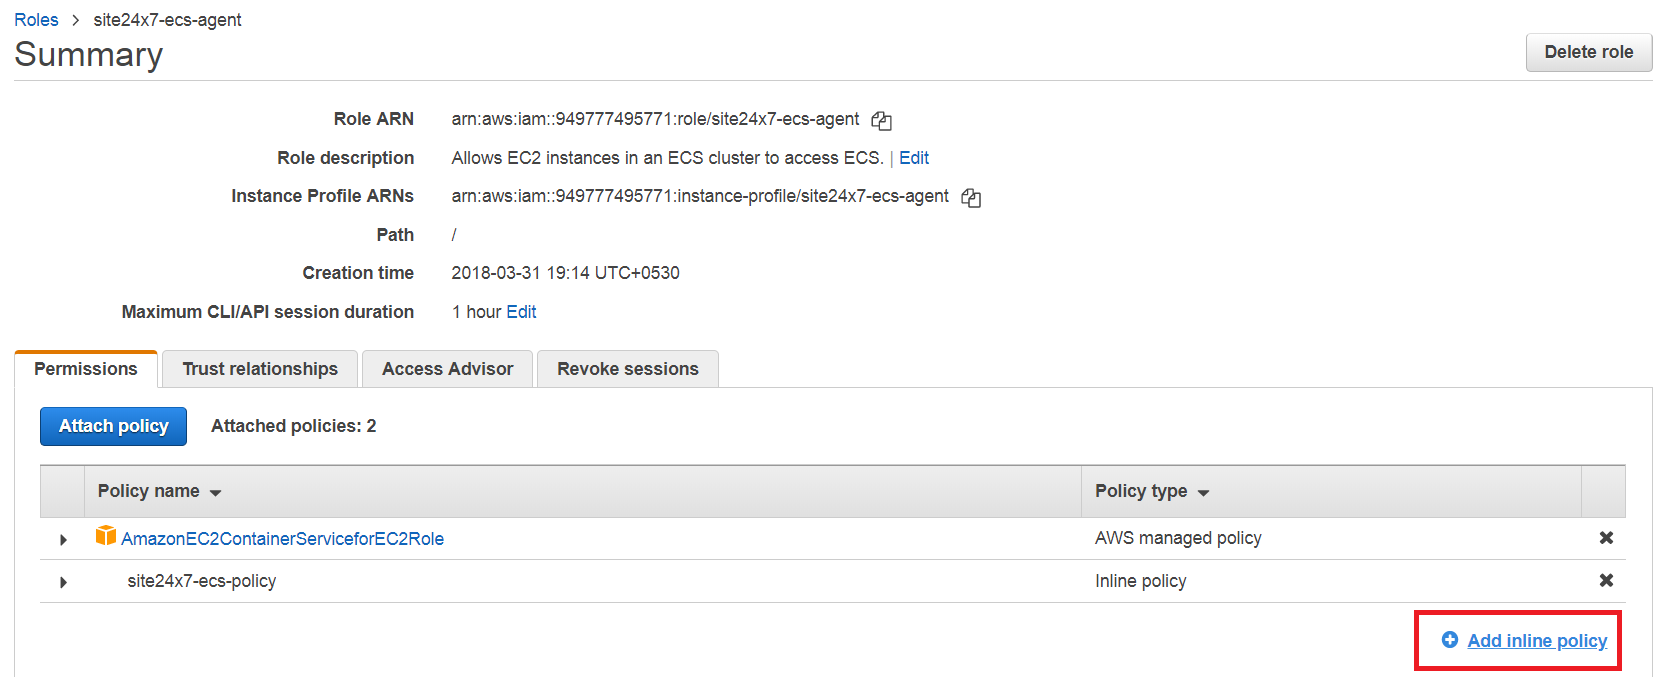
- Now click on the above created role and then click on Add Inline Policy
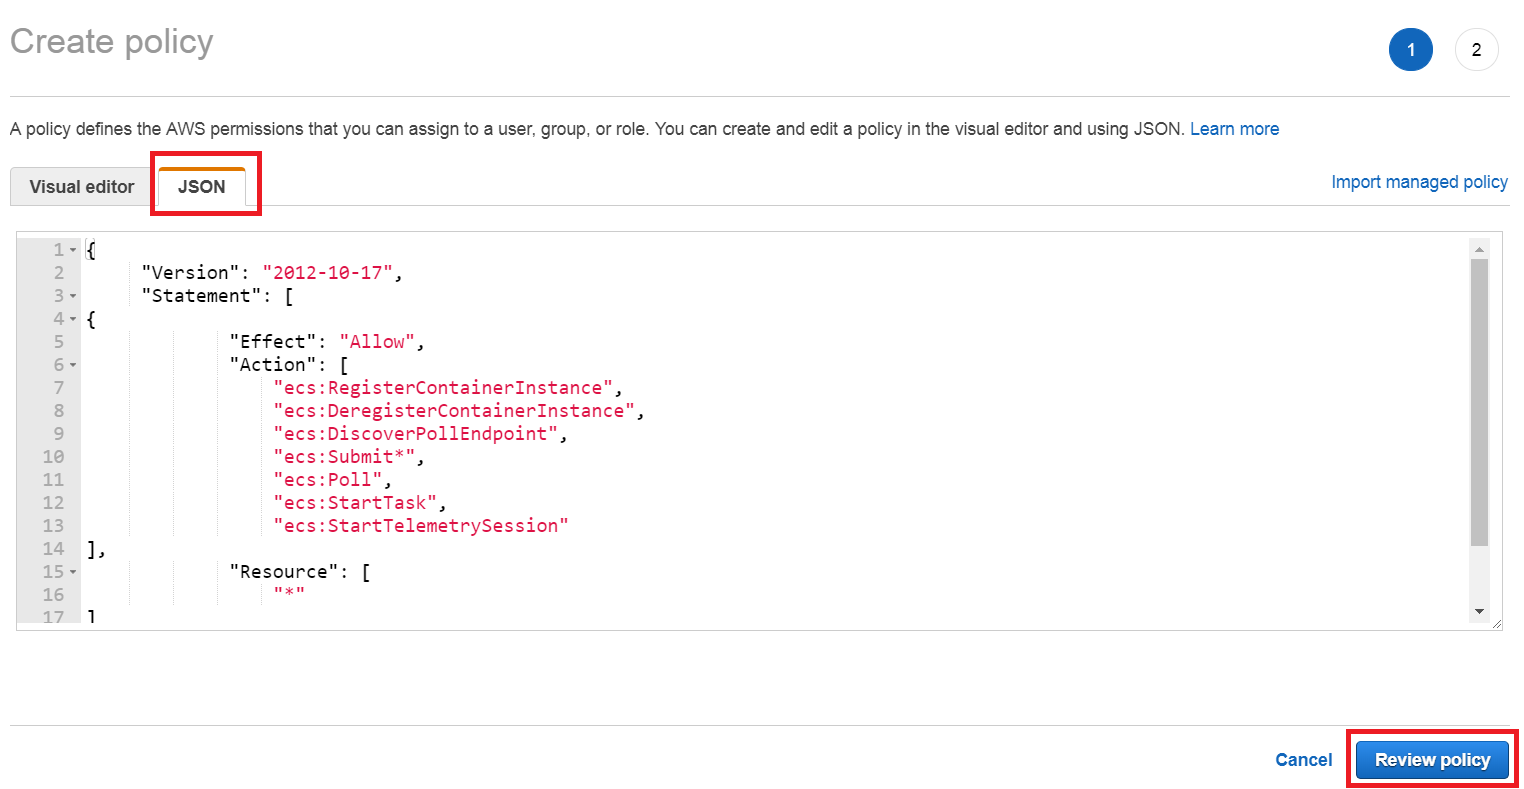
- Paste the below policy in the JSON tab of Create Policy and then click on Review Policy button.
{
"Version": "2012-10-17","Statement": [
{
"Effect": "Allow",
"Action": [
"ecs:RegisterContainerInstance",
"ecs:DeregisterContainerInstance",
"ecs:DiscoverPollEndpoint",
"ecs:Submit*",
"ecs:Poll",
"ecs:StartTask",
"ecs:StartTelemetrySession"
],
"Resource": [
"*"
]
}
]
}
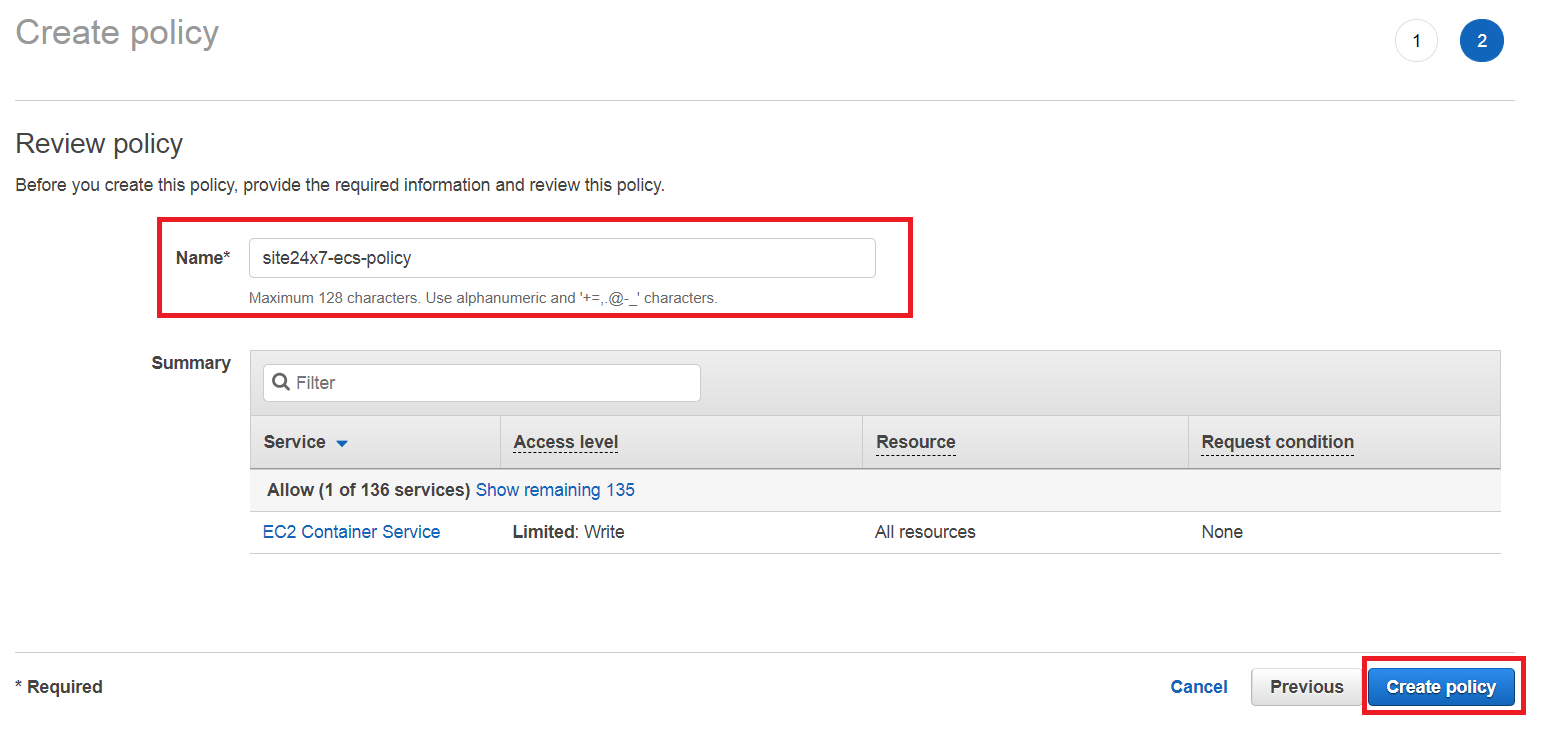
- Name the policy as site24x7-ecs-policy and click on Create Policy button.
Creating an instance with site24x7-agent that has to be added to the ECS cluster by adding a startup script
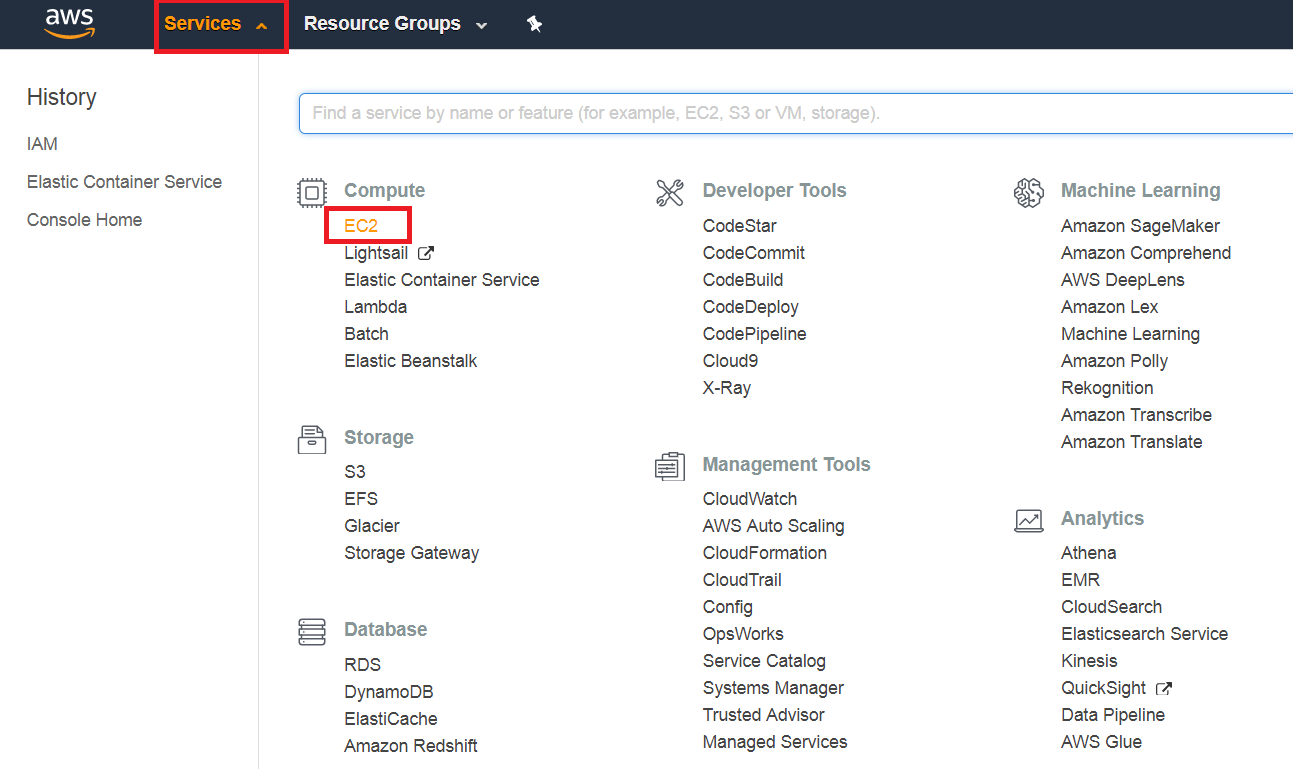
- Log in to the AWS console and click on Services > EC2
- Click the Launch Instance button to create a new instance
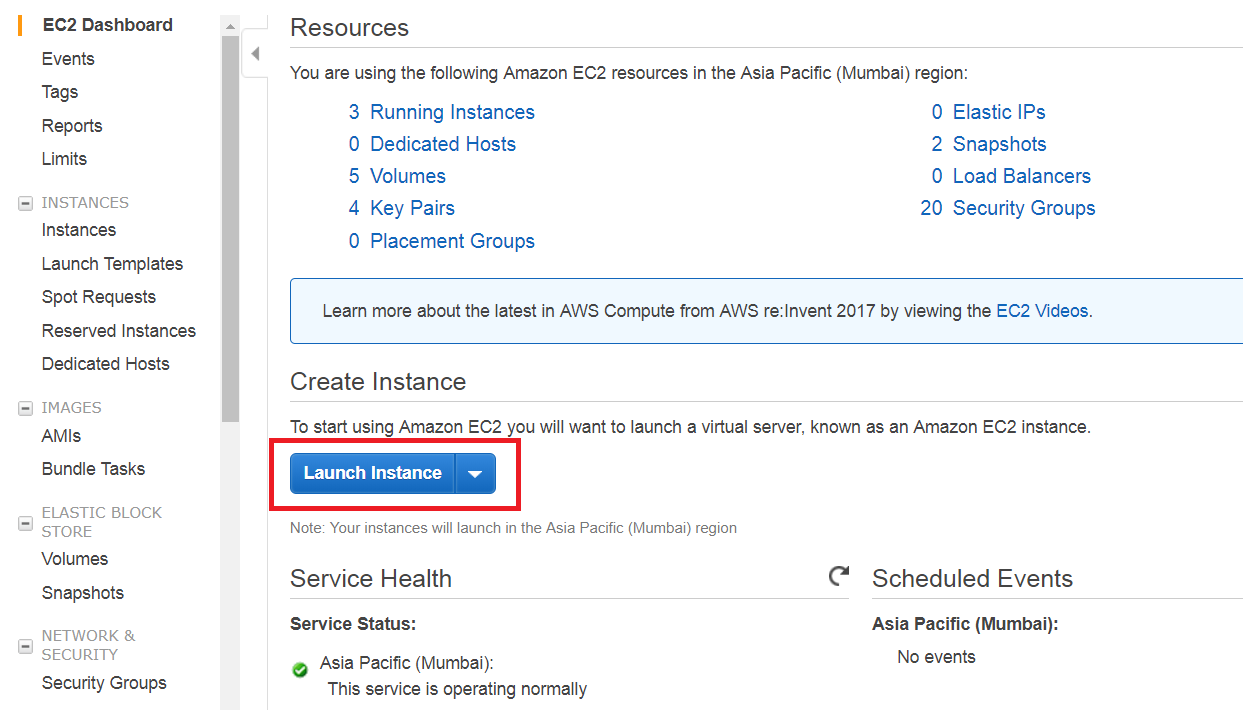
- Click on Community AMIs, search for "ecs optimized" and Select the image as per your requirement
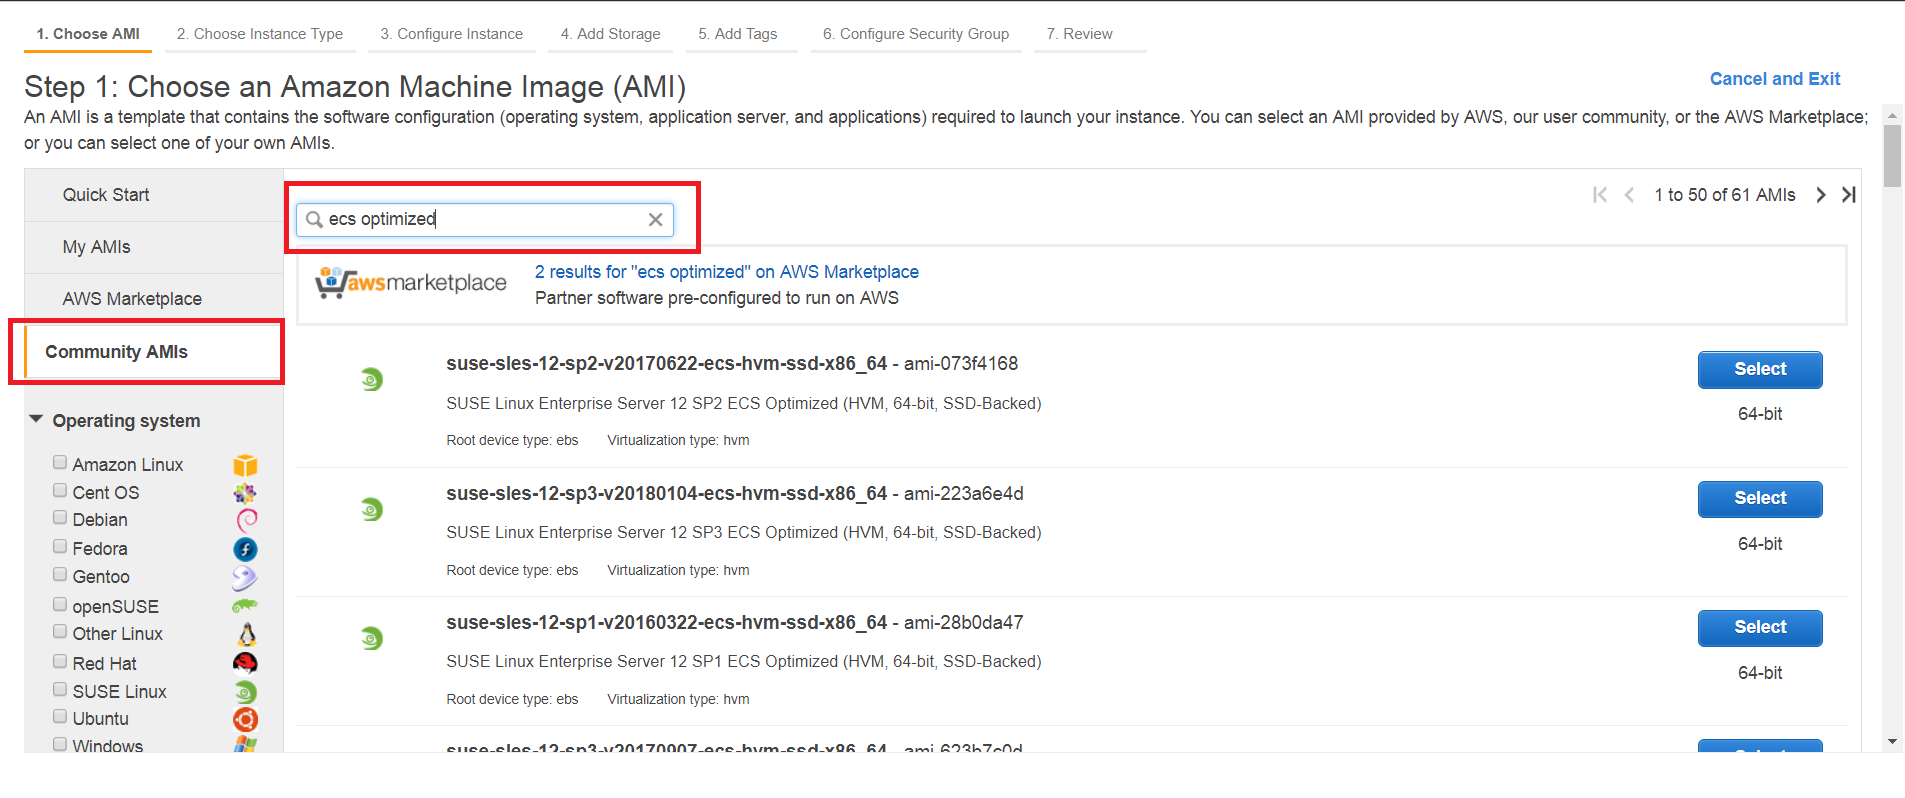
- Choose an Instance Type and click Next: Configure Instance Details button.
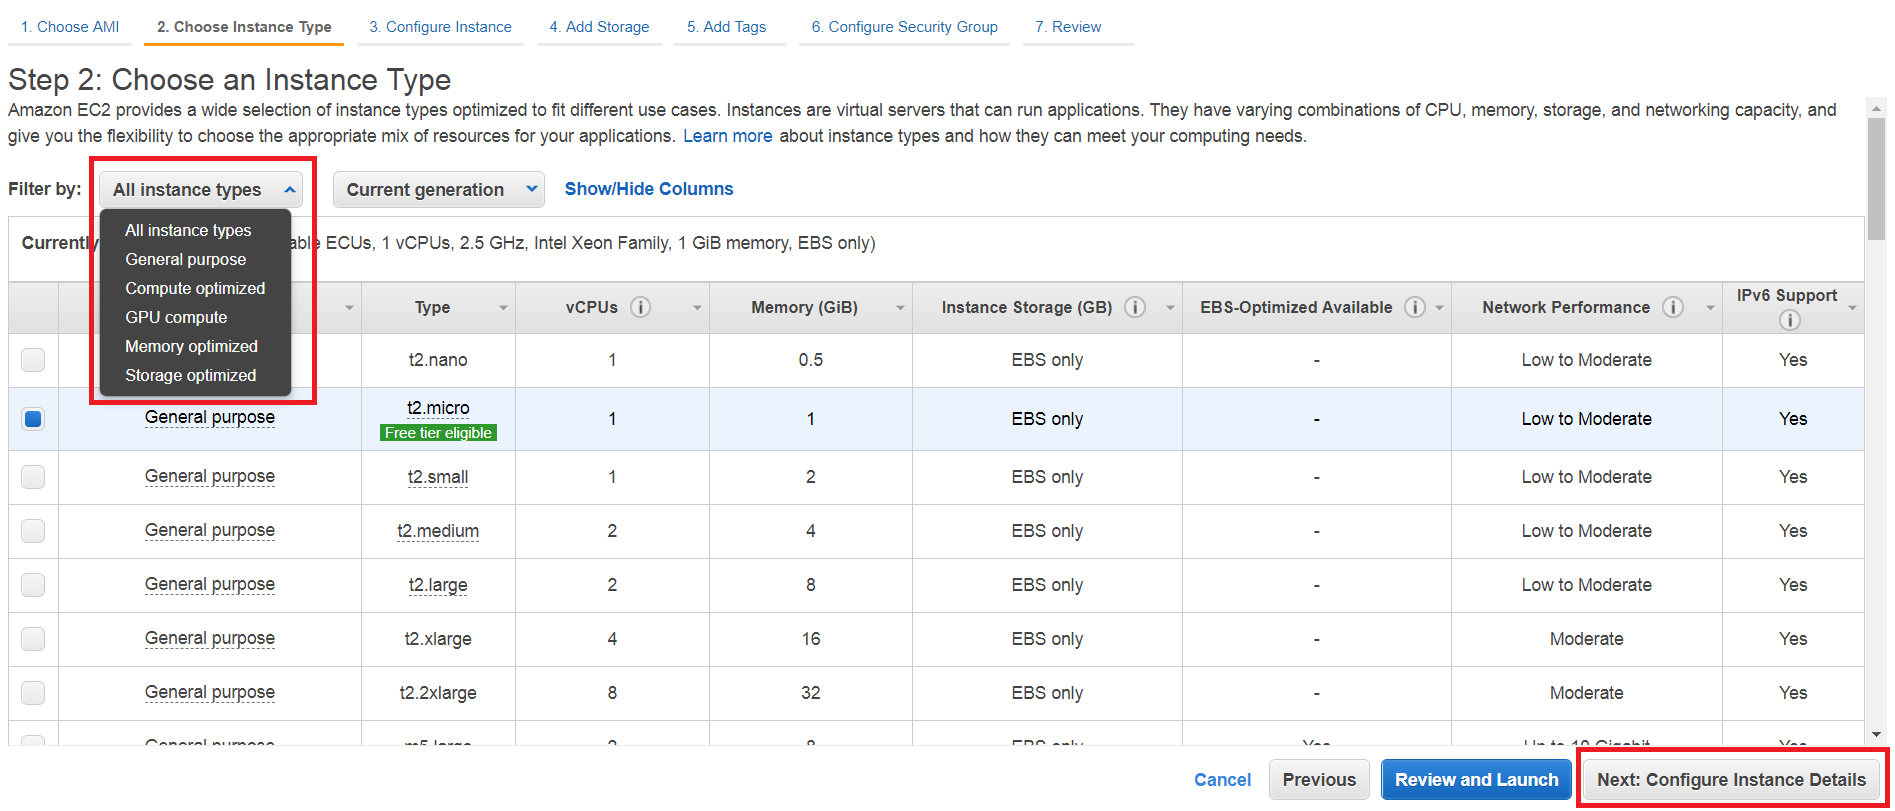
- In the IAM role section, select the above created IAM role or with the default ecsInstance IAM role. Then paste the below content in the User Data text box (Under Advanced Details)
#!/bin/bash
# Specify the cluster that the container instance should register into
cluster=<cluster_name>
# Write the cluster configuration variable to the ecs.config file
# (add any other configuration variables here also)
echo ECS_CLUSTER=$cluster >> /etc/ecs/ecs.config# Install the AWS CLI and the jq JSON parser
yum install -y aws-cli jq
instance_arn=$(curl -s http://localhost:51678/v1/metadata | jq -r '. | .ContainerInstanceArn' | awk -F/ '{print $NF}' )
cluster=$(curl -s http://localhost:51678/v1/metadata | jq -r '. | .Cluster' | awk -F/ '{print $NF}' )
region=$(curl -s http://localhost:51678/v1/metadata | jq -r '. | .ContainerInstanceArn' | awk -F: '{print $4}')# Specify the task definition to run at launch
task_definition=<task_definition_which_has_been_created_in_the_above_step>
# Run the AWS CLI start-task command to start your task on this container instance
aws ecs start-task --cluster $cluster --task-definition $task_definition --container-instances $instance_arn --started-by $instance_arn --region $region
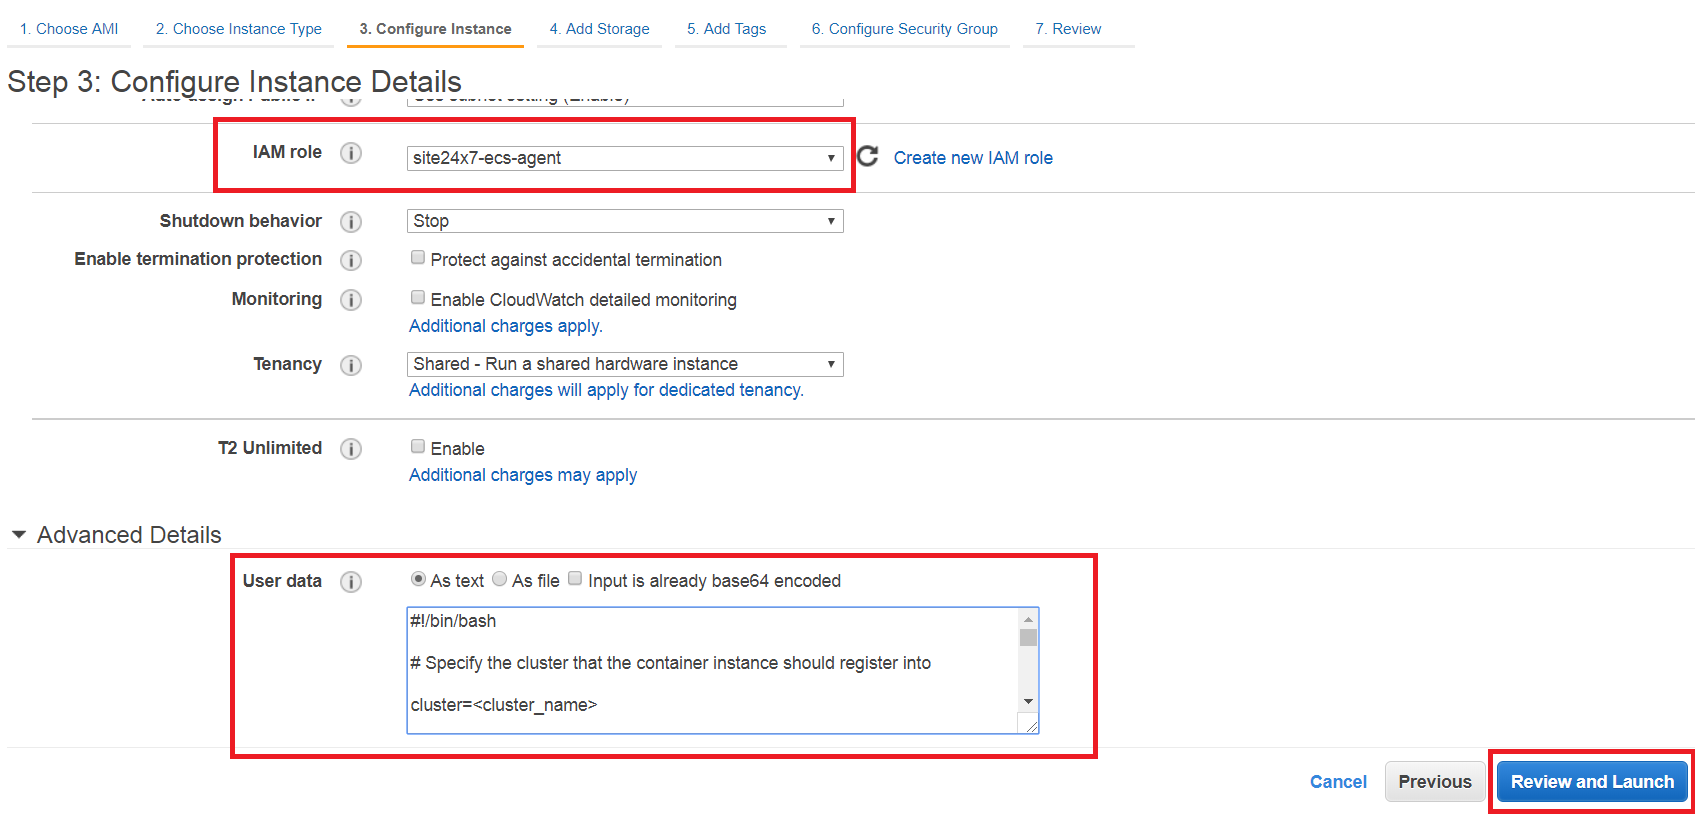
- Replace the cluster and task_definition variable value as required in the User Data. Then click on Review and Launch button.
Creating an instance with site24x7-agent without adding a startup script
- Log in to the AWS console and click on Services > Elastic Container Service
- In the left pane, select Clusters and click on the cluster where the agent is deployed
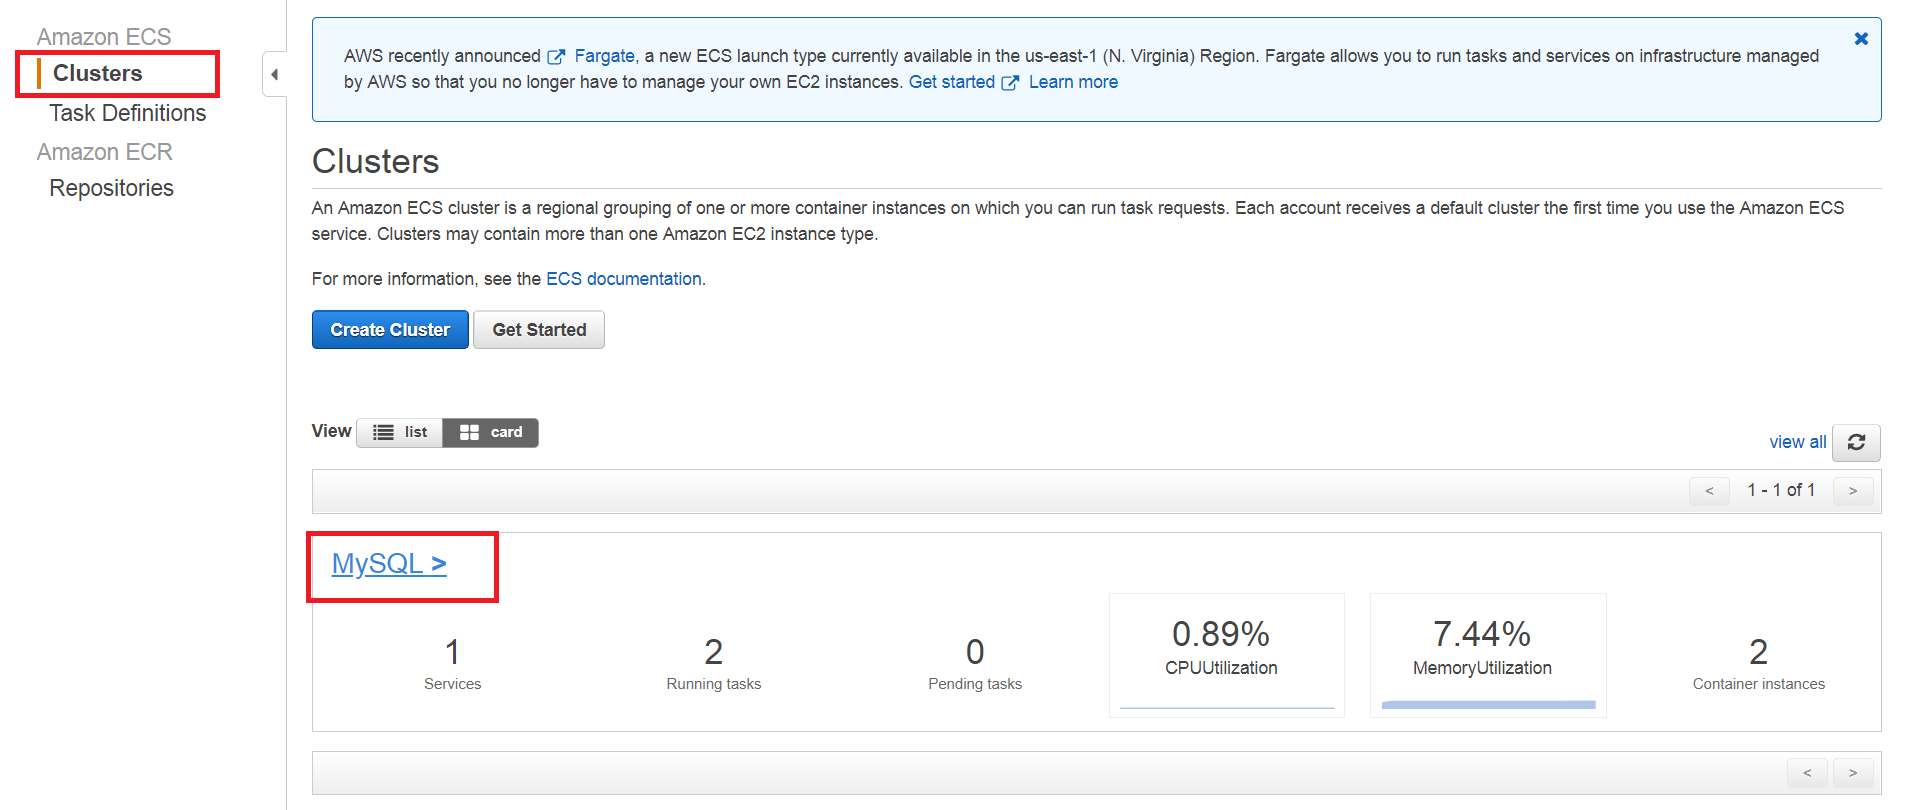
- Click on the Tasks tab and select Run New Task
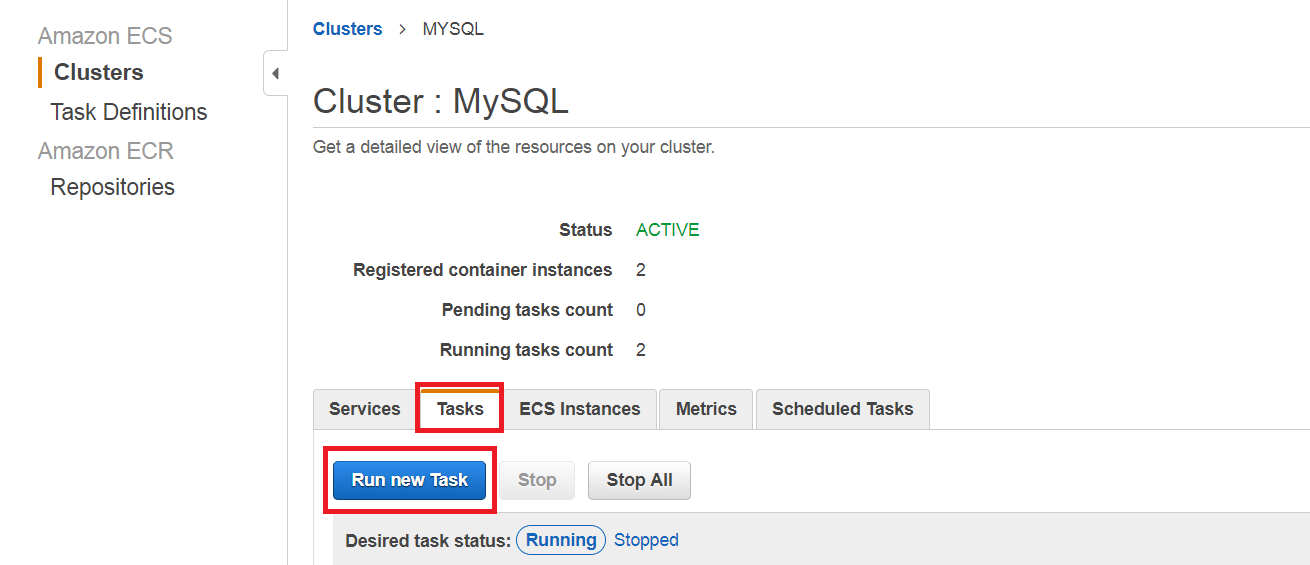
- In the Run Task form, enter the number of nodes present in the cluster in the field Number of Tasks. Under Task Placement, select the Placement Template as One Task Per Host.
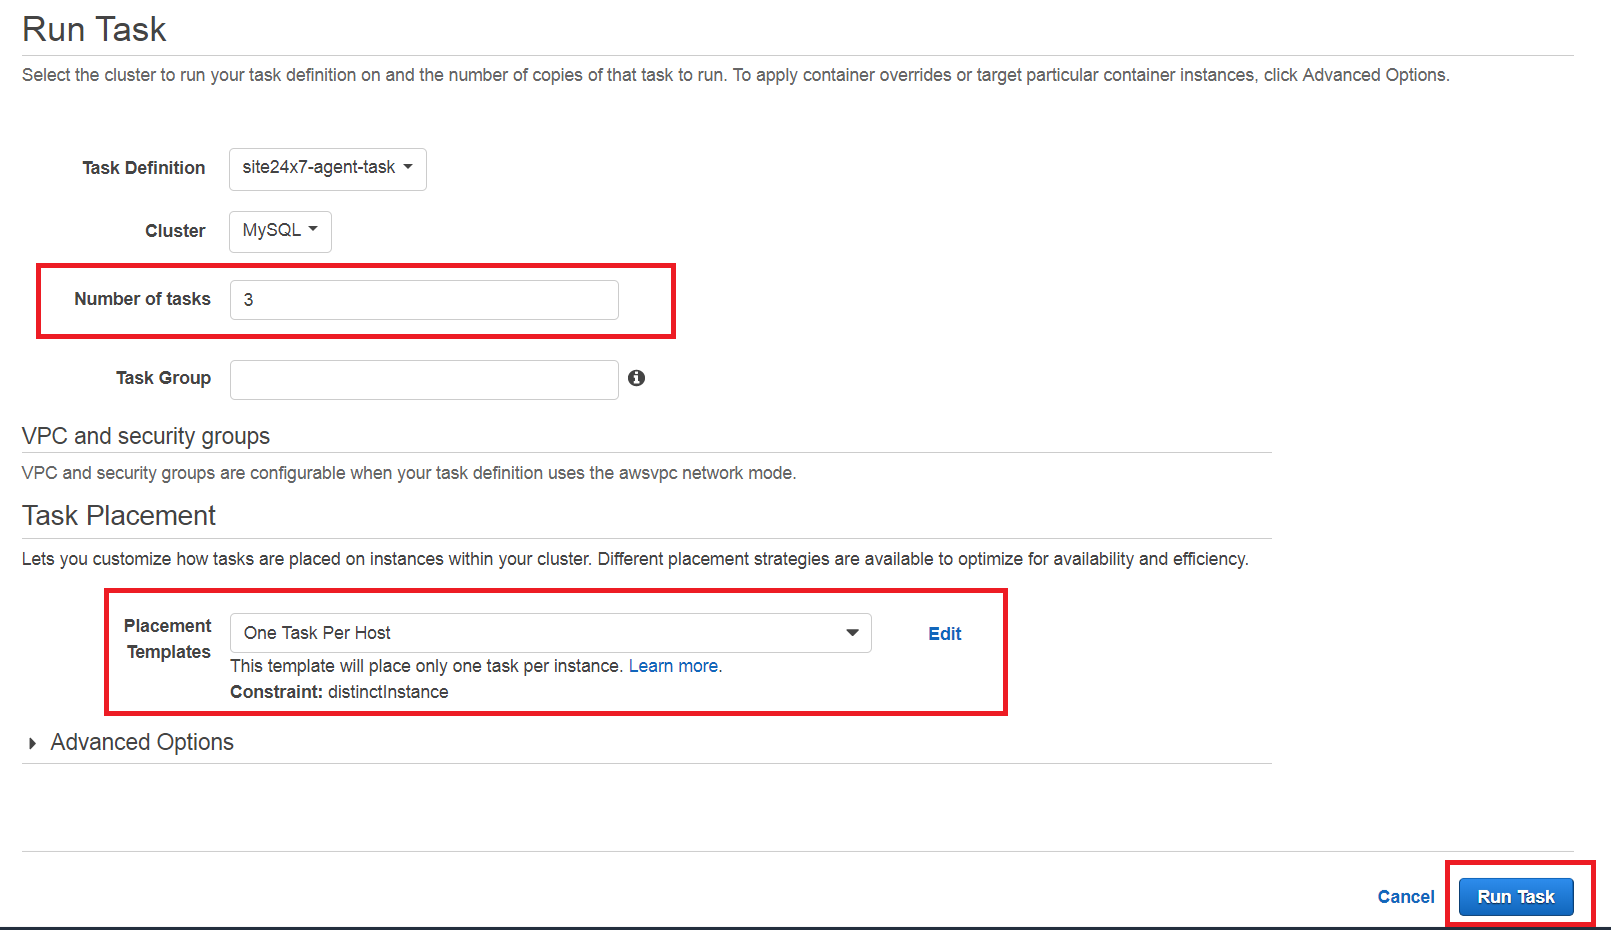
- Click Run Task
Kubernetes
- Download the file site24x7-agent.yaml and save it in your Kubernetes master. Replace <device_key> with the device key given in the Site24x7 web client. If you are using proxy, mention the name and port under env section in the YAML file.
For example,
- name : KEY
  value: <device key>
- name: proxy
value : proxy_host:proxy_port - Run the below command
kubectl create -f site24x7-agent.yaml
- This will add the file as a daemonset in the Kubernetes.
Related Articles
- Performance metrics for Docker
- FAQs related to Docker application and Docker agent
- Other virtualization monitors: VMware ESX/ESXi | VMware vCenter | Hyper-V
- Server monitoring architecture
- Add a server: Windows | Linux | FreeBSD | OS X
-
On this page
- AWS ECS
- Kubernetes
- Related Articles
